设计模式——单例设计模式
一种方法设计套路,一共有23种设计模式
单列设计模式要求:
- 保证在整个系统当中,对某个类只能有一个对象实例,并且该类只提供一个取得其对象实例的方法.
多线程
程序:
是为完成特定任务、用某种语言编写的一组指令的集合。即指一 段静态的代码,静态对象。
进程:
是程序的一次执行过程,或是正在运行的一个程序。是一个动态 的过程:有它自身的产生、存在和消亡的过程。——生命周期
程序是静态的,进程是动态的
进程作为资源分配的单位,系统在运行时会为每个进程分配不同的内存区域
线程
进程可进一步细化为线程,是一个程序内部的一条执行路径。
若一个进程同一时间并行执行多个线程,就是支持多线程的
线程作为调度和执行的单位,每个线程拥有独立的运行栈和程序计数器(pc),线程切换的开销小
一个进程中的多个线程共享相同的内存单元/内存地址空间,它们从同一堆中分配对象,可以访问相同的变量和对象。这就使得线程间通信更简便、高效。但多个线程操作共享的系统资 源可能就会带来安全的隐患(即线程同步问题)。
并行与并发
并行:多个CPU同时执行多个任务。比如:多个人同时做不同的事。
并发:一个CPU(采用时间片)同时执行多个任务。比如:秒杀、多个人做同一件事。
注意:子类抛得异常范围不能超过父类创建多线程的2种方法
package com.study.java.day1;

/**
 * 多线程创建,方式一,继承thread类
 * 1.创建一个继承于thread类的子类
 * 2.重写thread类的run方法 --> 将此线程执行的操作生命到run方法中
 * 3.创建thread类的子类对象
 * 4.通过对象调用start()方法
 * 例子:遍历100以内的所有偶数
 * @author hjm
 */

//1.创建一个继承于thread类的子类
class myThread extends Thread{
//2.重写thread类的run方法

    @Override
    public void run() {
        for(int i = 0;i<100;i++){
            if(i%2 == 0){

                System.out.println(i);
            }
        }
    }
}
public class thread {
    public static void main(String[] args) {
        //3.创建thread类的子类对象
        myThread my = new myThread();
        //4.通过对象调用start()方法,start()方法作用,1:启动当前线程,2:调用当前线程的run()方法
        my.start();
        //不能通过run()方法启动线程,直接run方法就是普通的方法,没有调用多线程
        //一个线程不能start两次,会报线程非法错误,需要再次new一个,然后在start


        //下面代码是在main线程中执行的
        System.out.println("hello word!");
    }
}
package com.study.java.day1;

/**
 * @author hjm
 */
//练习:创建两个线程,一个遍历100以内的偶数,一个遍历100以内的奇数
class myThread1 extends Thread{
   public void run(){
       for(int i =0;i<100;i++){
           if(i%2 == 0){
               System.out.println(Thread.currentThread().getName()+" "+i);
           }
       }
   }
}
class myThread2 extends Thread{
    public void run(){
        for(int i =0;i<100;i++){
            if(i%2 != 0){
                System.out.println(Thread.currentThread().getName()+" "+i);
            }
        }
    }
}

public class thread2 {
    public static void main(String[] args) {
        /*myThread1 op = new myThread1();
        myThread2 op1 = new myThread2();
        op.start();
        op1.start();*/
        //由于线程只创建了一次,可以用匿名子类的方式创建
        new Thread(){
            @Override
            public void run() {
                for(int i =0;i<100;i++){
                    if(i%2 == 0){
                        System.out.println(Thread.currentThread().getName()+" "+i);
                    }
                }
            }
        }.start();

        new Thread(){
            @Override
            public void run() {
                for(int i =0;i<100;i++){
                    if(i%2 != 0){
                        System.out.println(Thread.currentThread().getName()+" "+i);
                    }
                }
            }
        }.start();

    }
}
package com.study.java.day1;

/**
 * 测试Thread常用方法
 * 1. start():启动当前线程,调用线程run()方法
 * 2. run():通常重写thread类中的此方法,将创建的线程要执行的操作声明在此方法中
 * 3. currentThread():静态方法,返回当前代码执行的线程
 * 4. getName():获取当前线程的名字
 * 5. setName():设置当前线程的名字
 * 6. yield():释放cpu的执行权(但是有可能下一次又分到cpu执行权,无缝衔接)
 * 7. join():在线程A中调用线程B的方法,此时线程A就进入阻塞状态,直到线程 B执行完成以后,线程 A才结束阻塞状态
 * 8. stop():该方法已过时。当执行此方法时,强制结束当前线程,不推荐使用
 * 9. sleep():让当前线程睡眠,单位是毫秒。在这个时间内线程为阻塞状态
 * 注意:子类抛得异常范围不能超过父类
 * 10. isAlive():判断当前线程是否还活着
 *
 * 线程的优先级
 * 1.
 *  MAX_PRIORITY : 10
 *  MIN_PRIORITY : 1
 *  NORM_PRIORITY : 5  默认优先级
 * 如何获取和设置当前线程的优先级
 * 1.
 *  getPriority():获取线程的优先级
 *  setPriority(int p) :设置线程的优先级
 *  说明:高优先级的线程要抢占低优先级的线程cpu的执行权,但是只是从概率上来讲高优先级高概率被执行,
 *  并不意味着,高优先级线程执行完后低优先级线程才开始执行
 *
 *
 *
 * @author hjm
 */
//测试Thread类中的方法
class HelloThread extends  Thread{


    @Override
    public void run() {
        for(int i =0;i<100;i++){
            try {
                sleep(10);
            } catch (InterruptedException e) {
                e.printStackTrace();
            }
            if(i%2 == 0){
                System.out.println(Thread.currentThread().getName()+""+getPriority()+" "+i);
            }
            if(i % 20 == 0) {
                this.yield (); //这种写法与yield();和Thread.currentThread().yield();效果相同
            }

        }
    }
    //通过构造器命名
    public HelloThread(String name){
        super(name);
    }

}
public class Threadmethodtest {
    public static void main(String[] args) {
        HelloThread h1 = new HelloThread("xiancheng1");
        //h1.setName("线程1");

        h1.start();

        //给主线程命名
        Thread.currentThread().setName("主线程:");
        for(int i =0;i<100;i++){

            if(i%2 == 0){
                System.out.println(Thread.currentThread().getName()+" "+i);
            }
            if(i ==20){
                try {
                    h1.join();
                } catch (InterruptedException e) {
                    e.printStackTrace();
                }
            }
        }
        System.out.println(h1.isAlive());
    }
}
package com.study.java.day1;

/**
 *
 * 例子:创建三个窗口卖票,总票100张
 * 线程安全问题待结局
 * @author hjm
 */

class Windows extends Thread{
    private static int ticket = 100;
    @Override
    public void run() {
        while(true){
            if(ticket > 0){
                System.out.println(getName()+":"+ticket);
                ticket--;
            }else {
                break;
            }
        }
    }
}
public class windowsTest {
    public static void main(String[] args) {
        Windows w1 = new Windows();
        Windows w2 = new Windows();
        Windows w3 = new Windows();
        w1.setName("窗口1");
        w2.setName("窗口2");
        w3.setName("窗口3");
        w1.start();
        w2.start();
        w3.start();

    }
}
package com.study.java.day1;

/**
 *
 * 创建多线程的方式二
 * 1. 创建了一个实现了Runnable接口的类
 * 2. 实现类去实现Runnable中的抽象方法,run()
 * 3. 创建实现类的对象
 * 4. 将此对象作为参数传递到thread类的构造器中,创建Thread类的对象
 * 5. 通过thread类的对象调用start()
 *
 *
 * 比较两种创建线程的方式
 * 开发中优先选择实现Runnable接口的方式
 * 原因:1. 实现的方式没有类的单继承的局限性
 *      2. 实现的方式更适合来处理多个线程有共享数据的情况,不用static声明
 * 联系:thread类也继承了Runnable接口
 * public class Thread implements Runnable
 * 相同点:都要重写run()方法,将要执行的声明放入run()方法中
 *
 *
 *
 * @author hjm
 */
//1. 创建了一个实现了Runnable接口的类
class Mthread implements Runnable{

    //2. 实现类去实现Runnable中的抽象方法,run()
    @Override
    public void run() {
        for(int i =0 ;i<100;i++){
            if(i%2 == 0){
                System.out.println(Thread.currentThread().getName()+":"+i);
            }
        }
    }
}
public class threadtest1 {
    public static void main(String[] args) {

        //3. 创建实现类的对象
        Mthread my = new Mthread();
        //4. 将此对象作为参数传递到thread类的构造器中,创建Thread类的对象
        Thread t1 = new Thread(my);
        //5. 通过thread类的对象调用start(),
        //start(),启动当前线程,调用当前线程的run方法,源码中run方法,当target不为null调用target的run,
        //target为Runnable类型
        t1.start();
        Thread t2 = new Thread(my);
        t2.start();

    }
}
package com.study.java.day1;

/**
 *
 * 使用Runnable接口实现卖票
 * 忽略线程安全问题
 * 不用静态声明,因为三个线程公用一个对象,所以只有一百张
 * 如果两个线程不是同一个对象就会多出100张
 * @author hjm
 */
class win1 implements Runnable {
    private int ticket = 100;
    @Override
    public void run() {
        while(true){
            if(ticket > 0){
                System.out.println(Thread.currentThread().getName()+":"+ ticket);
                ticket--;
            }else{
                break;
            }
        }
    }
}

public class wintest1 {
    public static void main(String[] args) {
        win1 we = new win1();
        Thread t1 = new Thread(we);
        Thread t2 = new Thread(we);
        Thread t3 = new Thread(we);
        t1.setName("窗口1");
        t2.setName("窗口2");
        t3.setName("窗口3");

        t1.start();
        t2.start();
        t3.start();

    }
}
其中常用的 wait() / notify /notifyAll 定义在object类中java中线程分两类,一类为守护线程,一类为用户线程
守护线程是用来服务于用户线程的,通过在start()方法前调用
thread.SetDaemon(true)可以把一个用户线程变成一个守护线程。
java垃圾回收就是一个守护线程
若JVM中都是都护线程,当前JVM将退出
想想理解:兔死狗烹,鸟尽弓藏!
Thread类中public enum State 记录了线程的状态
public enum State {
    /**
         * Thread state for a thread which has not yet started.
         */
    NEW,  //刚创建

    /**
         * Thread state for a runnable thread.  A thread in the runnable
         * state is executing in the Java virtual machine but it may
         * be waiting for other resources from the operating system
         * such as processor.
         */
    RUNNABLE,   //执行,分配到CPU资源

    /**
         * Thread state for a thread blocked waiting for a monitor lock.
         * A thread in the blocked state is waiting for a monitor lock
         * to enter a synchronized block/method or
         * reenter a synchronized block/method after calling
         * {@link Object#wait() Object.wait}.
         */
    BLOCKED,    //阻塞

    /**
         * Thread state for a waiting thread.
         * A thread is in the waiting state due to calling one of the
         * following methods:
         * <ul>
         *   <li>{@link Object#wait() Object.wait} with no timeout</li>
         *   <li>{@link #join() Thread.join} with no timeout</li>
         *   <li>{@link LockSupport#park() LockSupport.park}</li>
         * </ul>
         *
         * <p>A thread in the waiting state is waiting for another thread to
         * perform a particular action.
         *
         * For example, a thread that has called {@code Object.wait()}
         * on an object is waiting for another thread to call
         * {@code Object.notify()} or {@code Object.notifyAll()} on
         * that object. A thread that has called {@code Thread.join()}
         * is waiting for a specified thread to terminate.
         */
    WAITING,  //阻塞

    /**
         * Thread state for a waiting thread with a specified waiting time.
         * A thread is in the timed waiting state due to calling one of
         * the following methods with a specified positive waiting time:
         * <ul>
         *   <li>{@link #sleep Thread.sleep}</li>
         *   <li>{@link Object#wait(long) Object.wait} with timeout</li>
         *   <li>{@link #join(long) Thread.join} with timeout</li>
         *   <li>{@link LockSupport#parkNanos LockSupport.parkNanos}</li>
         *   <li>{@link LockSupport#parkUntil LockSupport.parkUntil}</li>
         * </ul>
         */
    TIMED_WAITING,  //阻塞时间

    /**
         * Thread state for a terminated thread.
         * The thread has completed execution.
         */
    TERMINATED;   //死亡
}
总结:
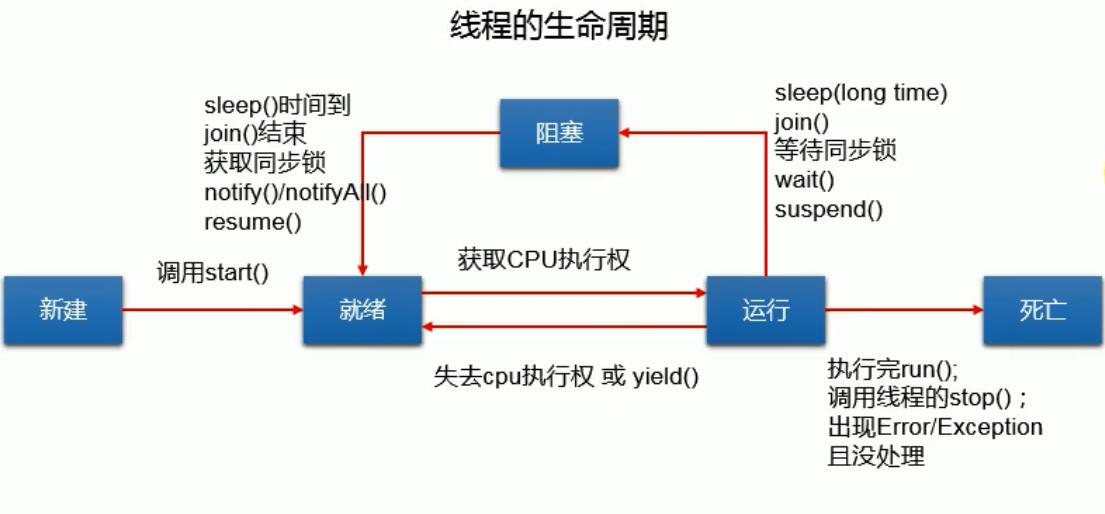
新建: 当一个Thread类或其子类的对象被声明并创建时,新生的线程对象处于新建 状态
就绪:处于新建状态的线程被start()后,将进入线程队列等待CPU时间片,此时它已 具备了运行的条件,只是没分配到CPU资源
运行:当就绪的线程被调度并获得CPU资源时,便进入运行状态, run()方法定义了线 程的操作和功能 阻塞:在某种特殊情况下,被人为挂起或执行输入输出操作时,让出 CPU 并临时中 止自己的执行,进入阻塞状态
死亡:线程完成了它的全部工作或线程被提前强制性地中止或出现异常导致结束
线程生命周期:
线程同步
package com.atigo.java;

/**
 *
 * 使用Runnable接口实现卖票
 * 1.问题:卖100张票,会出现重票和错票
 * 2.原因:当某个线程操作车票的过程中,尚未操作完成时,其他线程参与进来,也操作车票
 * 3.解决:当一个线程操作共享数据的时候,其他线程不能参与进来,直到线程A操作完,其他线程才能操作,即使线程 A 阻塞也不能改变
 * 4.在java中通过同步机制解决线程安全问题
 *  方式一:同步代码块
 *      synchronized(同步监视器){
 *          需要被同步的代码
 *      }
 *      1.说明:操作共享数据的代码即为需要同步的代码
 *      2.共享数据,多个线程操作的共享的变量
 *      3.同步监视器,俗称:锁,任何一个类的对象都可以充当锁,
 *                  要求:多个线程必须要共用一把锁。
 *                  继承Runnable接口创建的线程,共用一个对象,只要声明一个普通的类的实例即可
 *                  继承Thread类创建的多线程,锁需要声明静态,这样才能实现共用一把锁
 *      4.补充:在继承Runnable接口的多线程方式中,我们可以考虑使用this充当同步监视器(锁)
 *      5.在继承Thread类,创建多线程的方式中慎用this充当同步监视器(this是否唯一)可以考虑用当前类(name.class)充当锁,类只会加载一次(类也是对象)
 *  方式二:同步方法
 *      1.如果操作共享数据的代码完整的生命在一个方法中,我们不妨将此方法声明为同步的
 *      关于同步方法的总结:
 *         1.同步方法仍然涉及到同步监视器,只是不需要我们显示的声明
 *         2.非静态的同步方法,同步监视器是:this
 *           静态的同步方法,同步监视器是:当前类本身
 *
 *
 * 5.同步方式解决了线程安全问题——好处
 *   操作同步代码块时,只能有一个线程参与,其他线程等待,相当于一个单线程操作过程,效率低——局限性
 *
 * @author hjm
 */
class win1 implements Runnable {
    private int ticket = 100;
    Object obj = new Object();
    @Override
    public void run() {
        while(true){
            synchronized (this) { //方式一 写个this:表示当前对象,唯一的win1对象,继承Thread类写的类不能用this,因为他创建了多个对象
                //方式二 创建一个对象,obj,用obj代表锁
                if (ticket > 0) {
                    System.out.println(Thread.currentThread().getName() + ":" + ticket);
                    ticket--;
                } else {
                    break;
                }
            }
        }
    }
}

public class wintest1 {
    public static void main(String[] args) {
        win1 we = new win1();
        Thread t1 = new Thread(we);
        Thread t2 = new Thread(we);
        Thread t3 = new Thread(we);
        t1.setName("窗口1");
        t2.setName("窗口2");
        t3.setName("窗口3");

        t1.start();
        t2.start();
        t3.start();

    }
}
package com.atigo.java;

/**
 *
 * 使用同步方法解决Runnable实现的线程同步安全问题
 *
 * @author hjm
 */
class win2 implements Runnable {
    private int ticket = 100;
    Object obj = new Object();
    @Override
    public void run() {
        while(true){
            show();
        }
    }

    public synchronized void show(){  //同步监视器(锁) 为默认的this
        if (ticket > 0) {
            System.out.println(Thread.currentThread().getName() + ":" + ticket);
            ticket--;
        }
    }
}

public class test2 {
    public static void main(String[] args) {
        win2 we = new win2();
        Thread t1 = new Thread(we);
        Thread t2 = new Thread(we);
        Thread t3 = new Thread(we);
        t1.setName("窗口1");
        t2.setName("窗口2");
        t3.setName("窗口3");

        t1.start();
        t2.start();
        t3.start();

    }
}
package com.atigo.java;

/**
 * 使用同步方法解决继承Thread类实现的线程安全问题
 *
 * @author hjm
 */

class Windows extends Thread{
    private static int ticket = 100;
    @Override
    public void run() {
        while(true){
            show();
        }
    }
    public static synchronized void show(){//同步监视器:Windows.class
    //public synchronized void show(){  //此方法是错误的,同步监视器,默认的this也就是t1,t2,t3.
        if(ticket > 0){
            System.out.println(Thread.currentThread().getName()+":"+ticket);
            ticket--;
        }
    }
}
public class window3 {
    public static void main(String[] args) {
        Windows w1 = new Windows();
        Windows w2 = new Windows();
        Windows w3 = new Windows();
        w1.setName("窗口1");
        w2.setName("窗口2");
        w3.setName("窗口3");
        w1.start();
        w2.start();
        w3.start();

    }
}
用线程安全解决懒汉模式的线程安全问题
package com.atigo.java;

/**
 * 用线程同步解决懒汉模式的线程安全问题
 * @author hjm
 */
public class lanhan {
    public static void main(String[] args) {

    }
}
class Bank {
    Bank(){}

    private static Bank bank = null;

    public  static Bank getBank(){  //增加关键字synchronized
        /*//方式一 :效率稍差
        synchronized(Bank.class) {
            if (bank == null) {
                bank = new Bank();
            }
            return bank;
        }*/
        //方式二,线程稍高
        if(bank == null){
            synchronized(Bank.class) {
                if (bank == null) {
                    bank = new Bank();
                }

            }
        }
        return bank;
    }
}
释放锁的操作:
当前线程的同步方法、同步代码块执行结束,
当前线程在同步代码块、同步方法中遇到break、return终止了该代码块、 该方法的继续执行。
当前线程在同步代码块、同步方法中出现了未处理的Error或Exception,导 致异常结束。
当前线程在同步代码块、同步方法中执行了线程对象的wait()方法,当前线 程暂停,并释放锁。
不会释放锁的操作:
- 线程执行同步代码块或同步方法时,程序调用Thread.sleep()、 Thread.yield()方法暂停当前线程的执行
- 线程执行同步代码块时,其他线程调用了该线程的suspend()方法将该线程 挂起,该线程不会释放锁(同步监视器)。应尽量避免使用suspend()和resume()来控制线程
线程死锁
死锁 :
不同的线程分别占用对方需要的同步资源不放弃,都在等待对方放弃自己需要的同步资源,就形成了线程的死锁
出现死锁后,不会出现异常,不会出现提示,只是所有的线程都处于 阻塞状态,无法继续。
解决方法 :
专门的算法、原则 ,尽量减少同步资源的定义 ,尽量避免嵌套同步
线程死锁演示
package com.atigo.java.sisuoyanshi;

import static java.lang.Thread.sleep;

/**
 * 演示死锁问题
 * 1.死锁的理解:不同的线程分别占用对方需要的同步资源不放弃
 *   都在等待对方放弃自己需要的的同步资源,就形成了线程死锁
 *
 * 2.说明
 * 1)出现死锁后,不会出现异常,不会出现提示,只是所有线程都处于阻塞状态,无法继续
 * 2)使用同步时,避免死锁
 * @author hjm
 */
public class sisuoyanshi {
    public static void main(String[] args) {
        StringBuffer s1 = new StringBuffer();
        StringBuffer s2 = new StringBuffer();
        new Thread(){
            @Override
            public void run() {
                synchronized(s1){

                    try {
                        sleep(100);
                    } catch (InterruptedException e) {
                        e.printStackTrace();
                    }
                    s1.append("a");
                    s2.append("1");
                    synchronized (s2){
                        s1.append("b");
                        s2.append("2");
                        System.out.println(s1);
                        System.out.println(s2);
                    }
                }
            }
        }.start();


        new Thread(new Runnable() {
            @Override
            public void run() {
                synchronized(s2){

                    try {
                        sleep(100);
                    } catch (InterruptedException e) {
                        e.printStackTrace();
                    }
                    s1.append("c");
                    s2.append("3");
                    synchronized (s1){
                        s1.append("d");
                        s2.append("4");
                        System.out.println(s1);
                        System.out.println(s2);
                    }
                }
            }
        }).start();
    }
}
线程通信
package com.atigo.java.lianxiti;

/**
 * 线程通信的例子,使用两个线程交替打印1-100,
 * 涉及到三个方法
 * wait();一旦执行此方法,当前线程进入阻塞状态,并且会释放同步监视器
 * notify();一旦执行此方法,就会唤醒被wait()的一个线程,如果有多个就唤醒优先级高的那个
 * notifyAll();唤醒所有被wait的线程
 *
 * 说明:
 * 1.wait(),notify,notifyAll三个方法必须使用在同步代码块中或同步方法中,lock不行
 * 2.上述三个方法的调用者必须是同步代码块或同步方法中的同步监视器。
 *   否在会抛IllegalMonitorStateException异常
 * 3.上述三个方法是定义在java.lang.Object类当中,方便任何对象都可以充当同步监视器
 *
 *
 * 面试题:sleep和wait
 * 相同点:一旦执行,线程进入阻塞状态
 * 不同点:两个方法声明位置不同,Thread类中声明sleep,Object类中声明wait
 *        调用要求不同:sleep可以在任何场景下调用,wait必须使用在同步代码块和同步方法中
 *        如果两个都是用在同步代码块和同步方法中,sleep不会释放锁,wait会释放锁
 *
 * @author hjm
 */
class Number implements Runnable{
    private int num = 1;
    private Object obj = new Object();
    @Override
    public void run() {
        while (true){
            synchronized (this) {
                notify();//根据优先级唤醒线程
                if(num<=100){
                    System.out.println(Thread.currentThread().getName()+":"+num);
                    num++;
                }else{
                    break;
                }
                try {
                    //使用调用如下方法的线程进入阻塞状态,会释放锁,而sleep不会释放锁
                    wait();
                } catch (InterruptedException e) {
                    e.printStackTrace();
                }
            }
        }
    }
}
public class xianchegtongxinlizi {
    public static void main(String[] args) {
        Number num = new Number();
        Thread t1 = new Thread(num);
        Thread t2 = new Thread(num);

        t1.setName("线程一");
        t2.setName("线程二");

        t1.start();
        t2.start();

    }
}
经典例题:生产者/消费者问题
生产者(Productor)将产品交给店员(Clerk),而消费者(Customer)从店员处 取走产品,店员一次只能持有固定数量的产品(比如:20),如果生产者试图 生产更多的产品,店员会叫生产者停一下,如果店中有空位放产品了再通 知生产者继续生产;如果店中没有产品了,店员会告诉消费者等一下,如 果店中有产品了再通知消费者来取走产品。
- 这里可能出现两个问题: 生产者比消费者快时,消费者会漏掉一些数据没有取到。
- 消费者比生产者快时,消费者会取相同的数据。
package com.atigo.java.shengchanxiaofei;

/**
 * 线程通信的应用 生产者/消费者
 *
 * 分析:
 * 1.是多线程问题
 * 2.有共享数据
 * 3.三种锁解决线程安全问题
 * 4.涉及到线程通信
 *
 * @author hjm
 */
class Clerk{
    private int number=0;
    public synchronized void producerProduct(){
        if(number < 20){
            number++;
            System.out.println(Thread.currentThread().getName()+":开始生产"+number+"产品");

            notify();
        }else{
            try {
                wait();
            } catch (InterruptedException e) {
                e.printStackTrace();
            }
        }
    }

    public synchronized void consumeProduct(){
        if(number >0){

            System.out.println(Thread.currentThread().getName()+":开始消费"+number+"产品");
            number--;

            notify();
        }else{
            try {
                wait();
            } catch (InterruptedException e) {
                e.printStackTrace();
            }
        }
    }
}

class Producer extends Thread{

    private Clerk clerk;

    public Producer(Clerk clerk){
        this.clerk = clerk;
    }

    @Override
    public void run() {
        System.out.println(Thread.currentThread().getName()+"开始生产++++");
        while(true){
            try {
                sleep(10);
            } catch (InterruptedException e) {
                e.printStackTrace();
            }
            clerk.producerProduct();
        }
    }
}

class Consumer extends Thread{

    private Clerk clerk;

    public Consumer(Clerk clerk){
        this.clerk = clerk;
    }

    @Override
    public void run() {
        System.out.println(Thread.currentThread().getName()+"开始消费----");
        while(true){
            try {
                sleep(100);
            } catch (InterruptedException e) {
                e.printStackTrace();
            }
            clerk.consumeProduct();
        }
    }
}
public class ProdectTest {
    public static void main(String[] args) {
        Clerk clerk = new Clerk();
        Producer p1 = new Producer(clerk);
        Consumer c1 = new Consumer(clerk);
        p1.setName("生产者一");
        c1.setName("消费者一");

        Consumer c2 = new Consumer(clerk);
        c2.setName("消费者二");
        p1.start();
        c1.start();
        c2.start();
    }
}
jdk5.0新增创建线程方式
实现callable接口创建多线程
Future接口
可以对具体Runnable、Callable任务的执行结果进行取消、查询是 否完成、获取结果等
FutrueTask是Futrue接口的唯一的实现类
FutureTask 同时实现了Runnable, Future接口。它既可以作为 Runnable被线程执行,又可以作为Future得到Callable的返回值
package com.atigo.java.chuangjianxiancheng;

import java.util.concurrent.Callable;
import java.util.concurrent.ExecutionException;
import java.util.concurrent.FutureTask;

/**
 * 创建线程方式三,实现callable接口  ——————jdk5.0新增
 *
 * 如何理解实现callable接口的方式创建多线程比Runnable接口创建多线程更加强大
 * 1.call方法可以有返回值
 * 2.call可以抛出异常,被外面的操作捕获,获取异常信息
 * 3.Callable支持泛型
 * @author hjm
 */
//1.创建一个实现Callable接口的实现类
class NumThread implements Callable{

    //2.实现call方法,将此线程需要执行的操作声明在call()方法中
    @Override
    public Object call() throws Exception {
        int sum = 0;
        for(int i = 1;i<=100;i++){
            if(i%2 == 0){
                System.out.println(i);
                sum += i;
            }
        }
        return sum;
    }
}
public class CreateThread {
    public static void main(String[] args) {
        //3.创建Callable接口实现类的对象
        NumThread numThread = new NumThread();
        //4.将此Callable接口实现类的对象作为参数传递到FutureTask构造器中,创建FutureTask对象
        FutureTask futureTask = new FutureTask(numThread);
        //5.将FutureTask对象作为参数创建Thread对象,并且调用start()
        new Thread(futureTask).start();
        try {
            //6.可以获取Callable中的get方法获取call方法的返回值
            //get()返回值即为FutureTask构造器参数Callable实现类重写的call()的返回值。
            Object obj = futureTask.get();
            System.out.println(obj);
        } catch (InterruptedException e) {
            e.printStackTrace();
        } catch (ExecutionException e) {
            e.printStackTrace();
        }
    }
}
使用线程池的方式创建多线程
背景:经常创建和销毁、使用量特别大的资源,比如并发情况下的线程, 对性能影响很大。
思路:提前创建好多个线程,放入线程池中,使用时直接获取,使用完 放回池中。可以避免频繁创建销毁、实现重复利用。类似生活中的公共交 通工具。
好处:
提高响应速度(减少了创建新线程的时间)
降低资源消耗(重复利用线程池中线程,不需要每次都创建)
便于线程管理
参数:
corePoolSize:核心池的大小
maximumPoolSize:最大线程数
keepAliveTime:线程没有任务时最多保持多长时间后会终止
……
线程池相关API
JDK 5.0起提供了线程池相关API:ExecutorService 和 Executors
ExecutorService:真正的线程池接口。常见子类ThreadPoolExecutor
void execute(Runnable command) :执行任务/命令,没有返回值,一般用来执行 Runnable
Future submit(Callable task):执行任务,有返回值,一般又来执行 Callable
void shutdown() :关闭连接池
Executors:工具类、线程池的工厂类,用于创建并返回不同类型的线程池
Executors.newCachedThreadPool():创建一个可根据需要创建新线程的线程池
Executors.newFixedThreadPool(n); 创建一个可重用固定线程数的线程池
Executors.newSingleThreadExecutor() :创建一个只有一个线程的线程池
Executors.newScheduledThreadPool(n):创建一个线程池,它可安排在给定延迟后运 行命令或者定期地执行。
package com.atigo.java.chuangjianxiancheng;

import java.util.concurrent.ExecutorService;
import java.util.concurrent.Executors;

/**
 * 创建线程的方式四:线程池
 * 好处:
 * 1.提高响应速度(减少了创建线程的时间)
 * 2.降低资源消耗度(重复利用线程池中的线程,不需要每次创建)
 * 3.便于线程管理
 *          corePollSize  线程池大小
 *          maximumPoolSize  最大线程数
 *          keepAliveTime   线程没有任务时最多保持多长时间后会终止
 * @author hjm
 */
class Num implements Runnable{
    @Override
    public void run() {
        for(int i=0;i<=100;i++){
            if(i%2 ==0){
                System.out.println(Thread.currentThread().getName()+" "+i);
            }
        }
    }
}
public class CreateThread1 {
    public static void main(String[] args) {
        //在线程池创建十个线程
        ExecutorService executorService = Executors.newFixedThreadPool(10);

        //查看这个接口具体指向的对象,接口具体实现的是ThreadPoolExecutor类
        //如果要设置各种属性方法在ThreadPoolExecutor类里找,将接口executorService(指针)强制转换一下
        System.out.println(executorService.getClass());
        //适合使用runnable方法
        executorService.execute(new Num());
        executorService.execute(new Num());
        //submit方法适合于使用callable方法
        //executorService.submit();

        //关闭链接池
        executorService.shutdown();
    }
}
总结
父类指向子类,可以调用子类重写的方法,不可以调用子类独有的方法,静态方法属于类也不可以。
静态方法是编译是被确定的
静态方法可以重载的(重载是编译是确定的属于编译是多态)
静态方法是不可以写的(写是运行时确定的属于运行时多态)
生命周期总结:
1.生命周期关注两个概念:状态,相应的方法
2.关注:状态a–>状态b:哪些方法执行了(回调方法)
某个方法主动调用:状态a–>状态b
3.阻塞:临时,不可以做为最终状态
最终线程都是走向死亡。
锁的推荐使用顺序
lock ————>同步代码块synchronized————>同步方法synchronized
利弊:
同步的方式解决了线程安全问题 ————>好处
操作同步代码块时,只能有一个线程参与,其他线程等待,相当于一个线程操作,效率低
同步:同一时间只能有一个来做
异步:各做各的,同一时间多个线程一起
- 1.wait(),notify,notifyAll三个方法必须使用在同步代码块中或同步方法中,lock不行
- 2.上述三个方法的调用者必须是同步代码块或同步方法中的同步监视器。
- 否在会抛IllegalMonitorStateException异常
- 3.上述三个方法是定义在java.lang.Object类当中,方便任何对象都可以充当同步监视器
常用类
String
package com.atigo.java.chuangjianxiancheng;

import org.junit.Test;

/**
 * String 的使用
 * @author hjm
 */

public class StringTest {
    /*
    * String字符串使用双引号”“引起来使用
    * 1.String声明为final的,不可被继承
    * 2.String实现了Serializable接口:表示字符串支持序列化的,(自我理解)可序列的网络传输在还原成对象
    *         实现了Comparable接口:表示可以比较大小
    * 3.String内部定义了final char[] value数组用于存储字符串数据,字符数组赋值后数组就不可在赋值了,元素也不可在更改了
    * 4.String:代表不可变的字符序列。简称:不可变特性
    *          1.当对字符串重新赋值时,需要重写指定内存区域赋值,不能使用原有value进行赋值。
    *          2.当对现有的字符串进行链接操作时,也要重新指定内存区域赋值,不能使用原有value进行赋值。
    *          3.当调用replace方法修改字符或字符串时,也必须重新指定内存区域赋值,不能使用原有value进行赋值。
    *
    * 5.通过字面量方式(区别与new)给一个字符串赋值,此时的字符串值声明在字符串常量池中。
    * 6.字符串常量池中是不会存储相同内容的字符串的。多个变量会指向相同的值。
    *
    */
    @Test
    public void test1(){
        String s1 = "abc"; //字面量定义方式
        String s2 = "abc";
        //s1 = "Hello";
        System.out.println(s1 == s2);  //比较s1和s2的地址
        System.out.println(s1);
        System.out.println(s2);
        String s3 = "abc";
        s3 += "def";
        System.out.println(s3);
        System.out.println(s2);

        String s4 = "abc";
        String s5 = s4.replace('a','m');
        System.out.println(s5);

    }

}
图解如下:
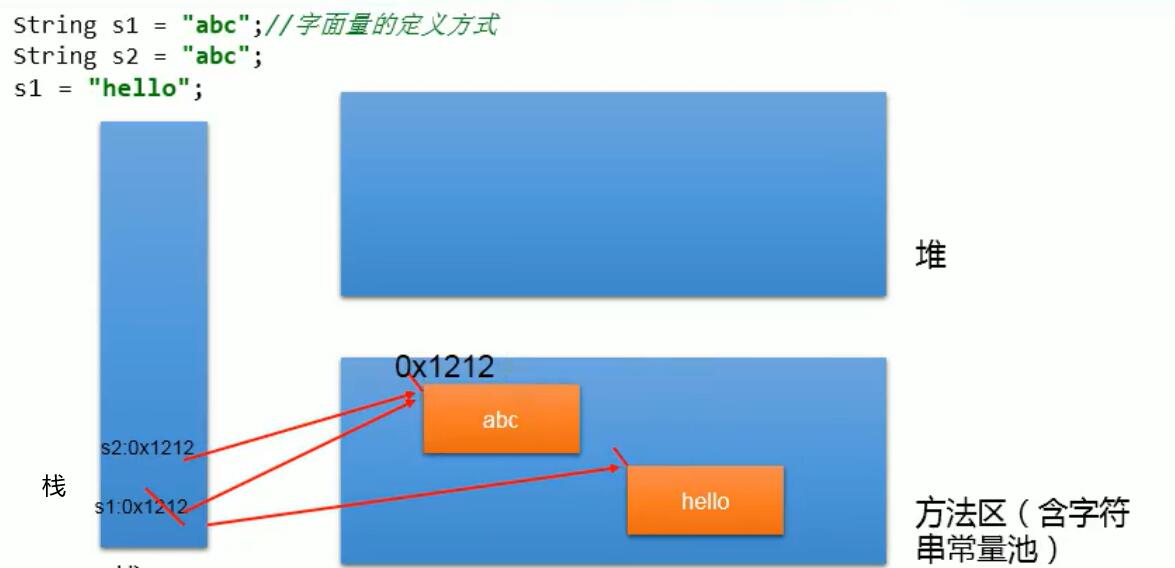
通过new + 构造器方法赋值String,是在堆空间开辟空间,堆空间里的值也是地址,指向方法区的字符串常量池中。
/*
* String实例化的两种方式
* 方式一:通过字面量的方式
* 方式二:通过new+构造器的方式
* 面试题:String s = new String("abc"),在内存中创建了几个对象?
* 两个,一个是在堆空间中new一个存放指向常量池中的地址,一个是char型数组对应常量池中的数据”abc“,常量池中不会存放两个相同数据,如果还有abc也指向这个地址
*
*
*
*/
@Test
public void test2(){
//此时的s1和s2都声明在方法去中的字符串常量池中
String s1 = "javaee";
String s2 = "javaee";
//通过new+构造器的方式,此时的s3和s4保存的地址值,是数据在堆空间开辟空间后对应的地址
String s3 = new String("javaee");
String s4 = new String("javaee");
System.out.println(s1 == s2); //true
System.out.println(s1 == s3); //false
System.out.println(s3 == s4); //false
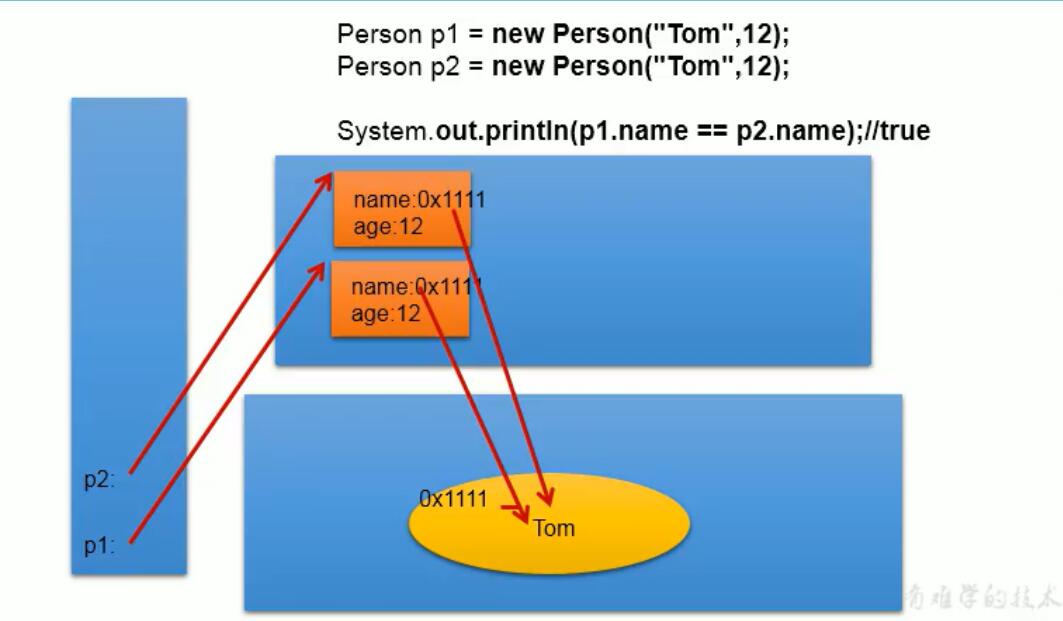
Person p1 = new Person("Tom",12);
Person p2 = new Person("Tom",12);
System.out.println(p1.name.equals(p2.name));//String重写了equals方法,比较值
System.out.println(p1.name == p2.name);//字面量方式赋值,地址为字符串常量池中,相同
p1.name="jerry";
System.out.println(p2.name);//虽然地址相同但是由于value为final不可改,p1重新造了一个字符串,指向新的
}
class Person{
String name;
int age;
Person(String name,int age){
this.age = age;
this.name=name;
}
Person(){
}
}
@Test
public void test3(){
/*
* 常量与常量的拼接结果在常量池。且常量池中不会存在相同内容的常量。
* 只要其中有一个是变量,结果就在堆中
* 如果拼接的结果调用intern()方法,返回值就在常量池中
*/
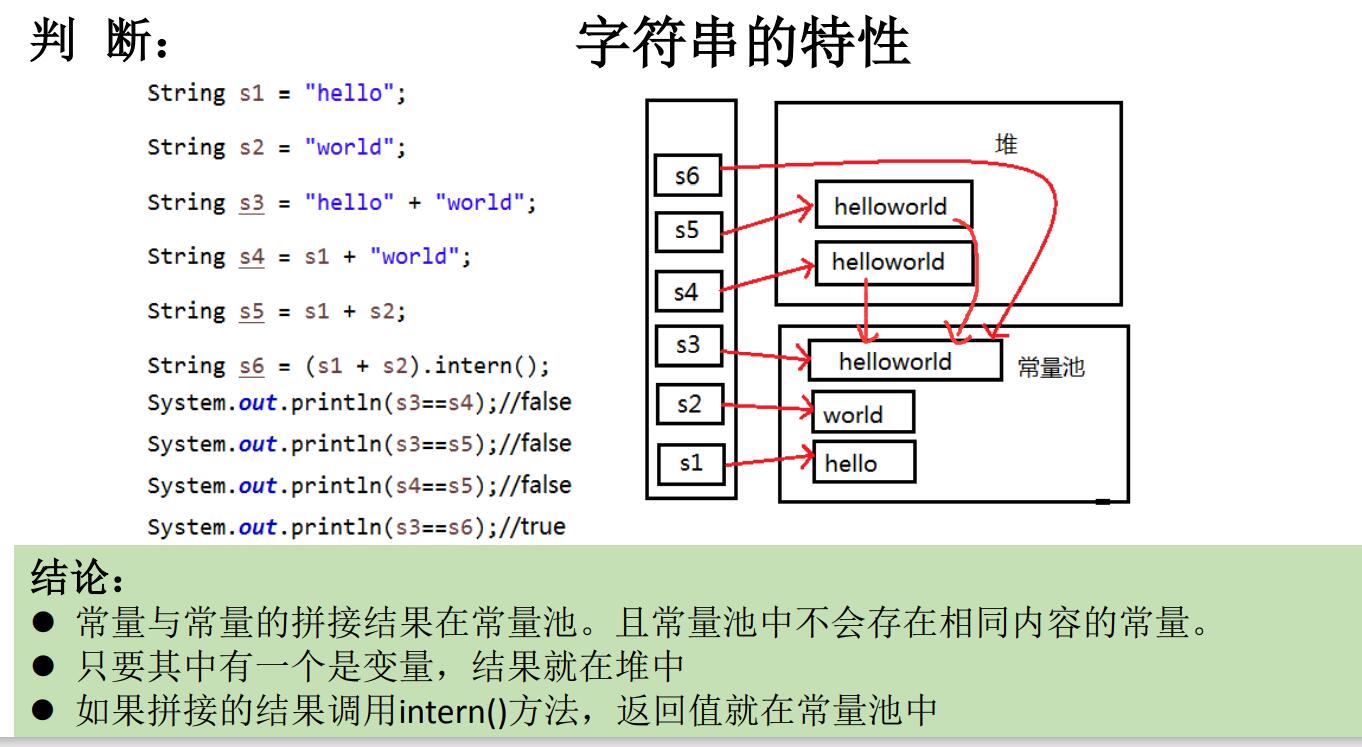
String s1 = "java";
String s2 = "hadoop";
String s3 = "javahadoop"; //字面量直接赋值在字符串常量池中
String s4 = "java" + "hadoop"; //字面量相加的方式赋值,也在字符串常量池中
String s5 = s1 + "hadoop"; //有变量相加的情况,在堆空间开辟空间
String s6 = "java" + s2;
String s7 = s1 + s2;
System.out.println(s3 == s4); //true
System.out.println(s3 == s5); //false
System.out.println(s3 == s6); //false
System.out.println(s3 == s7); //false
System.out.println(s5 == s6); //false
System.out.println(s5 == s7); //false
System.out.println(s6 == s7); //false
String s8 = s5.intern();//返回值得到的s8,使用常量池中已经存在的javahadoop,没有的话会在常量池中造一个
System.out.println(s3 == s8);//true
System.out.println(s3 == s5); //false
}结论:
- 常量与常量的拼接结果在常量池。且常量池中不会存在相同内容的常量。
- 只要其中有一个是变量,结果就在堆中
- 如果拼接的结果调用intern()方法,返回值就在常量池中
基本类型传数据,引用数据类型传地址,具体传后发生了什么变化再看,(不一定传地址的值更改了,原来的也会更改,比如String)
面试题:
package com.atigo.java.chuangjianxiancheng;

/**
 * @author hjm
 */
public class StringTest {
    String str = new String("good");
    char[] ch = { 't', 'e', 's', 't' };
    public void change(String str, char ch[]) {
        str = "test";
        ch[0] = 'b';
    }
    public static void main(String[] args) {
        StringTest ex = new StringTest();
        /*这里数组传的地址,字符串也传输的地址
        * 数组的形参ch(copy)里的值更改后,原来的值也更改,地址一样
        * String也是传的地址,但是由于char[] value为final类型变量,另外赋值会在开辟一个新的空间存储
        * 新的值,形参str(copy)会指向新的空间的值,但是原来的实参str指向还是不变。
        */
        ex.change(ex.str, ex.ch);
        System.out.println(ex.str);
        System.out.println(ex.ch);
    }
}
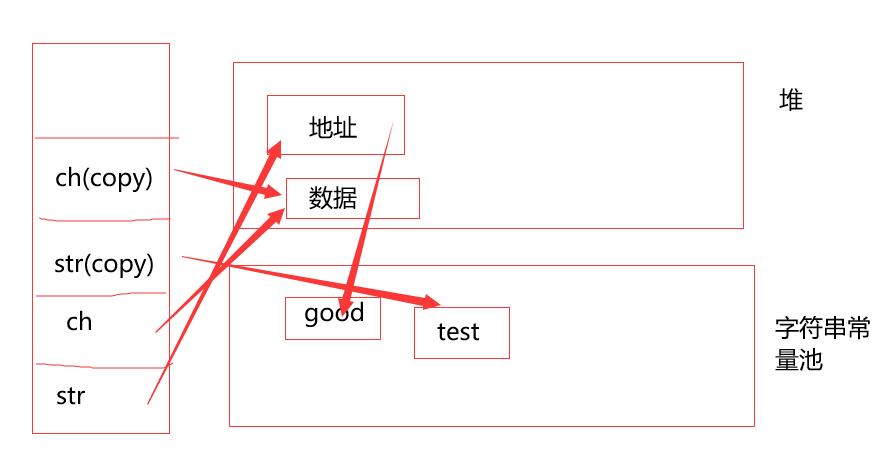
change函数开始执行的时候
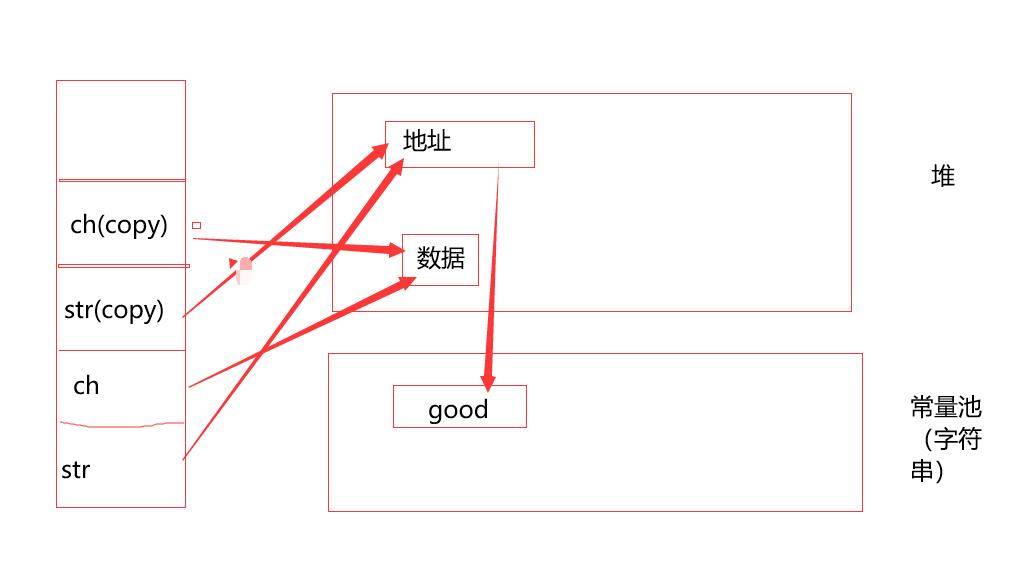
执行结束后:注:ch(copy)和str(copy)会被回收
String常用方法
package com.atigo.java.chuangjianxiancheng;

import org.junit.Test;

/**
 * int length():返回字符串的长度: return value.length
 * char charAt(int index): 返回某索引处的字符return value[index]
 * boolean isEmpty():判断是否是空字符串:return value.length == 0
 * String toLowerCase():使用默认语言环境,将 String 中的所有字符转换为小写
 * String toUpperCase():使用默认语言环境,将 String 中的所有字符转换为大写
 * String trim():返回字符串的副本,忽略前导空白和尾部空白
 * boolean equals(Object obj):比较字符串的内容是否相同
 * boolean equalsIgnoreCase(String anotherString):与equals方法类似,忽略大小写
 * String concat(String str):将指定字符串连接到此字符串的结尾。 等价于用“+”
 * int compareTo(String anotherString):比较两个字符串的大小
 * String substring(int beginIndex):返回一个新的字符串,它是此字符串的从
 * beginIndex开始截取到最后的一个子字符串。
 * String substring(int beginIndex, int endIndex) :返回一个新字符串,它是此字符串从beginIndex开始截取到endIndex(不包含)的一个子字符串。
 *
 * boolean endsWith(String suffix):测试此字符串是否以指定的后缀结束
 * boolean startsWith(String prefix):测试此字符串是否以指定的前缀开始
 * boolean startsWith(String prefix, int toffset):测试此字符串从指定索引开始的子字符串是否以指定前缀开始
 *
 *
 * boolean contains(CharSequence s):当且仅当此字符串包含指定的 char 值序列时,返回 true
 * int indexOf(String str):返回指定子字符串在此字符串中第一次出现处的索引
 * int indexOf(String str, int fromIndex):返回指定子字符串在此字符串中第一次出现处的索引,从指定的索引开始
 * int lastIndexOf(String str):返回指定子字符串在此字符串中最右边出现处的索引
 * int lastIndexOf(String str, int fromIndex):返回指定子字符串在此字符串中最后一次出现处的索引,从指定的索引开始反向搜索
 * 注:indexOf和lastIndexOf方法如果未找到都是返回-1
 *
 *
 * String replace(char oldChar, char newChar):返回一个新的字符串,它是通过用 newChar 替换此字符串中出现的所有 oldChar 得到的。
 * String replace(CharSequence target, CharSequence replacement):使用指定的字面值替换序列替换此字符串所有匹配字面值目标序列的子字符串。
 * String replaceAll(String regex, String replacement) : 使 用 给 定 的
 * replacement 替换此字符串所有匹配给定的正则表达式的子字符串。
 * String replaceFirst(String regex, String replacement) : 使 用 给 定 的
 * replacement 替换此字符串匹配给定的正则表达式的第一个子字符串。
 * boolean matches(String regex):告知此字符串是否匹配给定的正则表达式。
 * String[] split(String regex):根据给定正则表达式的匹配拆分此字符串。
 * String[] split(String regex, int limit):根据匹配给定的正则表达式来拆分此字符串,最多不超过limit个,如果超过了,剩下的全部都放到最后一个元素中。
 *
 *
 *
 * @author hjm
 */
public class StringMethodTest {
    @Test
    public void test(){
        String s = "Hello Word! ";
        String s1 = "hello word! ";

        System.out.println(s.length());
        System.out.println(s.charAt(2));
        System.out.println(s.isEmpty()); //底层是判断字符串数组长度是否为0
        System.out.println(s.toUpperCase());//s本身是不变的,重新开辟了一个空间存放变得内容
        System.out.println(s.toLowerCase());//同上
        System.out.println(s.trim());
        System.out.println(s.equalsIgnoreCase(s1));
        System.out.println(s.concat("666"));
        System.out.println(s1.compareTo(s));//从左到右一个一个去比,正数前边的大,负数后边的大
        System.out.println(s.substring(1,2));
        System.out.println(s.startsWith("he"));
        System.out.println(s.endsWith("!"));
        System.out.println(s.startsWith("ll",2));

        System.out.println(s.contains("ord!"));
        System.out.println(s.indexOf("lo"));
        System.out.println(s.indexOf("lo",5));
        System.out.println(s.lastIndexOf("lo"));
        System.out.println(s.lastIndexOf("lo",7));
        //社么情况下indexOf和lastIndexOf返回值一样
        //1.只有一个指定字符串,2.没有指定字符串

        System.out.println(s1.replace('h','b'));
        System.out.println(s1.replace("hello","best"));

        String s2 = "231swwwwdj3533nsd8sd9sdasd9as9d9a213";
        System.out.println(s2.replaceAll("\\d+",","));
        System.out.println(s2.replaceAll("\\d+",",").replaceAll("^,|,$",""));

        System.out.println(s2.replaceFirst("\\d+",","));

        String str = "12345";
        //判断str字符串中是否全部有数字组成,即有1-n个数字组成
        boolean matches = str.matches("\\d+");
        System.out.println(matches);
        String tel = "0571-4534289";
        //判断这是否是一个杭州的固定电话
        boolean result = tel.matches("0571-\\d{7,8}");
        System.out.println(result);

        str = "hello|world|java";
        String[] strs = str.split("\\|");
        for (int i = 0; i < strs.length; i++) {
            System.out.println(strs[i]);
        }
        System.out.println();
        String str2 = "hello.world.java";
        String[] strs2 = str2.split("\\.");
        for (int i = 0; i < strs2.length; i++) {
            System.out.println(strs2[i]);
        }


    }

}
String类型与常见数据类型之间的转换
package com.atigo.java.chuangjianxiancheng;

import org.junit.Test;

import java.io.UnsupportedEncodingException;
import java.util.Arrays;

/**
 * 涉及到String和其他类型之间的转换
 * @author hjm
 */
public class StringChange {
    /*
    * String  与基本数据类型,包装类型之间的转换
    * String --> 基本数据类型,包装类:调用包装类静态方法parseXxx(str)
    * 基本数据类型,包装类 --> String:调用String重载的valueOf(xxx)
     */
    @Test
    public void test(){
        String str1 = "123"; //只有子父类之间的关系才能在前边加上(类型)进行强转

        //int num = (int)str1;  错误的,
        //只有子父类之间的关系才能在前边加上(类型)进行强转
        int num = Integer.parseInt(str1);

        String str2 = String.valueOf(num);

    }

    /*
    * String类型与char[] 数组之间的转换
    * String 转换为 char[] 通过String的toCharArray方法
    * char[] 转换为 String 调用String构造器
    */

    @Test
    public void test2(){
        String str = "okokpolsdw";
        char[] charArray = str.toCharArray();
        for(char i : charArray){
            System.out.println(i);
        }
        char[] charArray1 = new char[]{'a','b','c','d','e','f'};
        String str1 = new String(charArray1);
        System.out.println(str1);
    }

    /*
    * String 与 byte[] 之间的转换
    * String --> byte[]  : 调用String中的getBytes方法
    *
    * 编码:字符串转换为字节(看得懂-->看不懂的二进制数据)
    * 解码:字节转换为字符串(看不懂的二进制数据 --> 看得懂的)
    *
    * 说明:编码与解码字符集要一致,不然会出现乱码
    */
    @Test
    public void test3() throws UnsupportedEncodingException {
        String str = "abc123中国";
        byte[] bytes = str.getBytes();//使用默认的字符集转换,本人编译器默认UTF-8,使用utf-8字符集,一个汉字三个字节
        System.out.println(Arrays.toString(bytes));

        byte[] bytes1 = str.getBytes("gbk");//gbk字符集中一个汉字占两个字节
        System.out.println(Arrays.toString(bytes1));

        //将byte[]数组转换为String
        String str3 = new String(bytes); //使用编译器默认字符集(本人utf-8)
        System.out.println(str3);
        String str4 = new String(bytes1);//使用默认的会乱码,编码与解码用的字符集不同
        System.out.println(str4);

        String str5 = new String(bytes1,"gbk");//使用gbk字符集,不会乱码,编码集与解码集一致
        System.out.println(str5);


    }


}
关于StringBuffer和StringBuilder的使用以及StringBuffer常用方法,StringBuilder同理
package com.atigo.java.chuangjianxiancheng;

import org.junit.Test;

/**
 * 关于StringBuffer和StringBuilder的使用
 *
 * @author hjm
 */
public class StringBufferBuilderTest {
    /*
    * String,StringBuffer,StringBuilder三者异同
    * String:不可变的字符列,底层使用char型数组
    * StringBuffer:可变的字符序列,线程安全,效率偏低,底层使用char型数组,jdk1.9改成byte数组
    * tringBuilder:可变的字符序列,线程不安全的,效率高,jdk5.0新增底层使用char型数组,jdk1.9改成byte数组
    *
    * 源码分析:
    * String str = new String();//char[] value = new char[0];
    * String str1 = new String("abc");//char[] value = new char[]{'a','b','c'};
    *
    * StringBuffer sb1 = new StringBuffer();//char[] value = new char[16];底层创建了一个长度为16的char数组
    * sb1.append('a');//char[0] = 'a'   sb1.append('b');//char[1] = 'b'
    * StringBuffer sb2 = new StringBuffer("abc");//底层char[] value = new char["abc".length+16];
    *
    * 问题一:
    * sb1.length()返回的是count而不是value.length
    * 问题二:
    * 扩容,如果要添加的数组,要扩容底层数组,默认情况下扩容为原来的2倍+2,同时将原有数组元素复制到新的数组中,如果扩容不够,直接将原有长度+新的长度作为新的数组长度
    * 建议使用:StringBuffer(int capacity),创建StringBuffer对象,避免扩容,扩容浪费时间
    * 以上StringBuilder同理
    *
    *
    */
    @Test
    public void test(){
        StringBuffer str = new StringBuffer(20);
        System.out.println(str.length());

    }

    /*
    * StringBuffer常用方法,StringBuilder同理,一般情况下String有的方法StringBuffer都有
    * StringBuffer append(xxx):提供了很多的append()方法,用于进行字符串拼接
    * StringBuffer delete(int start,int end):删除指定位置的内容
    * StringBuffer replace(int start, int end, String str):把[start,end)位置替换为str
    * StringBuffer insert(int offset, xxx):在指定位置插入xxx
    * StringBuffer reverse() :把当前字符序列逆转
    * public int indexOf(String str)  //返回指定字符串在当前字符串首次出现的位置
    * public String substring(int start,int end) //返回一个start开始,end结束的字符串[start,end),不是在当前字符串切割
    * public int length()
    * public char charAt(int n )
    * public void setCharAt(int n ,char ch)  //将指定位置字符改为指定字符
    *
    */

    @Test
    public void test2(){
        StringBuffer str = new StringBuffer("abc");
        str.append(1);
        str.append('a');
        str.append('b');
        System.out.println(str);
        str.delete(2,4);
        System.out.println(str);
        str.replace(0,1,"hello");
        System.out.println(str);
        str.insert(0,false);
        System.out.println(str);
        System.out.println(str.length());//将false看成5个字符
        str.reverse();
        System.out.println(str);

    }


}
效率对比,效率:StringBuilder > StringBuffer > String
package com.atigo.java.chuangjianxiancheng;

/**
 * @author hjm
 */
public class TimeCompare {
    public static void main(String[] args) {
        /*
        * 效率:StringBuilder > StringBuffer > String
        */
        long startTime = 0L;
        long endTime = 0L;
        String text = "";
        StringBuffer buffer = new StringBuffer("");
        StringBuilder builder = new StringBuilder("");//开始对比
        startTime = System.currentTimeMillis();
        for (int i = 0; i < 20000; i++) {
            buffer.append(String.valueOf(i));
        }
        endTime = System.currentTimeMillis();
        System.out.println("StringBuffer的执行时间:" + (endTime - startTime));
        startTime = System.currentTimeMillis();
        for (int i = 0; i < 20000; i++) {
            builder.append(String.valueOf(i));
        }
        endTime = System.currentTimeMillis();
        System.out.println("StringBuilder的执行时间:" + (endTime - startTime));
        startTime = System.currentTimeMillis();
        for (int i = 0; i < 20000; i++) {
            text = text + i;
        }
        endTime = System.currentTimeMillis();
        System.out.println("String的执行时间:" + (endTime - startTime));

    }
}
JDK8之前日期时间API
package com.atigo.java.chuangjianxiancheng;

import org.junit.Test;

import java.util.Date;

/**
 * jdk8之前日期和时间测试
 * @author hjm
 */
public class UseTime {

    /*
    * System类提供的public static long currentTimeMillis()用来返回当前时间与1970年1月1日0时0分0秒之间以毫秒为单位的时间差。
    */
    @Test
    public void test(){
        long time = System.currentTimeMillis();
        //返回当前时间与1970年1月1日0时0分0秒之间以毫秒为单位的时间差
        //称为时间戳
        System.out.println(time);
    }


    /*
    * java.util.Date类
    *          子类 java.sql.Date类
    * 1.两个构造器的使用
    * 2.两个方法的使用
    *     date.toString() 显示当前的年月日时分秒
    *     date.getTime()    返回毫秒数,时间戳
    *
    * 3.java.sql.Date对应着数据库中的日期类型的变量
    *   >如何实例化
    *   >把sql对象转换为sql对象
    */
    @Test
    public void test2(){
        //构造器一:Date()//创建一个对应当前时间的对象
        Date date = new Date();
        //显示当前的年月日时分秒
        System.out.println(date.toString());  //Sun Dec 26 20:36:26 CST 2021
        System.out.println(date.getTime());//返回毫秒数

        //构造器二:创建指定毫秒数的对象
        Date date1 = new Date(1640522276501L);
        System.out.println(date1.toString());

        //创建一个sql对象
        java.sql.Date date2 = new java.sql.Date(1640522276501L);
        System.out.println(date2.toString());

        //如何将util下的Date对象转换成sql下的Date对象
        //情况一
        //Date date3 = new java.sql.Date(3232131312313L);
        //java.sql.Date date4 = (java.sql.Date) date3;
        //情况二
        Date date6 = new Date();
        java.sql.Date date7 = new java.sql.Date(date6.getTime());
        System.out.println(date7);


    }
}
SimpleDateFormat
package com.atigo.java.chuangjianxiancheng;

import org.junit.Test;

import java.text.ParseException;
import java.text.SimpleDateFormat;
import java.util.Calendar;
import java.util.Date;

/**
 * 1.System类提供的public static long currentTimeMillis()
 * 2.java.util.Date类 和 子类 java.sql.Date类
 * 3.SimpleDataFormat
 * 4.Calendar
 * @author hjm
 */
public class SimpleDataFormatTest {
    //SimpleDataFormat的使用:SimpleDataFormat对日期Date类的格式化和解析
    //1.两个操作
    //格式化   和  解析
    //格式化    ---> 日期->字符串
    //解析     ---->  字符串 -> 日期

    @Test
    public void test() throws ParseException {
        //实例化
        SimpleDateFormat simpleDateFormat = new SimpleDateFormat();
        //格式化日期
        Date date = new Date();
        System.out.println(date);
        String str = simpleDateFormat.format(date);
        System.out.println(str);

        //解析,将字符串转换为日期
        String str1 = "2021/12/26 下午10:08";
        simpleDateFormat.parse(str1);

        //指定格式
        SimpleDateFormat sdf = new SimpleDateFormat("yyyy-MM-dd hh:mm:ss");
        String str2 = sdf.format(date);
        System.out.println(str2);
        //解析,要求字符串格式必须符合SimpleDateFormat识别的格式(通过构造器指定,没有则默认),否则抛异常
        Date date1 = sdf.parse("2021-12-26 10:14:37");
        System.out.println(date1);

    }

    /*
    * 练习
    * 字符串”2020-09-01“转换为java.sql.Date类型
    * */
    @Test
    public void test1() throws ParseException {
        String birth="2020-09-08";
        SimpleDateFormat simpleDateFormat = new SimpleDateFormat("yyyy-MM-dd");
        Date date = simpleDateFormat.parse(birth);
        System.out.println(date);
        java.sql.Date date1 = new java.sql.Date(date.getTime());
        System.out.println(date1);
    }

    /*
    * 练习一:计算指定日期到指定日期的天数
    *
    * 方式一:计算毫秒数,做减法,然后在转化成天
    * 方式二:计算年,判断有多少闰年,闰年加一天,然后再算多出来的月份,计算天数
    */
    @Test
    public void test2(){

    }

    /*
    * Calendar日历类(抽象类)的使用
    * */
    @Test
    public void test3(){
        //实例化,因为Calendar是抽象类,所以用其子类进行实例化
        /*
        * 获取Calendar实例的方法
        * 使用Calendar.getInstance()方法,也是new一个子类GregorianCalendar对象
        * 调用它的子类GregorianCalendar的构造器。
        */
        Calendar calendar = Calendar.getInstance();
        System.out.println(calendar.getClass());
        /*
        * 一个Calendar的实例是系统时间的抽象表示,通过get(int field)方法来取得想
        * 要的时间信息。比如YEAR、MONTH、DAY_OF_WEEK、HOUR_OF_DAY 、MINUTE、SECOND
        * public void set(int field,int value)
        * public void add(int field,int amount)
        * public final Date getTime()
        * public final void setTime(Date date)
        * 注意:
        * 获取月份时:一月是0,二月是1,以此类推,12月是11
        * 获取星期时:周日是1,周二是2 , 。。。。周六是7
        * */
        //get()
        int day = calendar.get(Calendar.DAY_OF_MONTH);//获取这个月的第几天
        System.out.println(day);
        System.out.println(calendar.get(Calendar.DAY_OF_YEAR));//输出一年的第几天
        //set()
        calendar.set(Calendar.DAY_OF_MONTH,22);
        day = calendar.get(Calendar.DAY_OF_MONTH);
        System.out.println(day);

        //add()
        calendar.add(Calendar.DAY_OF_MONTH,-3);
        day = calendar.get(Calendar.DAY_OF_MONTH);
        System.out.println(day);

        //getTime
        Date date = calendar.getTime();
        System.out.println(date);

        //setTime :Date --> 日历类
        Date date1 = new Date();
        calendar.setTime(date1);
        day = calendar.get(Calendar.DAY_OF_MONTH);
        System.out.println(day);


    }


}
jdk1.8中新的时间API
package com.atigo.java.chuangjianxiancheng;

import org.junit.Test;

import java.time.LocalDate;
import java.time.LocalDateTime;
import java.time.LocalTime;
import java.util.Date;

/**
 * @author hjm
 */
public class jdk18Time {
    /*
     * jdk1.8中新的时间API
     */
    @Test
    public void test4(){
        /*
         * 而Calendar并不比Date好多少。它们面临的问题是:
         * 可变性:像日期和时间这样的类应该是不可变的。
         * 偏移性:Date中的年份是从1900开始的,而月份都从0开始。
         * 格式化:格式化只对Date有用,Calendar则不行。
         * 此外,它们也不是线程安全的;不能处理闰秒等。
         */
        Date date = new Date(2020,9,8);//Fri Oct 08 00:00:00 CST 3920
        System.out.println(date);
        /*
         * 且Java 8中引入的java.time API 已经纠正了过去的缺陷,将来很长一段时间我么都用它
         * Java 8 吸收了 Joda-Time 的精华,以一个新的开始为 Java 创建优秀的 API。
         * 新的java.time 中包含了所有关于本地日期(LocalDate)、本地时间(LocalTime)、本地日期时间(LocalDateTime)、时区(ZonedDateTime)
         * 和持续时间(Duration)的类。历史悠久的 Date 类新增了 toInstant() 方法,
         * 用于把 Date 转换成新的表示形式。
         * java.time – 包含值对象的基础包
         * java.time.chrono – 提供对不同的日历系统的访问
         * java.time.format – 格式化和解析时间和日期
         * java.time.temporal – 包括底层框架和扩展特性
         * java.time.zone – 包含时区支持的类
         */
        /*
         * LocalDate、LocalTime、LocalDateTime 的使用
         * now 获取当前时间,日期,日期时间
         * 说明:
         *    1.LocalDateTime相较于LocalDate、LocalTime使用频率更高一些
         *    2.类似于Calendar
         */
        LocalDate localDate = LocalDate.now();
        LocalTime localTime = LocalTime.now();
        LocalDateTime localDateTime = LocalDateTime.now();
        System.out.println(localDate);
        System.out.println(localTime);
        System.out.println(localDateTime);

        //of()设置指定的年,月,日,时,分,秒  没有偏移量
        LocalDateTime localDateTime1 = LocalDateTime.of(2020,10,1,10,25,34);
        System.out.println(localDateTime1);

        //get()相关方法,获取相关属性
        System.out.println(localDateTime.getDayOfMonth());
        System.out.println(localDateTime.getDayOfWeek());
        System.out.println(localDateTime.getMinute());
        System.out.println(localDateTime.getMonth());
        System.out.println(localDateTime.getMonthValue());

        //localxxx 体现不可变性
        //withxxx  设置相关属性
        LocalDate localDate1 = localDate.withDayOfMonth(22);
        System.out.println(localDate);
        System.out.println(localDate1);

        //加操作plus    体现不可变性
        LocalDateTime localDateTime2 = localDateTime.plusMonths(3);
        System.out.println(localDateTime);
        System.out.println(localDateTime2);

        //减操作minus   体现不可变性
        LocalDateTime localDateTime3 = localDateTime.minusDays(3);
        System.out.println(localDateTime);
        System.out.println(localDateTime3);


    }
}
瞬时:Instant
package com.atigo.java.chuangjianxiancheng;

import org.junit.Test;

import java.time.Instant;
import java.time.OffsetDateTime;
import java.time.ZoneOffset;

/**
 * @author hjm
 */
public class InstantTest {
    /*
    * Instant 的使用
    * 类似于java.util.Date类
    */
    @Test
    public void test(){
        //now 获取本初子午线时间
        Instant instant = Instant.now();//2021-12-27T03:45:58.311525800Z 本初子午线时间
        System.out.println(instant);

        //显示东八区时间需要+8小时
        OffsetDateTime offsetDateTime = instant.atOffset(ZoneOffset.ofHours(8));
        System.out.println(offsetDateTime);

        //获取时区点对应的毫秒数,截取1970年1月1日0时0分0秒(UTC)开始的毫秒数
        long op = instant.toEpochMilli();
        System.out.println(op);

        //ofEpochMilli 通过给定毫秒数获取 Instant 实例 -->  Date(Long millis)
        Instant instant1 = Instant.ofEpochMilli(1640578234177L);
        System.out.println(instant1);


    }
}
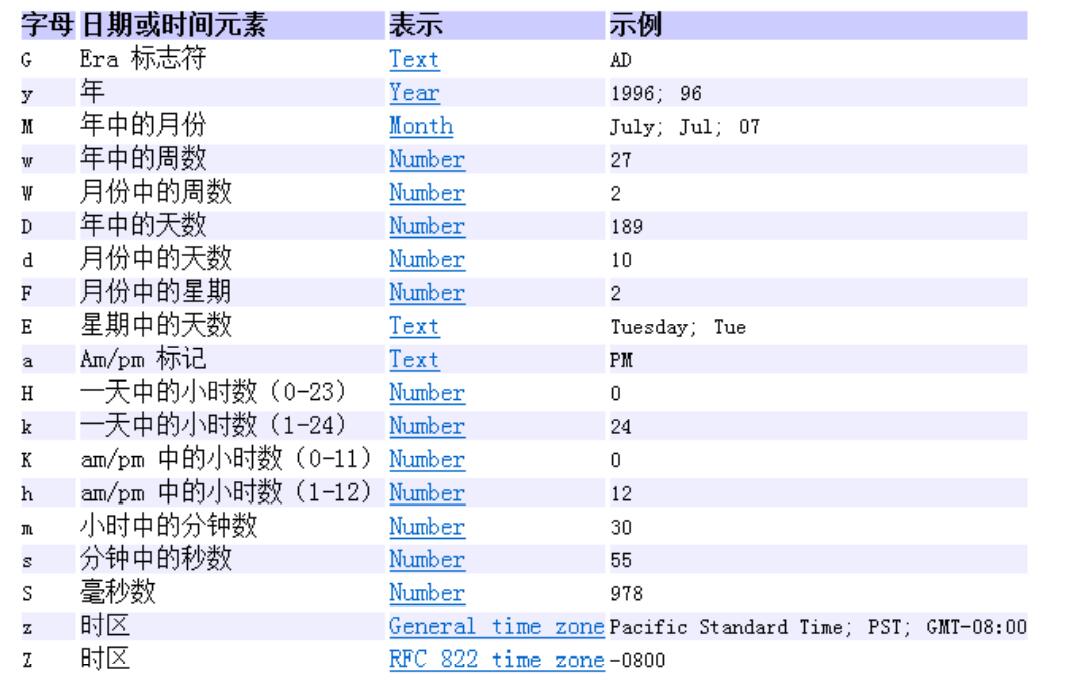
java.time.format.DateTimeFormatter 类:格式化与解析日期或时间,类似于SimpleDateFormat
@Test
public void test1(){
    /*
        * java.time.format.DateTimeFormatter 类:格式化与解析日期或时间
        * 类似于SimpleDateFormat
        * 实例化三种方式
        * 方式一:预定义的标准格式。如:ISO_LOCAL_DATE_TIME;ISO_LOCAL_DATE;ISO_LOCAL_TIME
        * 方式二:本地化相关的格式。如:ofLocalizedDateTime(FormatStyle.LONG)
        * 方式三:自定义的格式。如:ofPattern(“yyyy-MM-dd hh:mm:ss”)
        */
    //方式一:预定义的标准格式。如:ISO_LOCAL_DATE_TIME;ISO_LOCAL_DATE;ISO_LOCAL_TIME
    DateTimeFormatter formatter = DateTimeFormatter.ISO_LOCAL_DATE_TIME;
    //格式化  日期  --> 字符串
    LocalDateTime localDateTime = LocalDateTime.now();
    String str = formatter.format(localDateTime);
    System.out.println(localDateTime);
    System.out.println(str);

    //解析  字符串 --> 日期
    TemporalAccessor parse = formatter.parse("2021-12-27T12:20:56.8870");
    System.out.println(parse);

    //方式二:本地化相关的格式。如:ofLocalizedDateTime(FormatStyle.LONG)
    //FormatStyle.LONG  /  FormatStyle.MEDIUM  /  FormatStyle.SHORT  :适用于 LocalDateTime
    // 用LONG 后面加上.withZone(ZoneId.systemDefault())不然会报错
    DateTimeFormatter formatter1 = DateTimeFormatter.ofLocalizedDateTime(FormatStyle.SHORT);
    String str2 = formatter1.format(localDateTime);
    System.out.println(str2);

    //本地化相关的格式。如:ofLocalizedDate
    //FormatStyle.FULL / FormatStyle.LONG  /  FormatStyle.MEDIUM  /  FormatStyle.SHORT  :适用于 LocalDateTime
    DateTimeFormatter formatter2 = DateTimeFormatter.ofLocalizedDate(FormatStyle.FULL);
    String str3 = formatter2.format(LocalDate.now());
    System.out.println(str3);


    //重点,自定义的格式。如:ofPattern("yyyy-MM-dd hh:mm:ss E")
    DateTimeFormatter formatter3 = DateTimeFormatter.ofPattern("yyyy-MM-dd hh:mm:ss E");
    String str4 = formatter3.format(LocalDateTime.now());
    System.out.println(str4);
    //解析
    System.out.println(formatter3.parse("2021-12-27 04:50:50 周一"));


}
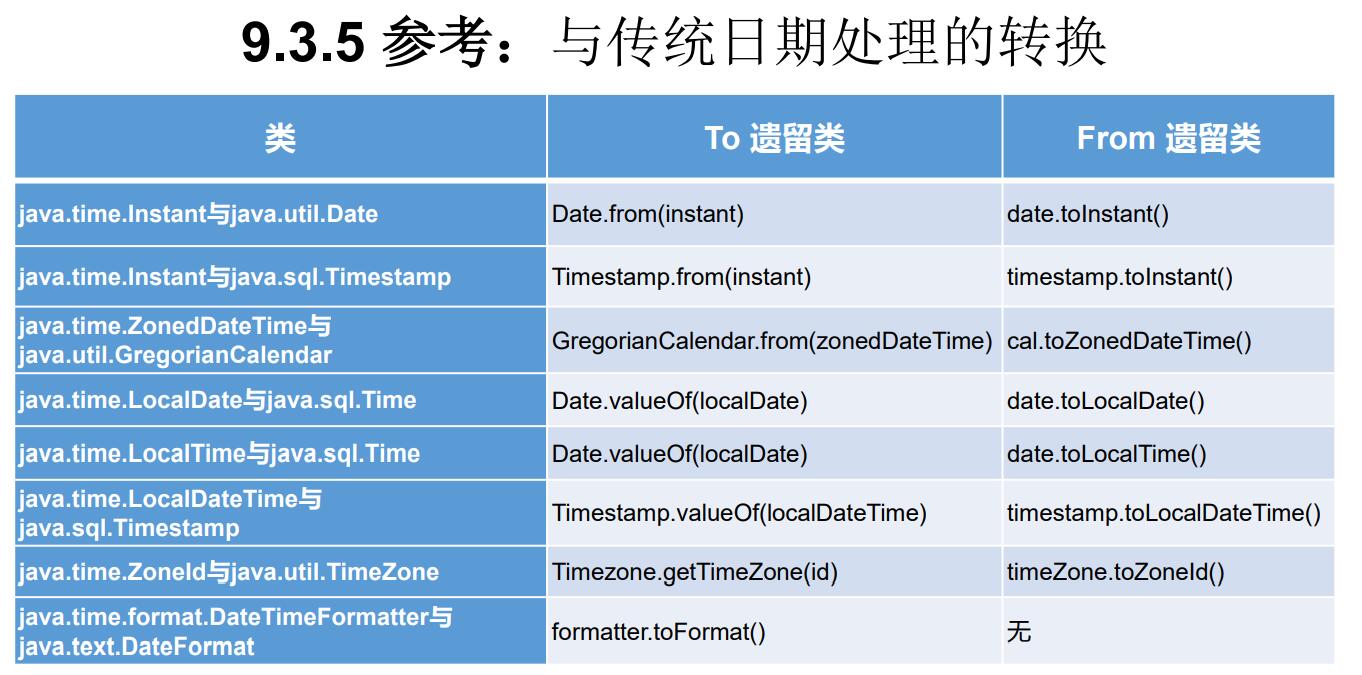
其它API
ZoneId:该类中包含了所有的时区信息,一个时区的ID,如 Europe/Paris ZonedDateTime:一个在ISO-8601日历系统时区的日期时间,如 2007-12- 03T10:15:30+01:00 Europe/Paris。其中每个时区都对应着ID,地区ID都为“{区域}/{城市}”的格式,例如: Asia/Shanghai等
Clock:使用时区提供对当前即时、日期和时间的访问的时钟。持续时间:Duration,用于计算两个“时间”间隔 ,日期间隔:Period,用于计算两个“日期”间隔
TemporalAdjuster : 时间校正器。有时我们可能需要获取例如:将日期调整 到“下一个工作日”等操作。
TemporalAdjusters : 该类通过静态方法(firstDayOfXxx()/lastDayOfXxx()/nextXxx())提供了大量的常用 TemporalAdjuster 的实现。
Java比较器
题外话:
对于java语言中的“==”操作符号,jvm会根据其两边相互比较的操作数的类型,在编译时生成不同的指令:
对于boolean,byte、short、int、long这种整形操作数,会生成 if_icmpne 指令。该指令用于比较整形数值是否相等。
如果操作数是对象的话,编译器则会生成指if_acmpne令,与if_icmpne相比将i(int)改成了a(object reference)。
package com.atigo.java.chuangjianxiancheng;
import org.junit.Test;
import java.util.Arrays;
import java.util.Comparator;
/**
* 一.说明:java中的对象,正常情况下只能进行比较:== 或 != 不能使用大于或小于的。
* 在开发中应用比较器进行对象大小比较
* 使用 Comparable 或 Comparator
*
* 二.Comparable接口 与 Comparator 的对比和使用
* Comparable接口:类继承Comparable接口实现compareTo方法,对数据进行比较排序可以在任何位置使用
* Comparator接口:临时性的比较,需要临时创建,不是在类中实现的,是工具集使用的
*
* @author hjm
*/
public class ComparaTest {
/*
* Comparable 使用举例 自然排序
* 1.像String,包装类等实现了 Comparable 接口,重写了compareTo(obj)方法,给出了比较两个对象大小的方式
* 2.重写compareTo(obj)的规则
* 如果当前对象this大于形参对象obj,则返回正整数,
* 如果当前对象this小于形参对象obj,则返回负整数,
* 如果当前对象this等于形参对象obj,则返回零。
* 注:默认情况下,通常为从小到大排序,升序。
*
* 4.对于自定义类,如果要排序,可以让自定义类实现Comparable接口,重写compareTo()方法
* 在compareTo()方法中指明如何排序
* 注:这是自然排序
*
*
*
*/
@Test
public void test1(){
String[] arr = new String[]{"AA","CC","KK","MM","GG","JJ","DD"};
Arrays.sort(arr);
System.out.println(Arrays.toString(arr));
}
@Test
public void test2(){
Person[] arr = new Person[4];
arr[0] = new Person("lianxieang",34);
arr[1] = new Person("daier",5);
arr[2] = new Person("xiaomi",5);
arr[3] = new Person("huawei",45);
Arrays.sort(arr);
System.out.println(Arrays.toString(arr));
}
/*
* Comparator 接口的使用 定制排序
* 当元素的类型没有实现java.lang.Comparable接口而又不方便修改代码,或者实现了java.lang.Comparable接口的排序规则不适合当前的操作,那么可以考虑使用 Comparator 的对象来排序
* 重写compare(Object o1,Object o2)方法,比较o1和o2的大小:如果方法返回正整数,则表示o1大于o2;如果返回0,表示相等;返回负整数,表示o1小于o2。
*
* */
@Test
public void test3(){
String[] arr = new String[]{"AA","CC","KK","MM","GG","JJ","DD"};
//按照字符串从大到小排列
Arrays.sort(arr, new Comparator<String>() {
@Override
public int compare(String o1, String o2) {
return -o1.compareTo(o2);
}
});
System.out.println(Arrays.toString(arr));
}
@Test
public void test4(){
Person[] arr = new Person[4];
arr[0] = new Person("lianxieang",34);
arr[1] = new Person("daier",5);
arr[2] = new Person("daier",6);
arr[3] = new Person("huawei",34);
Arrays.sort(arr, new Comparator<Person>() {
//先按照产品名称从低到高,价格从高到低
@Override
public int compare(Person o1, Person o2) {
if(o1.getName().compareTo(o2.getName()) == 0){
return -Double.compare(o1.getPrice(),o2.getPrice());
}else{
return o1.getName().compareTo(o2.getName());
}
}
});
System.out.println(Arrays.toString(arr));
}
}
class Person implements Comparable{
private String name;
private double price;
Person(){
}
Person(String name,double price){
this.name = name;
this.price = price;
}
public String getName() {
return name;
}
public void setName(String name) {
this.name = name;
}
public double getPrice() {
return price;
}
public void setPrice(double price) {
this.price = price;
}
@Override
public String toString(){
return "Person "+String.valueOf(this.name)+" "+String.valueOf(this.price);
}
//按照什么方法进行排序,指明比较大小的方式
//首先按照价格排序,再按照名字进行排序,可以在返回值前加一个符号,转变排序规则,也可以调换对象位置转变排序规则
//person.price,this.price 这样的顺序与this.price,person.price排序结果不同(从高到低 从低到高)
@Override
public int compareTo(Object o) {
if(o instanceof Person){
Person person = (Person) o;
if(Double.compare(this.price,person.price) == 0){
//String也重写了compareTo方法
return this.name.compareTo(person.name);
}else{
return Double.compare(this.price,person.price);
}
}
throw new RuntimeException("传入数据不一致");
}
}
其他常用类System,BigInteger,BigDecimal类
System类
System类代表系统,系统级的很多属性和控制方法都放置在该类的内部。 该类位于java.lang包。由于该类的构造器是private的,所以无法创建该类的对象,也就是无法实例化该类。其内部的成员变量和成员方法都是static的,所以也可以很方便 的进行调用。
成员变量 System类内部包含in、out和err三个成员变量,分别代表标准输入流 (键盘输入),标准输出流(显示器)和标准错误输出流(显示器)。
成员方法
native long currentTimeMillis(): 该方法的作用是返回当前的计算机时间,时间的表达格式为当前计算机时 间和GMT时间(格林威治时间)1970年1月1号0时0分0秒所差的毫秒数。
void exit(int status): 该方法的作用是退出程序。其中status的值为0代表正常退出,非零代表 异常退出。使用该方法可以在图形界面编程中实现程序的退出功能等。
void gc(): 该方法的作用是请求系统进行垃圾回收。至于系统是否立刻回收,则 取决于系统中垃圾回收算法的实现以及系统执行时的情况。
String getProperty(String key): 该方法的作用是获得系统中属性名为key的属性对应的值。系统中常见 的属性名以及属性的作用如下表所示:
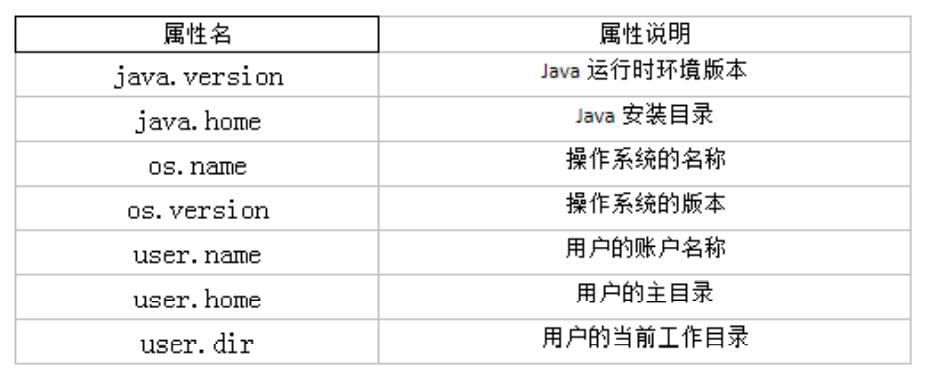
package com.atigo.java.chuangjianxiancheng;

import org.junit.Test;

import java.math.BigDecimal;
import java.math.BigInteger;

/**
 * 其他常用类
 * 1.System
 * 2.Math
 * 3.BigInteger  和  BigDecimal
 *
 * @author hjm
 */
public class OtherClass {

    @Test
    public void test(){
        String javaVersion = System.getProperty("java.version");
        System.out.println("java的version:" + javaVersion);
        String javaHome = System.getProperty("java.home");
        System.out.println("java的home:" + javaHome);
        String osName = System.getProperty("os.name");
        System.out.println("os的name:" + osName);
        String osVersion = System.getProperty("os.version");
        System.out.println("os的version:" + osVersion);
        String userName = System.getProperty("user.name");
        System.out.println("user的name:" + userName);
        String userHome = System.getProperty("user.home");
        System.out.println("user的home:" + userHome);
        String userDir = System.getProperty("user.dir");
        System.out.println("user的dir:" + userDir);

    }

    /*
    * java.lang.Math提供了一系列静态方法用于科学计算。其方法的参数和返回值类型一般为double型。
    * abs 绝对值
    * acos,asin,atan,cos,sin,tan 三角函数
    * sqrt 平方根
    * pow(double a,doble b) a的b次幂
    * log 自然对数
    * exp e为底指数
    * max(double a,double b)
    * min(double a,double b)
    * random() 返回0.0到1.0的随机数
    * long round(double a) double型数据a转换为long型(四舍五入)
    * toDegrees(double angrad) 弧度—>角度
    * toRadians(double angdeg) 角度—>弧度
    * */

    /*
    * Integer类作为int的包装类,能存储的最大整型值为2的31次方-1,Long类也是有限的,最大为2的63次方-1。
    * 如果要表示再大的整数,不管是基本数据类型还是他们的包装类都无能为力,更不用说进行运算了。
    * java.math包的BigInteger可以表示不可变的任意精度的整数。BigInteger 提供所有 Java 的基本整数操作符的对应物,并提供 java.lang.Math 的所有相关方法。
    * 另外,BigInteger 还提供以下运算:模算术、GCD 计算、质数测试、素数生成、位操作以及一些其他操作。
    * 构造器
    * BigInteger(String val):根据字符串构建BigInteger对象
    * 常用方法
    * public BigInteger abs():返回此 BigInteger 的绝对值的 BigInteger。
    * BigInteger add(BigInteger val) :返回其值为 (this + val) 的 BigInteger
    * BigInteger subtract(BigInteger val) :返回其值为 (this - val) 的 BigInteger
    * BigInteger multiply(BigInteger val) :返回其值为 (this * val) 的 BigInteger
    * BigInteger divide(BigInteger val) :返回其值为 (this / val) 的 BigInteger。整数相除只保留整数部分。
    * BigInteger remainder(BigInteger val) :返回其值为 (this % val) 的 BigInteger。
    * BigInteger[] divideAndRemainder(BigInteger val):返回包含 (this / val) 后跟(this % val) 的两个 BigInteger 的数组。
    * BigInteger pow(int exponent) :返回其值为 (thisexponent) 的 BigInteger。
    */

    /*
    * BigInteger类是整形大数,那么BigDecimal类就是高精度浮点型大数
    * 一般的Float类和Double类可以用来做科学计算或工程计算,但在商业计算中,要求数字精度比较高,故用到java.math.BigDecimal类。
    * BigDecimal类支持不可变的、任意精度的有符号十进制定点数。
    * 构造器
    * public BigDecimal(double val)
    * public BigDecimal(String val)
    * 常用方法
    * public BigDecimal add(BigDecimal augend)
    * public BigDecimal subtract(BigDecimal subtrahend)
    * public BigDecimal multiply(BigDecimal multiplicand)
    * public BigDecimal divide(BigDecimal divisor, int scale, int roundingMode)
    * */

    @Test
    public void test2(){
        BigInteger bi = new BigInteger("12433241123");
        BigDecimal bd = new BigDecimal("12435.351");
        BigDecimal bd2 = new BigDecimal("11");
        System.out.println(bi);
        // System.out.println(bd.divide(bd2));
        //ROUND_HALF_UP  四舍五入
        System.out.println(bd.divide(bd2 ,BigDecimal.ROUND_HALF_UP));
        //保留十四位四舍五入
        System.out.println(bd.divide(bd2,14 ,BigDecimal.ROUND_HALF_UP));
        //保留15位小数
        System.out.println(bd.divide(bd2, 15, BigDecimal.ROUND_HALF_UP));
    }

}
枚举与注解
方式一:jdk5.0之前,自己定义
package com.atigo.java.meijuandzhujie;

/**
 * 一.枚举类的使用
 * 1.枚举类的理解:类的对象只有有限个,确定的,称此类为枚举类
 * 2.需要定义一组常量时,强烈建议使用枚举类
 * 3.如果枚举类中值只有一个对象,则可以作为一种单例模式的实现方式
 *
 * 二.如何定义枚举类
 * 方式一:jdk5.0之前,自己定义
 * 方式二:jdk5.0时可以使用enum关键字定义枚举类
 *
 *
 * @author hjm
 */
public class SeasonTest {
    public static void main(String[] args) {
        Season spring = Season.SPRING;
        System.out.println(spring.toString());

    }
}

//自定义枚举类
class Season{
    //声明Season对象的属性
    private final String seasonName;
    private final String seasonDesc;


    //私有化类的构造器,并且给对象属性赋值
    private Season(String seasonName,String seasonDesc){
        this.seasonName = seasonName;
        this.seasonDesc = seasonDesc;
    }

    //提供当前枚举类的多个对象:public static final 修饰
    public static final Season SPRING = new Season("春天","春暖花开");
    public static final Season SUMMER = new Season("夏天","夏日炎炎");
    public static final Season AUTUMN = new Season("秋天","秋高气爽");
    public static final Season WINTER = new Season("冬天","冰天雪地");


    //其他诉求1,获取枚举类对象的属性
    public String getSeasonName() {
        return seasonName;
    }

    public String getSeasonDesc() {
        return seasonDesc;
    }


    //其他诉求2:toString()方法
    @Override
    public String toString() {
        return "Season{" +
                "seasonName='" + seasonName + '\'' +
                ", seasonDesc='" + seasonDesc + '\'' +
                '}';
    }
}
方式二:jdk5.0时可以使用enum关键字定义枚举类
package com.atigo.java.meijuandzhujie;

/**
 * 一.枚举类的使用
 * 1.枚举类的理解:类的对象只有有限个,确定的,称此类为枚举类
 * 2.需要定义一组常量时,强烈建议使用枚举类
 * 3.如果枚举类中值只有一个对象,则可以作为一种单例模式的实现方式
 *
 * 二.如何定义枚举类
 * 方式一:jdk5.0之前,自己定义
 * 方式二:jdk5.0时可以使用enum关键字定义枚举类
 *
 * 使用enum定义的枚举类都默认继承java.lang.Enum类
 *
 * @author hjm
 */
public class SeasonTest1 {
    public static void main(String[] args) {
        Season1 spring = Season1.SPRING;
        System.out.println(spring);

        System.out.println(Season1.class.getSuperclass());

    }
}

//enum 枚举类
enum Season1{


    //提供当前枚举类的多个对象:多个对象之间用逗号隔开,末尾对象用”;“结束
    SPRING("春天","春暖花开"),
    SUMMER("夏天","夏日炎炎"),
    AUTUMN("秋天","秋高气爽"),
    WINTER("冬天","冰天雪地");

    //声明Season对象的属性
    private final String seasonName;
    private final String seasonDesc;


    //私有化类的构造器,并且给对象属性赋值
    private Season1(String seasonName,String seasonDesc){
        this.seasonName = seasonName;
        this.seasonDesc = seasonDesc;
    }


    //其他诉求1,获取枚举类对象的属性
    public String getSeasonName() {
        return seasonName;
    }

    public String getSeasonDesc() {
        return seasonDesc;
    }


    //其他诉求2:toString()方法
    @Override
    public String toString() {
        return "Season{" +
                "seasonName='" + seasonName + '\'' +
                ", seasonDesc='" + seasonDesc + '\'' +
                '}';
    }
}
使用enum关键字定义的枚举类实现接口情况
package com.atigo.java.meijuandzhujie;

/**
 * 一.枚举类的使用
 * 1.枚举类的理解:类的对象只有有限个,确定的,称此类为枚举类
 * 2.需要定义一组常量时,强烈建议使用枚举类
 * 3.如果枚举类中值只有一个对象,则可以作为一种单例模式的实现方式
 *
 * 二.如何定义枚举类
 * 方式一:jdk5.0之前,自己定义
 * 方式二:jdk5.0时可以使用enum关键字定义枚举类
 *
 * 使用enum定义的枚举类都默认继承java.lang.Enum类
 *
 * enum 的方法
 * 只实验了一些主要方法
 * Enum类的主要方法:
 *    values()方法:返回枚举类型的对象数组。该方法可以很方便地遍历所有的枚举值。
 *    valueOf(String str):可以把一个字符串转为对应的枚举类对象。要求字符串必须是枚举类对象的“名字”。如不是,会有运行时异常:IllegalArgumentException。
 *    toString():返回当前枚举类对象常量的名称
 *
 * 四.使用enum关键字定义的枚举类实现接口情况
 *    情况一:实现接口,在enum类中实现抽象方法
 *    情况二:让枚举类中的对象分别实现接口中的抽象方法
 * @author hjm
 */
public class SeasonTest1 {
    public static void main(String[] args) {
        Season1 spring = Season1.SPRING;

        //toString()方法
        System.out.println(spring);

        //查看父类
        System.out.println(Season1.class.getSuperclass());

        //values()
        Season1[] arr = Season1.values();
        for(Season1 i : arr){
            System.out.println(i);
        }
        Thread.State[] status = Thread.State.values();
        for(Thread.State i : status){
            System.out.println(i);
        }

        //valueOf(String objName):返回枚举类中对象名为objName的对象
        //如果没有对象名为objName的对象,则抛异常IllegalArgumentException
        Season1 winter = Season1.valueOf("WINTER");
        System.out.println(winter);
        winter.show();
    }
}

interface face{
    void show();
}


//enum 枚举类
enum Season1 implements face{


    //提供当前枚举类的多个对象:多个对象之间用逗号隔开,末尾对象用”;“结束
    SPRING("春天","春暖花开"){
        @Override
        public void show() {
            System.out.println("春天在哪里");
        }
    },
    SUMMER("夏天","夏日炎炎"){
        @Override
        public void show() {
            System.out.println("夏天在哪里");
        }
    },
    AUTUMN("秋天","秋高气爽"){
        @Override
        public void show() {
            System.out.println("秋天在哪里");
        }
    },
    WINTER("冬天","冰天雪地"){
        @Override
        public void show() {
            System.out.println("冬天在哪里");
        }
    };

    //声明Season对象的属性
    private final String seasonName;
    private final String seasonDesc;


    //私有化类的构造器,并且给对象属性赋值
    private Season1(String seasonName,String seasonDesc){
        this.seasonName = seasonName;
        this.seasonDesc = seasonDesc;
    }


    //其他诉求1,获取枚举类对象的属性
    public String getSeasonName() {
        return seasonName;
    }

    public String getSeasonDesc() {
        return seasonDesc;
    }


    //其他诉求2:toString()方法
    @Override
    public String toString() {
        return "Season{" +
                "seasonName='" + seasonName + '\'' +
                ", seasonDesc='" + seasonDesc + '\'' +
                '}';
    }


    /*//情况一,重写接口方法
    @Override
    public void show() {
        System.out.println("这是一个季节");
    }*/
}
注解
主要内容
注解(Annotation)概述
常见的Annotation示例
自定义Annotation
JDK中的元注解
利用反射获取注解信息(在反射部分涉及)
JDK 8中注解的新特性
从 JDK 5.0 开始, Java 增加了对元数据(MetaData) 的支持, 也就是 Annotation(注解),Annotation 其实就是代码里的特殊标记, 这些标记可以在编译, 类加 载, 运行时被读取, 并执行相应的处理。Annotation 可以像修饰符一样被使用, 可用于修饰包,类, 构造器, 方 法, 成员变量, 参数, 局部变量的声明, 这些信息被保存在 Annotation 的 “name=value” 对中。
一定程度上 可以说:框架 = 注解 + 反射 + 设计模式。
示例一:生成文档相关的注解
@author 标明开发该类模块的作者,多个作者之间使用,分割
@version 标明该类模块的版本 @see 参考转向,也就是相关主题 @since 从哪个版本开始增加的
@param 对方法中某参数的说明,如果没有参数就不能写
@return 对方法返回值的说明,如果方法的返回值类型是void就不能写
@exception 对方法可能抛出的异常进行说明 ,如果方法没有用throws显式抛出的异常就不能写
其中
@param @return 和 @exception 这三个标记都是只用于方法的。
@param的格式要求:@param 形参名 形参类型 形参说明 @return 的格式要求:
@return 返回值类型 返回值说明 @exception的格式要求:
@exception 异常类型 异常说明 @param和@exception可以并列多个
示例二:在编译时进行格式检查(JDK内置的三个基本注解)
@Override: 限定重写父类方法, 该注解只能用于方法
@Deprecated: 用于表示所修饰的元素(类, 方法等)已过时。通常是因为 所修饰的结构危险或存在更好的选择
@SuppressWarnings: 抑制编译器警告
package com.atigo.java.zhujie;

import org.junit.Test;

import java.lang.annotation.Annotation;
import java.util.ArrayList;

/**
 *
 * 注解的使用
 * 1.理解Annotation:
 *   jdk5.0新增特性
 *   Annotation 其实就是代码里的特殊标记, 这些标记可以在编译, 类加载, 运行时被读取, 并执行相应的处理。通过使用 Annotation, 程序员可以在不改变原有逻辑的情况下, 在源文件中嵌入一些补充信息。
 *   在JavaSE中,注解的使用目的比较简单,例如标记过时的功能,忽略警告等。在JavaEE/Android中注解占据了更重要的角色,例如用来配置应用程序的任何切面,代替JavaEE旧版中所遗留的繁冗代码和XML配置等。
 * 2.Annotation使用示例
 * 示例一:生成文档的相关注解
 * 实例二:在编译时进行格式检查(jdk内置的三个基本注解)
 *    @Override: 限定重写父类方法, 该注解只能用于方法
 *    @Deprecated: 用于表示所修饰的元素(类, 方法等)已过时。通常是因为所修饰的结构危险或存在更好的选择
 *    @SuppressWarnings: 抑制编译器警告
 * 示例三:跟踪代码依赖性,实现替代配置文件功能
 *
 * 3.如何自定义注解:参照@SuppressWarnings进行定义
 *   1)注解声明为@interface
 *   2)内部定义成员,通常使用value表示
 *   3)可以指定成员默认值,用default定义
 *   4)如果自定义注解没有成员,表明是一个标识作用
 *
 *   如果注解有成员,在使用注解的时候要指定成员的值,有默认值且满足要求可以不用指定
 *   自定义注解必须配上注解的信息处理流程(使用反射的方式)才有意义。
 *   自定义注解通常会指明两个元注解:Retention、Target
 * 4.jdk提供的四种元注解,修饰其他注解的注解
 *   Retention:
 *   @Retention: 只能用于修饰一个 Annotation 定义, 用于指定该 Annotation 的生命周期, @Rentention 包含一个 RetentionPolicy 类型的成员变量, 使用
 *   @Rentention 时必须为该 value 成员变量指定值:
 *        RetentionPolicy.SOURCE:在源文件中有效(即源文件保留),编译器直接丢弃这种策略的注释
 *        RetentionPolicy.CLASS:在class文件中有效(即class保留) , 当运行 Java 程序时, JVM不会保留注解。 这是默认值
 *        RetentionPolicy.RUNTIME:在运行时有效(即运行时保留),当运行 Java 程序时, JVM 会保留注释。程序可以通过反射获取该注释。
 *   Target:
 *        @Target: 用于修饰 Annotation 定义, 用于指定被修饰的 Annotation 能用于修饰哪些程序元素。
 *        @Target({TYPE, FIELD, METHOD, PARAMETER, CONSTRUCTOR, LOCAL_VARIABLE, MODULE})
 *        FIELD  :用于描述域
 *        TYPE   :用于描述类,接口(包括注解类型)或enum声明
 *        METHOD:用于描述方法
 *        LOCAL_VARIABLE:用于描述局部变量
 *        PARAMETER:用于描述参数
 *        CONSTRUCTOR:用于描述构造器
 *        PACKAGE:用于描述包
 *
 *   ******出现频率较低************
 *   Documented:
 *        @Documented: 用于指定被该元 Annotation 修饰的 Annotation 类将被javadoc 工具提取成文档。默认情况下,javadoc是不包括注解的。
 *        定义为Documented的注解必须设置Retention值为RUNTIME。
 *   Inherited:
 *        @Inherited: 被它修饰的 Annotation 将具有继承性。如果某个类使用了被
 *        @Inherited 修饰的 Annotation, 则其子类将自动具有该注解。
 *
 * 5.通过反射获取注解信息
 *
 * 6.jdk8增加新特性:
 *        可重复注解
 *            1)在MyAnnotation上声明一个Repeatable,成员值为MyAnnotations.class
 *            2)MyAnnotation的Target等元注解和MyAnnotations的Target等元注解相同。
 *
 *        类型注解
 *            1)ElementType.TYPE_PARAMETER 表示该注解能写在类型变量的声明语句中(如:泛型声明)。
 *            2)ElementType.TYPE_USE 表示该注解能写在使用类型的任何语句中。
 *
 *
 *
 * @author hjm
 */
public class AnnotationTest {
    @SuppressWarnings("unused")
    int we = 10;

    //rawtypes抑制没有泛型警告,unsed抑制没有使用警告
    @SuppressWarnings({"unused","rawtypes"})
    ArrayList list = new ArrayList();


    @Test
    public void testGetAnnotation(){
        Class<Student> std = Student.class;
        Annotation[] annotations = std.getAnnotations();
        for(Annotation i : annotations){
            System.out.println(i);
        }
    }
}

//@MyAnnotation(value = "well")
//jdk1.8之前的写法
//@MyAnnotations({@MyAnnotation(value = "well"),@MyAnnotation(value = "dahe")})

@MyAnnotation(value = "well")
@MyAnnotation(value = "dahe")
class Person{
    private String name;
    private int age;

    public Person() {
    }

    public Person(String name, int age) {
        this.name = name;
        this.age = age;
    }

    public String getName() {
        return name;
    }

    public void setName(String name) {
        this.name = name;
    }

    public int getAge() {
        return age;
    }

    public void setAge(int age) {
        this.age = age;
    }

    @Override
    public String toString() {
        return "Person{" +
                "name='" + name + '\'' +
                ", age=" + age +
                '}';
    }
    public void walk(){
        System.out.println("人走路");
    }
    public void eat(){
        System.out.println("人吃饭");
    }
}

interface info{
    void show();
}

class Student extends Person implements info{

    @Override
    public void walk() {
        System.out.println("学生走路");
    }

    @Override
    public void show() {
        System.out.println("展示");
    }
}

class Generate<@MyAnnotation T>{

    public void test() throws @MyAnnotation RuntimeException{
        ArrayList<@MyAnnotation T> we = new ArrayList<>();

        int num = (@MyAnnotation int) 10L;
    }
}
package com.atigo.java.zhujie;
import java.lang.annotation.*;
import static java.lang.annotation.ElementType.*;
/**
*
*
*
*
* @author hjm
*/
@Inherited
@Repeatable(MyAnnotations.class)
@Retention(RetentionPolicy.RUNTIME)
@Target({TYPE, FIELD, METHOD, PARAMETER, CONSTRUCTOR, LOCAL_VARIABLE, MODULE,TYPE_PARAMETER,TYPE_USE})
public @interface MyAnnotation {
String value() default "hello";
}
package com.atigo.java.zhujie;

import java.lang.annotation.Inherited;
import java.lang.annotation.Retention;
import java.lang.annotation.RetentionPolicy;
import java.lang.annotation.Target;

import static java.lang.annotation.ElementType.*;

/**
 *
 *
 *
 *
 * @author hjm
 */
@Inherited
@Retention(RetentionPolicy.RUNTIME)
@Target({TYPE, FIELD, METHOD, PARAMETER, CONSTRUCTOR, LOCAL_VARIABLE, MODULE})
public @interface MyAnnotations {
    MyAnnotation[] value();
}
Java集合
package com.atigo.java.Collection;

/**
 *
 * 一、集合框架的概述
 *
 * 1.集合、数组都是对多个对象进行存储的结构,简称java容器。
 *   说明:此时的存储,主要是指内存层面的存储,不涉及到持久化的存储(.txt,.jpg,avi,数据库等)
 *
 * 2.数组在存储多个数据方面的特点:
 *     > 一旦初始化之后,长度就确定了。
 *     > 数组一旦定义好,其元素的类型就确定了,只能去操作指定类型的数据了
 *   数组在存储多个数据方面的缺点:
 *     > 一旦初始化,其长度就不可以在修改。
 *     > 数组中提供的方法非常有限,对于添加,删除,插入数据等操作,非常不便,同时效率不高。
 *     > 获取数组中实际元素的个数,数组没有现成的属性和方法使用
 *     > 数组存储元素的特点时有序的:有序,可重复。对于无序,不可重复的需求,不能满足。
 *
 *
 *
 *
 *
 * @author hjm
 */
public class CollectionTest {

}
Java 集合可分为 Collection 和 Map 两种体系
Collection接口:单列数据,定义了存取一组对象的方法的集合
List:元素有序、可重复的集合
Set:元素无序、不可重复的集合
Map接口:双列数据,保存具有映射关系“key-value对”的集合
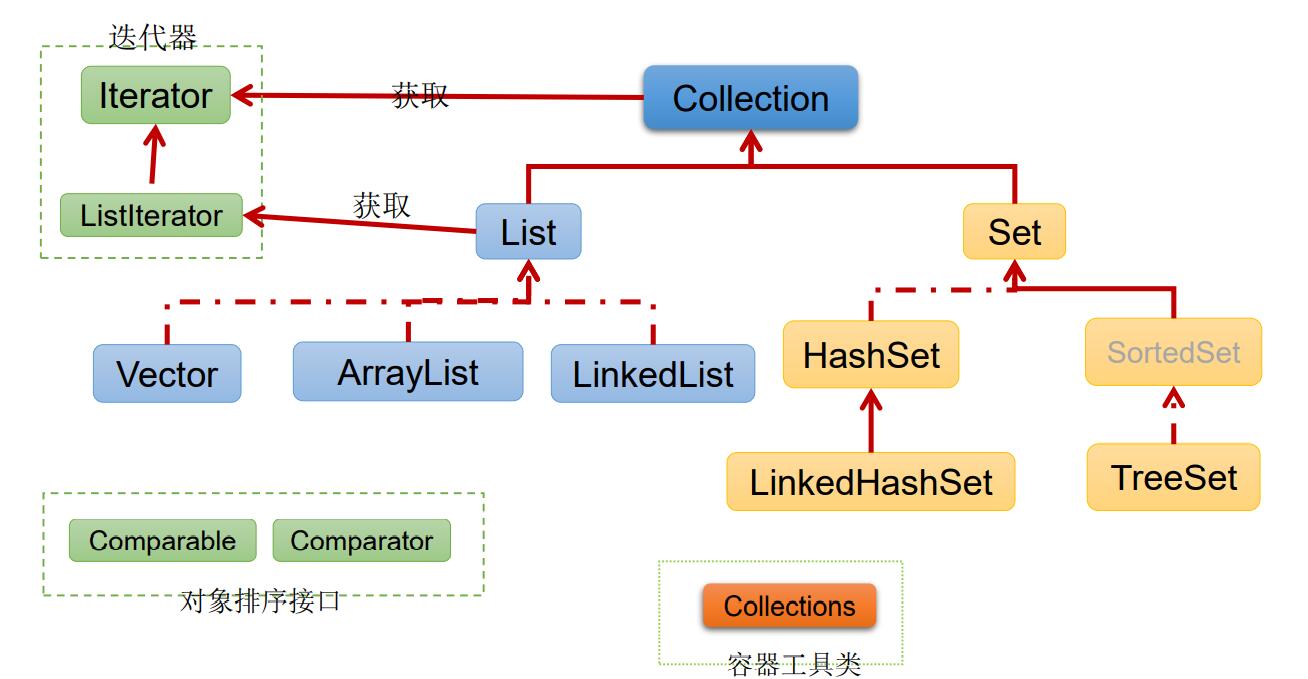
上图中实线为继承关系,虚线为实现关系
集合框架
package com.atigo.java.SetMapCollection;
import org.junit.Test;
import java.util.ArrayList;
import java.util.Collection;
import java.util.Date;
/**
* 一、集合框架
* |---Collection接口:单列集合,用来存储一个一个的对象
* |---List接口:存储有序可重复数据, -->"动态数组"
* |---ArrayList,LinkedList,Vector
* |---Set接口:存储无序的不可重复的数据 -->"高中讲的集合"
* |---HashSet,LinkedHashSet,TreeSet
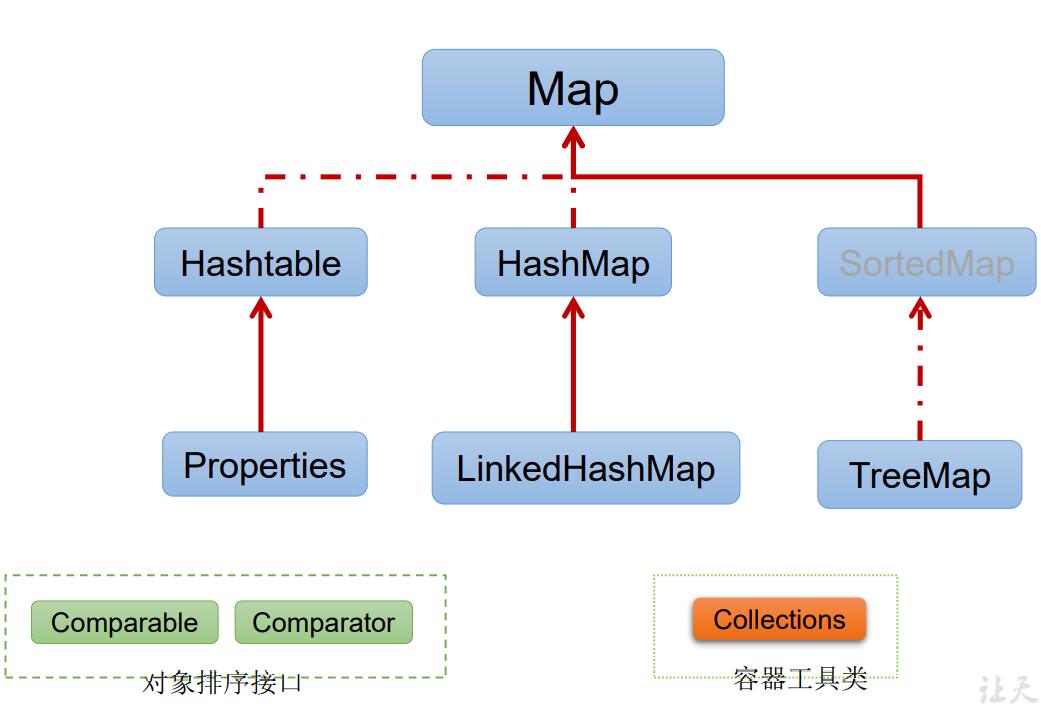
* |---Map接口:双列集合,用来存储一对(key-value)一对的数据 -->“高中讲的函数:y=f(x)”
* |---HashMap,LinkedHashMap,TreeMap,HashTable,Properties
*
* 二、Collection接口中的API,方法的使用
*
* @author hjm
*/
public class Demo {
@Test
public void test1(){
//call中都是抽象方法,具体实现在具体的实现类中
Collection call = new ArrayList();
//add(Object e) 将元素e添加到集合call中
call.add("AA");
call.add(123);//自动装箱
call.add(new Date());
for(Object i : call){
System.out.println(i);
}
//size()
System.out.println(call.size());
//addAll();
Collection call1 = new ArrayList();
call1.add(456);
call1.add("CC");
call.addAll(call1);
System.out.println(call.size());
System.out.println(call);//调用toString
//clear(),清空集合元素,不是赋值为null,还是有对象只是清空元素
call.clear();
//isEmpty(),判断当前集合是否为空
System.out.println(call.isEmpty());
}
}
package com.atigo.java.SetMapCollection;

import org.junit.Test;

import java.util.ArrayList;
import java.util.Arrays;
import java.util.Collection;
import java.util.List;

/**
 * Collection接口中声明的方法的测试
 *
 * 向Collection接口的实现类的对象中添加数据obj时,要求obj重写equals()方法,便于判断是否存在
 * @author hjm
 */
public class Demo1 {
    @Test
    public void test1(){
        Collection coll = new ArrayList();
        coll.add(345);
        coll.add(123);
        coll.add(123);
        coll.add(new String("tom"));
        coll.add(false);

        //contains(Object o) :判断当前集合是否包含o
        boolean contains = coll.contains(345);//contains调用的是equals方法
        System.out.println(contains);//如果重写了就比较值,否则就比较地址
        System.out.println(coll.contains((new String("tom"))));

        //containsAll(Collection coll1):判断形参coll1中所有元素是否都存在于当前集合中
        Collection coll1 = Arrays.asList(123,345);
        System.out.println(coll.containsAll(coll1));


        //remove(Object obj)  移除obj   也是通过equals判断
        System.out.println(coll.remove(123));
        System.out.println(coll);
        //removeAll(Collection coll1)  从当前集合中移除集合coll1中的所有元素
        System.out.println(coll.removeAll(coll1));


    }

    @Test
    public void test2(){
        Collection coll = new ArrayList();
        coll.add(345);
        coll.add(123);
        coll.add(123);
        coll.add(new String("tom"));
        coll.add(false);
        Collection coll1 = Arrays.asList(123,345);
        //retainAll()  求交集
        coll.retainAll(coll1);
        System.out.println(coll);
        Collection coll2 = new ArrayList();
        coll2.add(345);
        coll2.add(123);
        coll2.add(123);

        //equals(Object obj)  比较两个集合里边元素是否相等
        //注意:顺序不一样,元素一样也不相等,因为ArrayList有序
        System.out.println(coll.equals(coll2));
    }

    @Test
    public void test3(){
        Collection coll = new ArrayList();
        coll.add(345);
        coll.add(123);
        coll.add(123);
        coll.add(new String("tom"));
        coll.add(false);

        //hashCode()  返回当前对象的hash值
        System.out.println(coll.hashCode());

        //集合转换为数组  集合 --->  数组:toArray()
        Object[] objects = coll.toArray();
        for(Object i : objects){
            System.out.println(i);
        }

        //拓展:数组 ---> 集合  调用Arrays静态方法asList
        List<String> strings = Arrays.asList(new String[]{"AA", "BB", "CC"});
        System.out.println(strings);

        List<int[]> ints = Arrays.asList(new int[]{123, 456});
        System.out.println(ints);//将数组整体作为一个元素
        List<Integer> integers = Arrays.asList(new Integer[]{123, 456});
        System.out.println(integers); //两个元素,123,456

        //interator():  返回interator接口的实例,用于遍历集合的元素,放在IteratorTest.java中测试

    }
}
package com.atigo.java.SetMapCollection;

import org.junit.Test;

import java.util.ArrayList;
import java.util.Collection;
import java.util.Iterator;

/**
 * 集合元素的遍历,使用迭代器Iterator接口
 * 搭配内部方法,hasnext 和 next
 *
 * @author hjm
 */
public class IteratorTest {

    @Test
    public void test1(){
        Collection coll = new ArrayList();
        coll.add(345);
        coll.add(123);
        coll.add(123);
        coll.add(new String("tom"));
        coll.add(false);
        Iterator iterator = coll.iterator();

        /*for(;iterator.hasNext();){
            System.out.println(iterator.next());
        }

        //抛异常  NoSuchElementException
        System.out.println(iterator.next());*/

        //推荐写法
        while(iterator.hasNext()){
            System.out.println(iterator.next());
        }
    }
}
迭代器(Iterator)
package com.atigo.java.SetMapCollection;

import org.junit.Test;

import java.util.ArrayList;
import java.util.Collection;
import java.util.Iterator;

/**
 * 1.集合元素的遍历,使用迭代器Iterator接口
 * 搭配内部方法,hasnext 和 next
 * 2.集合对象每次调用iterator()方法都得到一个全新的迭代器对象,默认指针都在第一个集合元素之前
 *
 * 3.迭代器内部定义了remove(),可以在遍历的时候,删除集合元素,此方法不同于集合直接调用remove()
 *   注意:如果还未调用next()或在上一次调用 next 方法之后已经调用了 remove 方法,再调用remove都会报IllegalStateException。
 *   Iterator 主要是用来遍历 Collection 的,而不是Map的
 *
 *
 * @author hjm
 */
public class IteratorTest {

    @Test
    public void test1(){
        Collection coll = new ArrayList();
        coll.add(345);
        coll.add(123);
        coll.add(123);
        coll.add(new String("tom"));
        coll.add(false);
        Iterator iterator = coll.iterator();

        /*for(;iterator.hasNext();){
            System.out.println(iterator.next());
        }

        //抛异常  NoSuchElementException
        System.out.println(iterator.next());*/

        //推荐写法
        while(iterator.hasNext()){
            System.out.println(iterator.next());
        }
    }

    @Test
    public void test3(){
        Collection coll = new ArrayList();
        coll.add(345);
        coll.add(123);
        coll.add(123);
        coll.add(new String("tom"));
        coll.add(false);
        Iterator iterator = coll.iterator();

        //删除集合中的tom数据
        while(iterator.hasNext()){
            Object obj = iterator.next();
            if("tom".equals(obj)){

                iterator.remove();
            }
        }

        System.out.println(coll);
    }
}
增强for循环foreach
package com.atigo.java.SetMapCollection;

import org.junit.Test;

import java.util.ArrayList;
import java.util.Collection;

/**
 * jdk5.0新增了foreach,用来遍历集合和数组
 *
 *
 * @author hjm
 */
public class ForTest {

    @Test
    public void test1(){
        Collection coll = new ArrayList();
        coll.add(345);
        coll.add(123);
        coll.add(123);
        coll.add(new String("tom"));
        coll.add(false);

        //增强for循环,内部调用的仍然是迭代器
        for(Object obj : coll){
            System.out.println(obj);
        }
    }

    @Test
    public void test2(){
        int[] arr = new int[]{1,2,3,4,5,6,7};
        for(int i : arr){
            System.out.println(i);
        }
    }

    //练习题
    @Test
    public void test3(){
        String[] arr = new String[]{"MM","MM","MM"};

        /*//普通for循环赋值 可以赋值
        for(int i = 0; i < 3; i++){
            arr[i] = "GG";
        }*/
        //增强for循环 ,原有元素不编,变得只是局部变量str而已
        for(String str : arr){
            str = "GG";
        }
        for(int i = 0; i < 3; i++){
            System.out.println(arr[i]);
        }

    }
}
List接口框架
package com.atigo.java.SetMapCollection;

import org.junit.Test;

import java.util.ArrayList;
import java.util.Arrays;
import java.util.Iterator;
import java.util.List;

/**
 * 1. List接口框架
 * |---Collection接口:单列集合,用来存储一个一个的对象
 *     |---List接口:存储有序可重复数据,  -->"动态数组"
 *        |---ArrayList:作为List接口的主要实现类,1.2出现的,线程不安全的,效率高,底层结构使用Object[]
 *        |---LinkedList:对于频繁插入删除操作使用LinkedList比ArrayList效率高,底层使用双向链表存储
 *        |---Vector:作为List接口的古老实现类,1.0出现的,线程安全的,效率低,底层结构使用Object[]
 *
 *     2. ArrayList的源码分析
 *     2.1 jdk 7情况下:
 *         ArrayList list = new ArrayList();//地层创建了长度为 10 的底层数组
 *         list.add(123);//elementData[0] = new Integer(123)
 *         ...
 *         list.add(11);//如果此次的添加导致底层elementData数组容量不够,则扩容
 *         默认情况下,扩容容量为原来的1.5倍,同时将原有的数组中的数据复制到新的数组中
 *         结论:建议开发中使用有参构造器
 *
 *     2.2 jdk 8情况下:
 *         ArrayList list = new ArrayList();//底层object数组elementData初始化为{},并没有创建长度为10容量的数组
 *         list.add(123);//第一次添加数据调用add时,底层才创建了长度为10的数组,并且将数据123添加到elementData
 *         、、、
 *         后续添加扩容操作与 jdk7 无异
 *     2.3 小结
 *         jdk7中的ArrayList的对象的创建类似于单例模式的饿汉式
 *         jdk8中ArrayList的对象创建类似于单例模式中的懒汉式,延迟了数组创建,节省内存
 *
 *     3. LinkedList的源码分析
 *        LinkedList list = new LinkedList(); 内部声明了Node类型的first和last属性,默认值为null
 *        list.add(123);//将123封装到Node中,创建了Node对象
 *
 *        其中,Node定义为:体现了LinkedList的双向链表的说法
 *        private static class Node<E> {
 *              E item;
 *              Node<E> next;
 *              Node<E> prev;
 *
 *              Node(Node<E> prev, E element, Node<E> next) {
 *                  this.item = element;
 *                  this.next = next;
 *                  this.prev = prev;
 *              }
 *          }
 *     4. Vector的源码分析:jdk7 和jdk8 中通过Vector()构造器创建对象时,底层都创建了长度为10的数组
 *        在扩容方面,默认扩容为原来长度的二倍。
 *
 *     注意:Vector和ArrayList区别,Vector扩容为原来的二倍,并且市线程安全的,其他的基本相同
 *
 *
 * 比较ArrayList,LinkedList,Vector异同
 *   同:三各类都实现了List接口,存储数据特点相同;存储有序可重读的数据
 *   不同:见上
 *
 *
 * 5.List接口中的常用方法
 *   List除了从Collection集合继承的方法外,List 集合里添加了一些根据索引来操作集合元素的方法。
 *   void add(int index, Object ele):在index位置插入ele元素
 *   boolean addAll(int index, Collection eles):从index位置开始将eles中的所有元素添加进来
 *   Object get(int index):获取指定index位置的元素
 *   int indexOf(Object obj):返回obj在集合中首次出现的位置
 *   int lastIndexOf(Object obj):返回obj在当前集合中末次出现的位置
 *   Object remove(int index):移除指定index位置的元素,并返回此元素
 *   Object set(int index, Object ele):设置指定index位置的元素为ele
 *   List subList(int fromIndex, int toIndex):返回从fromIndex到toIndex位置的子集合
 *
 * 总结:常用方法:
 *      增:add(Object ele)
 *      删: remove(int index)/remove(Object ele):
 *      改: set(int index, Object ele)
 *      查: get(int index)
 *      插:add(int index, Object ele),
 *      长度: size()
 *      遍历: 1. Iterator迭代器方式
 *           2. 增强for循环
 *           3. 普通for循环
 *
 * @author hjm
 */
public class ListTest {

    @Test
    public void test2(){
        ArrayList list = new ArrayList();
        list.add(123);
        list.add(456);
        list.add("AA");
        list.add("AA");
        list.add(456);
        Iterator iterator = list.iterator();
        while(iterator.hasNext()){
            System.out.println(iterator.next());
        }
    }

    @Test
    public void test1(){
        ArrayList list = new ArrayList();
        list.add(123);
        list.add(456);
        list.add("AA");
        list.add("AA");
        list.add(456);
        System.out.println(list.toString());
        //void add(int index, Object ele):在index位置插入ele元素
        list.add(1,"uu");
        System.out.println(list.toString());
        //boolean addAll(int index, Collection eles):从index位置开始将eles中的所有元素添加进来
        List list1 = Arrays.asList(1,2,3);
        list.addAll(list1);
        System.out.println(list);
        //Object get(int index):获取指定index位置的元素
        System.out.println(list.get(1));
        //int indexOf(Object obj):返回obj在集合中首次出现的位置,没有返回-1
        System.out.println(list.indexOf("AA"));
        //int lastIndexOf(Object obj):返回obj在当前集合中末次出现的位置,没有返回-1
        System.out.println(list.lastIndexOf("AA"));
        //Object remove(int index):移除指定index位置的元素,并返回此元素
        Object obj = list.remove(0);
        System.out.println(obj);
        System.out.println(list);
        //Object set(int index, Object ele):设置指定index位置的元素为ele
        list.set(0,"cc");
        System.out.println(list);
        //List subList(int fromIndex, int toIndex):返回从fromIndex到toIndex位置的子集合,左闭右开
        List list2 = list.subList(1, 3);
        System.out.println(list2);

    }
}
set接口的框架结构
package com.atigo.java.SetMapCollection;

import org.junit.Test;
import java.util.*;

/**
 * 1.set接口的框架结构
 * |---Collection接口:单列集合,用来存储一个一个的对象
 *     |---Set接口:存储无序的不可重复的数据   -->"高中讲的集合"
 *         |---HashSet:作为set接口的实现类,线程不安全,可以存储null值
 *             |---LinkedHashSet:HashSet的子类,遍历其内部数据时可以按照添加的顺序遍历
 *                 对于频繁的遍历操作LinkedHashSet效率高于HashSet
 *         |---TreeSet:可以按照添加元素指定属性进行排序。
 *
 * 2. set接口中没有额外定义的新方法,使用的都是Collection中声明过的方法
 *
 *
 *
 *
 * @author hjm
 */
public class SetTest {
    /*
    * 一、set:存储无序的,不可重复的数据
    *    1.无序性 : 不等于随机性,储存不是按照索引存的,而是根据数据的HashCode值存的
    *    2.不可重复性 : 保证添加的元素按照equals判断时,不能返回true,即:相同的元素只能添加一个
    * 二、添加元素的过程:以HashSet为例:
    *    HashCode值不一样,他们不一样,
    *    HashCode值一样,equals不一样,他们不一样
    *    HashCode值一样,equals一样,他们一样
    *
    *    向HashSet中添加元素a,首先调用a所在类的hashCode()方法,计算元素a的hash值
    *    此hash值通过某种算法计算出在hashSet底层数组中的存放位置(即为索引位置),判断
    *    数组此位置是否有元素,如果没有元素,则a添加成功   -->方法1
    *    如果此位置有其他元素b(或以链表形式存在的多个元素),则比较元素a与元素b的hash值
    *        如果hash值不同(看解决hash冲突的方法),则元素a添加成功   -->方法2
    *        如果hash值相同,进而需要调用元素a所在类的equals()方法
    *                equals()返回true,元素a添加失败
    *                equals()返回false,元素a添加成功
    *
    *     对于添加成功的情况2和情况3而言:元素a与已经存在在指定索引位置上的数据以为链表方式存在
    *     jdk7  :  元素a放到数组中,指向原来元素
    *     jdk8  :  原来的元素放在数组中,指向元素a
    *     总结:七上八下
    *
    *     要求:向set中添加的数据,其所在的类一定要重写hashCode() 和equals()方法
    *     要求:重写的hashCode() 和 equals() 方法尽可能的保持一致性
    *          对应的类一定要重写equals()和hashCode(Object obj)方法,以实现对象相等规则。即:“相等的对象必须具有相等的散列码”
    *          就是如果equals()相等,hashCode()也要相等
    *          重写小技巧,用来进行equals()比较的字段用来进行hashCode()的计算
    *
    *
    *
    */

    @Test
    public void test1(){
        Set set = new HashSet();
        set.add(456);
        set.add(123);
        set.add("AA");
        set.add("bb");
        set.add(129);
        System.out.println(set);
    }

    //LinkedHashSet的使用
    //LinkedHashSet作为HashSet的子类,再添加数据的同时,每个数据还维护了两个引用,记录此数据前一个数据和后一个数据
    //有点:对于频繁的遍历操作LinkedHashSet效率高于HashSet
    @Test
    public void test2(){
        Set set = new LinkedHashSet();
        set.add(456);
        set.add(123);
        set.add("AA");
        set.add("bb");
        set.add(129);
        System.out.println(set);
    }


    @Test
    public void test3(){
        /*
        * 1.向treeset中添加的数据,要求是相同类的对象,不能添加不同类的对象(因为要排序,需要有相同的属性值去比较)
        * 2.两种排序方式:自然排序(实现Comparable接口) 和 定制排序(Comparator)
        * 3.自然排序中,比较两个对象是否相同的标准为:compareTo()返回0,不再是equals()
        * 4.定制排序中,比较两个对象是否相同的标准为:compare()返回0,不再是equals()
        */
        TreeSet set = new TreeSet();
        //失败,不能添加不同类的对象
        /*set.add(123);
        set.add(456);
        set.add("AA");*/

        /*set.add(1);
        set.add(4);
        set.add(3);
        set.add(2);*/
        set.add(new Person("Tom",32));
        set.add(new Person("Jim",45));
        set.add(new Person("Marry",61));
        set.add(new Person("Party",18));
        set.add(new Person("Party",19));
        System.out.println(set);
    }

    @Test
    public void test4(){

        Comparator com = new Comparator() {
            //按照年龄从小到大排序
            @Override
            public int compare(Object o1, Object o2) {
                if(o1 instanceof Person && o2 instanceof Person){
                    Person p1 = (Person) o1;
                    Person p2 = (Person) o2;
                    return Integer.compare(p1.getAge(),p2.getAge());
                }else{
                    throw new RuntimeException("输入类型不匹配");
                }
            }
        };
        TreeSet set = new TreeSet(com);
        set.add(new Person("Tom",32));
        set.add(new Person("Jim",45));
        set.add(new Person("Marry",61));
        set.add(new Person("Party",18));
        set.add(new Person("Party",19));
        System.out.println(set);
    }


}

class Person implements Comparable{
    String name;
    int age;

    public Person(String name, int age) {
        this.name = name;
        this.age = age;
    }

    @Override
    public boolean equals(Object o) {
        if (this == o) return true;
        if (o == null || getClass() != o.getClass()) return false;
        Person person = (Person) o;
        return age == person.age && Objects.equals(name, person.name);
    }

    @Override
    public int hashCode() {
        return Objects.hash(name, age);
    }

    @Override
    public String toString() {
        return "Person{" +
                "name='" + name + '\'' +
                ", age=" + age +
                '}';
    }

    public String getName() {
        return name;
    }

    public void setName(String name) {
        this.name = name;
    }

    public int getAge() {
        return age;
    }

    public void setAge(int age) {
        this.age = age;
    }

    Person(){

    }

    //按照姓名从小到达排序
    @Override
    public int compareTo(Object o) {
        if(o instanceof Person){
            Person person = (Person) o;
            int order = -this.name.compareTo(person.name);
            if(order != 0){
                return order;
            }else{
                return Integer.compare(this.age,person.age);
            }
        }
        throw new RuntimeException("输入类型不匹配");
    }
}
set重要题,要理解的
HashSet set = new HashSet();
Person p1 = new Person(1001,"AA");
Person p2 = new Person(1002,"BB");
set.add(p1);
set.add(p2);
p1.name = "CC";
set.remove(p1);
System.out.println(set);
set.add(new Person(1001,"CC"));
System.out.println(set);
set.add(new Person(1001,"AA"));
System.out.println(set);
//其中Person类中重写了hashCode()和equal()方法
结果如下:

Map的实现类的结构
DEFAULT_INITIAL_CAPACITY : HashMap的默认容量,16
MAXIMUM_CAPACITY : HashMap的最大支持容量,2的30次方
DEFAULT_LOAD_FACTOR:HashMap的默认加载因子 ,0.75
TREEIFY_THRESHOLD:Bucket中链表长度大于该默认值,转化为红黑树 8
UNTREEIFY_THRESHOLD:Bucket中红黑树存储的Node小于该默认值,转化为链表 MIN_TREEIFY_CAPACITY:桶中的Node被树化时最小的hash表容量。(当桶中Node的 数量大到需要变红黑树时,若hash表容量小于MIN_TREEIFY_CAPACITY时 64,此时应执行 resize扩容操作这个MIN_TREEIFY_CAPACITY的值至少是TREEIFY_THRESHOLD的4 倍。)
table:存储元素的数组,总是2的n次幂 entrySet:存储具体元素的集
size:HashMap中存储的键值对的数量
modCount:HashMap扩容和结构改变的次数。
threshold:扩容的临界值,=容量*填充因子 loadFactor:填充因子
package com.atigo.java.SetMapCollection;
import org.junit.Test;
import java.io.FileInputStream;
import java.util.*;
/**
* 一、Map的实现类的结构
* |---Map:双列数据,存储key-value对的数据 ---类似于高中的函数 : y=f(x)
* |---HashMap:作为Map的主要实现类,1.2,线程不安全,效率高,可以存储null的key和value
* |---LinkedHashMap: 保证遍历map元素的时候,可以按照添加的顺序实现遍历。
* 原因:在原有的HashMap底层结构基础上,添加了一对指针,表明指向前一个和后一个元素
* 对于频繁的遍历操作,此类执行效率高于HashMap。
* |---TreeMap:可以按照添加的key-value对进行排序,是西安排序遍历。此时考虑key的自然排序或定制排序。
* 底层使用红黑树
* |---Hashtable:古老实现类,1.0,线程安全,效率低,不能存储null的key和value
* |---Properties:常用来处理配置文件,key和value都是String类型
*
* HashMap底层:数组+链表(jdk7之前)
* 数组+链表+红黑树(jdk8)
*
* 面试题:
* 1.HashMap底层原理
* 2.HashMap和Hashtable异同
* 3.CurrentHashMap 与Hashtable 异同
*
* 二、Map结构的理解
* Map中的key:无序的,不可重复的,使用Set存储所有的key ---> 要求key所在的类重写equals() 和hashcode() 方法(以hashmap为例,treemap还有自然排序和定制排序)
* Map中的value:无序的,可重复的,使用Collection存储所有的value ---> 重写equals(),用来判断是否contains
* 一个键值对:key-value构成了一个Entry对象。
* Map中的Entry也是无序的,不可重复的,使用Set存储所有的entry
*
* 三、HashMap的底层原理?以jdk7为例
* HashMap map = new HashMap();
* 在实例化以后,底层创建了长度为16的一维数组Entry[] table
* ...执行多次put...
* map.put(k1,v1)
* 首先计算k1的hash值,调用k1所在类的方法hashCode()计算hash值,此hash值经过算法计算以后,得到在Entry数组中的存放位置
* 如果此位置上的数据为空,此时k1-v1添加成功 ---情况1
* 如果此位置上的数据不为空,证明此位置存在一个或多个数据(以链表形式存在),比较k1和已经存在的一个或多个数据的hash值
* 如果:k1的hash值与已经存在的数据的hash值都不相同,此时k1-value1添加成功 ---情况2
* 如果k1的hash值和已经存在的某一个数据(k2-v2)的hash值相同,继续比较:调用k1所在类的equals()方法,比较:
* 如果equals()返回false:此时k1-v1添加成功 ---情况3
* 如果equals()返回true:将使用v1替换相同key的value值
*
* 补充:关于情况2和情况3:此时k1-v1和原来的数据以链表的方式存储
* jdk7和jdk8,添加元素位置不一样,七上八下
*
* 在添加过程中扩容问题,当超出临界值(且要存放的位置非空)时,扩容。默认的扩容方式扩容为原来容量的二倍,并且将原有内容复制过来
*
* jdk8相较于jdk7的不同?
* 1.new HashMap():底层没有创建一个长度为16的Entry数组
* 2.jdk8中底层是:Node[],而非Entry[]
* 3.首次调用put方法时底层创建长度为16的数组
* 4.jdk7底层结构只有:数组+链表,jdk8底层结构有:数组+链表+红黑树
* 当数组的某一个索引位置的元素存在的数据个数 >8 且当前数组长度 >64 时,此时索引位置上的所有数据改为使用红黑树存储
*
* 四、LinkedHashMap的底层实现原理(了解)
* 源码中
* static class Entry<K,V> extends HashMap.Node<K,V> {
* Entry<K,V> before, after;//能够记录添加的元素的先后顺序
* Entry(int hash, K key, V value, Node<K,V> next) {
* super(hash, key, value, next);
* }
* }
* 注:set的元素为map的key,value指向同一个present,present为一个object无参对象
*
* 五、map中定义的方法
* 添加、删除、修改操作:
* Object put(Object key,Object value):将指定key-value添加到(或修改)当前map对象中
* void putAll(Map m):将m中的所有key-value对存放到当前map中
* Object remove(Object key):移除指定key的key-value对,并返回value
* void clear():清空当前map中的所有数据
* 元素查询的操作:
* Object get(Object key):获取指定key对应的value
* boolean containsKey(Object key):是否包含指定的key
* boolean containsValue(Object value):是否包含指定的value
* int size():返回map中key-value对的个数
* boolean isEmpty():判断当前map是否为空
* boolean equals(Object obj):判断当前map和参数对象obj是否相等
* 元视图操作的方法:
* Set keySet():返回所有key构成的Set集合
* Collection values():返回所有value构成的Collection集合
* Set entrySet():返回所有key-value对构成的Set集合
*
* @author hjm
*/
public class MapTest {
//Properties:常用来处理配置文件,key和value都是String类型
@Test
public void test7() throws Exception {
Properties properties = new Properties();
FileInputStream fis = new FileInputStream("C:\\Users\\胡余生\\IdeaProjects\\untitled\\jdbc.properties");
properties.load(fis);//加载流对应的文件
String name = properties.getProperty("name");
String password = properties.getProperty("password");
System.out.println(name+" "+password);
}
//向TreeMap中添加key-value,要求key必须是由同一个类创建的对象
//因为要按照key进行排序,自然排序,定制排序
//自然排序的类要继承comparable接口,重写了compareTo方法
//定制排序,添加参数new Comparator
@Test
public void test6(){
}
/*
* 元视图操作的方法:
* Set keySet():返回所有key构成的Set集合
* Collection values():返回所有value构成的Collection集合
* Set entrySet():返回所有key-value对构成的Set集合
*/
@Test
public void test5(){
Map map = new HashMap();
map.put("AA",123);
map.put(45,123);
map.put("BB",56);
map.put("AA",87);
//遍历所有的key元素,keySet()
Set set = map.keySet();
Iterator iterator = set.iterator();
while(iterator.hasNext()){
System.out.println(iterator.next());
}
//遍历所有的value,values()
Collection values = map.values();
for(Object i : values){
System.out.println(i);
}
//遍历所有key-value
//方式一、emtrySet()
Set entrySet = map.entrySet();
Iterator iterator1 = entrySet.iterator();
while(iterator1.hasNext()){
Object obj = iterator1.next();
//entrySet集合中的元素都是entry
Map.Entry entry = (Map.Entry)obj;
System.out.println(entry.getKey()+" "+entry.getValue());
}
//方式二、
Set keySet = map.keySet();
Iterator iterator2 = set.iterator();
while(iterator2.hasNext()){
System.out.println(map.get(iterator2.next()));
}
}
/*
* 元素查询的操作:
* Object get(Object key):获取指定key对应的value
* boolean containsKey(Object key):是否包含指定的key
* boolean containsValue(Object value):是否包含指定的value
* int size():返回map中key-value对的个数
* boolean isEmpty():判断当前map是否为空
* boolean equals(Object obj):判断当前map和参数对象obj是否相等
*/
@Test
public void test4(){
Map map = new HashMap();
map.put("AA",123);
map.put(45,123);
map.put("BB",56);
map.put("AA",87);
//Object get(Object key)
System.out.println(map.get("AA"));
//containsKey(Object key)
System.out.println(map.containsKey("AA"));
//boolean containsValue(Object value):是否包含指定的value
System.out.println(map.containsValue(87));
//boolean isEmpty():判断当前map是否为空
System.out.println(map.isEmpty());
}
/*
* 添加、删除、修改操作:
* Object put(Object key,Object value):将指定key-value添加到(或修改)当前map对象中
* void putAll(Map m):将m中的所有key-value对存放到当前map中
* Object remove(Object key):移除指定key的key-value对,并返回value
* void clear():清空当前map中的所有数据
*/
@Test
public void test3(){
Map map = new HashMap();
map.put("AA",123);
map.put(45,123);
map.put("BB",56);
map.put("AA",87);
System.out.println(map);
Map map1 = new HashMap();
map1.put("CC",123);
map1.put("DD",123);
map.putAll(map1);
System.out.println(map);
//remove(Object key)
Object value = map.remove("CC");
System.out.println(value);
System.out.println(map);
//clear() 与map = null 操作不同
map.clear();
System.out.println(map.size());
System.out.println(map);
}
@Test
public void test2(){
Map map = new LinkedHashMap();
map.put(123,"AA");
map.put(345,"BB");
map.put(12,"CC");
System.out.println(map);
}
@Test
public void test1(){
Map map = new HashMap();
map.put(null,123);
map.put(123,null);
}
}
Collections:操作Collection,Map的工具类
package com.atigo.java.SetMapCollection;

import org.junit.Test;

import java.util.ArrayList;
import java.util.Arrays;
import java.util.Collections;
import java.util.List;

/**
 * Collections:操作Collection,Map的工具类
 *
 * Collections 中提供了一系列静态的方法对集合元素进行排序、查询和修改等操作,
 * 还提供了对集合对象设置不可变、对集合对象实现同步控制等方法
 * 排序操作:(均为static方法)
 *  reverse(List):反转 List 中元素的顺序
 *  shuffle(List):对 List 集合元素进行随机排序
 *  sort(List):根据元素的自然顺序对指定 List 集合元素按升序排序
 *  sort(List,Comparator):根据指定的 Comparator 产生的顺序对 List 集合元素进行排序
 *  swap(List,int, int):将指定 list 集合中的 i 处元素和 j 处元素进行交换
 *
 * 查找、替换
 *  Object max(Collection):根据元素的自然顺序,返回给定集合中的最大元素
 *  Object max(Collection,Comparator):根据 Comparator 指定的顺序,返回给定集合中的最大元素
 *  Object min(Collection)
 *  Object min(Collection,Comparator)
 *  int frequency(Collection,Object):返回指定集合中指定元素的出现次数
 *  void copy(List dest,List src):将src中的内容复制到dest中
 *  boolean replaceAll(List list,Object oldVal,Object newVal):使用新值替换List 对象的所有旧值
 *
 *
 *
 * @author hjm
 */
public class CollectionsTest {

    @Test
    public void test2(){
        List list = new ArrayList();
        List listcopy = new ArrayList();
        list.add(123);
        list.add(123);
        list.add(123);
        list.add(12);
        list.add(23);
        list.add(13);
        list.add(42);
        //错误写法,报异常throw new IndexOutOfBoundsException("Source does not fit in dest");
        //Collections.copy(listcopy,list);
        //正确写法
        listcopy = Arrays.asList(new Object[list.size()]);
        Collections.copy(listcopy,list);
        System.out.println(listcopy);

        /*
        * Collections 类中提供了多个 synchronizedXxx() 方法,该方法可使将指定集合包装成线程同步的集合,从而可以解决多线程并发访问集合时的线程安全问
        *
        * */
        //反回的值就是线程安全的list,其他的map,set等同理
        List list1 = Collections.synchronizedList(list);


    }


    @Test
    public void test1(){
        List list = new ArrayList();
        list.add(123);
        list.add(123);
        list.add(123);
        list.add(12);
        list.add(23);
        list.add(13);
        list.add(42);
        System.out.println(list);
        Collections.reverse(list);
        System.out.println(list);
        Collections.shuffle(list);
        System.out.println(list);
        Collections.sort(list);
        System.out.println(list);
        Collections.swap(list,1,2);
        System.out.println(list);
        int num = Collections.frequency(list,123);
        System.out.println(num);

    }
}
泛型
package com.atigo.java.fanxing;
import org.junit.Test;
import java.util.*;
/**
* 泛型的使用
* 1. jdk5.0新增的特性
*
* 2.在集合中使用泛型
* 总结:
* 1.集合接口或者集合类在jdk5.0时都修改为带泛型的结构
* 2.在实例化集合类时,可以指明具体的泛型类型
* 3.指明完以后,在集合或者接口中凡是定义类或者接口时,内部类结构(比如:方法,构造器,属性等)使用到类的泛型的位置,都指定为实例化的泛型
* 如:add(E e) ----> 实例化以后:add(Integer integer)
* 4.注意点:泛型的类型必须是类,不能是基本类型,需要用到基本类型拿包装类替换
* 5.如果实例化时,没有指明泛型类型,默认类型为java.lang.Object类型。
*
* 3.如何自定义泛型结构:泛型类,泛型接口,泛型方法
* 1.关于自定义泛型类,泛型接口
* 总结:
* 1. 泛型类可能有多个参数,此时应将多个参数一起放在尖括号内。比如:<E1,E2,E3>
* 2. 泛型类的构造器如下:public GenericClass(){}。而下面是错误的:public GenericClass<E>(){}
* 3. 实例化后,操作原来泛型位置的结构必须与指定的泛型类型一致。
* 4. 泛型不同的引用不能相互赋值。
* >尽管在编译时ArrayList<String>和ArrayList<Integer>是两种类型,但是,在运行时只有一个ArrayList被加载到JVM中。
* 5. 泛型如果不指定,将被擦除,泛型对应的类型均按照Object处理,但不等价于Object。经验:泛型要使用一路都用。要不用,一路都不要用。
* 6. 如果泛型结构是一个接口或抽象类,则不可创建泛型类的对象。
* 7. jdk1.7,泛型的简化操作:ArrayList<Fruit> flist = new ArrayList<>();
* 8. 泛型的指定中不能使用基本数据类型,可以使用包装类替换。
* 9. 在类/接口上声明的泛型,在本类或本接口中即代表某种类型,可以作为非静态属性的类型、非静态方法的参数类型、非静态方法的返回值类型。但在静态方法中不能使用类的泛型。
* 10. 异常类不能是泛型的
* 11. 不能使用new E[]。但是可以:E[] elements = (E[])new Object[capacity];
* 参考:ArrayList源码中声明:Object[] elementData,而非泛型参数类型数组。
* 12.父类有泛型,子类可以选择保留泛型也可以选择指定泛型类型:
* 子类不保留父类的泛型:按需实现
* 没有类型 擦除
* 具体类型
* 子类保留父类的泛型:泛型子类
* 全部保留
* 部分保留
* 结论:子类必须是“富二代”,子类除了指定或保留父类的泛型,还可以增加自己的泛型
*
*
* @author hjm
*/
public class GenericTest {
@Test
public void test5(){
}
@Test
public void test4(){
//如果定义了泛型类,实例化没有指明类的泛型,则认为此泛型类为Object类型。
//要求:如果大家定义了类是带泛型的,建议在实例化时要指明类的泛型。
Order order = new Order();
order.setOrderT(123);
//建议:实例化时指明类的泛型
Order<String> order1 = new Order<>("OrderAA",1001,"orderAA");
order1.setOrderT("AA:hello");
SubOrder subOrder = new SubOrder();
//子类在继承带泛型的父类时,指明了泛型的类型,则实例化子类对象时不需要指明泛型
subOrder.setOrderT(123);
SubOrder1<String> subOrder1 = new SubOrder1<>();
subOrder1.setOrderT("AAA");
}
//在集合中使用泛型之前的情况:
@Test
public void test1(){
ArrayList list = new ArrayList();
//存放学生成绩
list.add(78);
list.add(89);
list.add(98);
list.add(87);
//问题一:类型不安全
list.add("Tom");
for(Object obj : list){
//问题二:强制转换时,可能出现ClassCastException
int sub = (int) obj;
System.out.println(sub);
}
}
@Test
public void test2(){
ArrayList<Integer> list = new ArrayList<Integer>();
//编译时进行类型检查,保证数据安全
list.add(123);
for(Integer i : list){
int test = i;
System.out.println(test);
}
}
//泛型在集合中的应用
@Test
public void test3(){
Map<String,Integer> map = new HashMap<>();
map.put("Tom",98);
map.put("jem",67);
map.put("mary",98);
//泛型嵌套
Set<Map.Entry<String,Integer>> entry = map.entrySet();
Iterator<Map.Entry<String, Integer>> iterator = entry.iterator();
while(iterator.hasNext()){
Map.Entry<String, Integer> next = iterator.next();
String key = next.getKey();
Integer score = next.getValue();
System.out.println(key+"------"+score);
}
}
}
package com.atigo.java.fanxing;

/**
 * 自定义泛型类
 * @author hjm
 * T,E,K,V
 * 一般K,V是键值
 * 自己写一般写一个T或者E就好
 *
 */
public class Order<T> {
    String name;
    int orderId;
    //类的内部结构就可以使用类的泛型
    T orderT;
    public Order(){
        //编译不通过
        //T[] we = new T[10];
        //编译通过
        //T[] arr = (T[]) new Object[10];
    }

    public Order(String name, int orderId, T orderT) {
        this.name = name;
        this.orderId = orderId;
        this.orderT = orderT;
    }

    public String getName() {
        return name;
    }

    public void setName(String name) {
        this.name = name;
    }

    public int getOrderId() {
        return orderId;
    }

    public void setOrderId(int orderId) {
        this.orderId = orderId;
    }

    public T getOrderT() {
        return orderT;
    }

    public void setOrderT(T orderT) {
        this.orderT = orderT;
    }

    @Override
    public String toString() {
        return "Order{" +
                "name='" + name + '\'' +
                ", orderId=" + orderId +
                ", orderT=" + orderT +
                '}';
    }
}
package com.atigo.java.fanxing;

/**
 * @author hjm
 */
public class SubOrder extends Order<Integer>{
}
package com.atigo.java.fanxing;

/**
 * @author hjm
 */
public class SubOrder1<T> extends Order<T>{//SubOrder1<T> 仍然是泛型类

}
class Father<T1, T2> {
}

// 子类不保留父类的泛型
// 1)没有类型 擦除
class Son1 extends Father {// 等价于class Son extends Father<Object,Object>{
}

// 2)具体类型
class Son2 extends Father<Integer, String> {
}

// 子类保留父类的泛型
// 1)全部保留
class Son3<T1, T2> extends Father<T1, T2> {
}

// 2)部分保留
class Son4<T2> extends Father<Integer, T2> {
}

class Father<T1, T2> {
}

// 子类不保留父类的泛型
// 1)没有类型 擦除
class Son<A, B> extends Father{//等价于class Son extends Father<Object,Object>{
}

// 2)具体类型
class Son2<A, B> extends Father<Integer, String> {
}

// 子类保留父类的泛型
// 1)全部保留
class Son3<T1, T2, A, B> extends Father<T1, T2> {
}

// 2)部分保留
class Son4<T2, A, B> extends Father<Integer, T2> {
}
class Person<T> {
    // 使用T类型定义变量
    private T info;
    // 使用T类型定义一般方法
    public T getInfo() {
    	return info;
    }
    public void setInfo(T info) {
    	this.info = info;
    }
    // 使用T类型定义构造器
    public Person() {
    }
    public Person(T info) {
    	this.info = info;
    }
        // static的方法中不能声明泛型
    //public static void show(T t) {
    //
    //}
    // 不能在try-catch中使用泛型定义
    //public void test() {
        //try {
        //
        //} catch (MyException<T> ex) {
        //
        //}
    //}
}
jdk7特性,前边写了泛型后边就不用写了,类型推断
ArrayList<Integer> list = new ArrayList<Integer>();
ArrayList<Integer> list = new ArrayList<>();
泛型方法
package com.atigo.java.fanxing;

import java.util.ArrayList;
import java.util.List;

/**
 * @author hjm
 */
public class GenericMethod<T> {
    String name;
    int orderId;
    //类的内部结构就可以使用类的泛型
    T orderT;

    public GenericMethod() {
    }

    public GenericMethod(String name, int orderId, T orderT) {
        this.name = name;
        this.orderId = orderId;
        this.orderT = orderT;
    }

    public String getName() {
        return name;
    }

    public void setName(String name) {
        this.name = name;
    }

    public int getOrderId() {
        return orderId;
    }

    public void setOrderId(int orderId) {
        this.orderId = orderId;
    }

    //如下方法都不是泛型方法
    public T getOrderT() {
        return orderT;
    }

    public void setOrderT(T orderT) {
        this.orderT = orderT;
    }

    @Override
    public String toString() {
        return "GenericMethod{" +
                "name='" + name + '\'' +
                ", orderId=" + orderId +
                ", orderT=" + orderT +
                '}';
    }

    //泛型方法:在方法中出现了泛型的结构,泛型的参数于类的泛型参数没有任何关系。
    //换句话说:泛型方法所属的类与该类是不是泛型类没有关系
    //泛型方法可以声明为静态的,原因:泛型参数是在调用方法时确定的,并非是在实例化类时确定的。
    public static <E> List<E> copyFromArrayToList(E[] arr){
        ArrayList<E> arrayList = new ArrayList<>();
        for(E o : arr){
            arrayList.add(o);
        }
        return arrayList;
    }
}
package com.atigo.java.fanxing;

import org.junit.Test;

import java.util.List;

/**
 * @author hjm
 */
public class TestMethod {
    @Test
    public void test(){
        GenericMethod<String> genericMethod = new GenericMethod<>();
        Integer[] arr = new Integer[]{1,2,3,4};
        //泛型方法在调用的时候,指明泛型参数的类型。
        List<Integer> integers = genericMethod.copyFromArrayToList(arr);
        System.out.println(integers);

    }
}
泛型在数据库方面的应用
package com.atigo.java.fanxing.shili;

/**
 * @author hjm
 */
public class DAO<T> {//表的共性操作的DAO
    //添加一条记录
    public void add(T a){

    }
    //删除一条记录
    public boolean remove(T o){
        return false;
    }
    //。。。。。
}
package com.atigo.java.fanxing.shili;

/**
 * @author hjm
 */
public class CustomerDAO extends DAO<Customer>{//只能操作某一个表的DAO

}
package com.atigo.java.fanxing.shili;

/**
 * @author hjm
 */
public class Customer {  //此类对应数据库中的customer表
}
package com.atigo.java.fanxing.shili;

import org.junit.Test;

/**
 * @author hjm
 */
public class DAOTest {
    @Test
    public void test(){
        CustomerDAO customerDAO = new CustomerDAO();
        customerDAO.add(new Customer());
    }

}
泛型在继承方面的体现,以及通配符
package com.atigo.java.fanxing.GenericExtends;

import org.junit.Test;

import java.util.ArrayList;
import java.util.Iterator;
import java.util.List;

/**
 * 1.泛型在继承方面的体现
 *
 *
 * 2.通配符的使用
 * @author hjm
 */
public class GenericExtendTest {
    /*
    * 1.泛型在继承方面的体现
    *
    * 虽然类A是类B的父亲,但是G<A>和G<B> 二者不具备子父类关系,二者是并列关系,二者共同的父类是 : G<?>
    * 补充类A是类B的父亲,A<G>和B<G>  是子父类关系   */
    @Test
    public void test1(){
        Object obj = new Object();
        String str = "AA";
        obj = str;
        Object[] arr1 = null;
        String[] arr2 = null;

        arr1 = arr2;

        List<Object> list1 = null;
        List<String> list2 = null;
        //此时的list1和list2不具备子父类关系
        //list1 = list2;
        List<String> list3 = null;
        ArrayList<String> list4 = null;
        list3 = list4;

    }

    //通配符的使用
    //通配符  ?
    //虽然类A是类B的父亲,但是G<A>和G<B> 二者共同的父类是 : G<?>
    @Test
    public void test2(){
        List<Object> list1 = null;
        List<String> list2 = null;
        List<?> list = null;
        list = list1;
        list = list2;
        //编译通过的
        //print(list1);
        List<String> list3 = new ArrayList<>();
        list3.add("AA");
        list3.add("AA");
        list3.add("AA");
        list = list3;
        //添加: 对于List<?>,不能向list里添加数据,除了添加null
        list.add(null);
        //读取: 允许读取数据,读取数据的类型是Object。
        Object o = list.get(0);
        System.out.println(o);
    }

    public void print(List<?> list){
        Iterator<?> iterator = list.iterator();
        while(iterator.hasNext()){
            Object obj = iterator.next();
            System.out.println(obj);
        }
    }

    /*
    * 3.有限制条件的通配符的使用
    *   ?extends A :
    *           G<? extends A> 可以作G<A>和G<B>的父类,其中B是A的子类
    *   ? super A  :
    *           G<? super A> 可以作为G<A>和G<B>的父类,其中B是A的父类
    */
    @Test
    public void test4(){
        List<? extends Person> list1 = null;
        List<? super Person> list2 = null;
        List<Student> list3 = new ArrayList<>();
        List<Person> list4 = new ArrayList<>();
        List<Object> list5 = new ArrayList<>();
        //extends  可以理解为 小于等于<=
        list1 = list3;
        list1 = list4;
        //list1 = list5;

        //super   可以理解为 大于等于>=
        //list2 = list3;
        list2 = list4;
        list2 = list5;

        //读数据
        list1 = list4;
        Person p = list1.get(0);
        //编译不通过
        //Student s = list1.get(0);
        list2 = list4;
        Object obj = list2.get(0);
        //编译不通过
        //Person pp = list2.get(0);


        //写入数据
        //编译不通过,有可能?比student还小
        //list1.add(new Student());

        //? 大于等于 Person  person和perso子类可以加入
        list2.add(new Person());
        list2.add(new Student());

    }


}
package com.atigo.java.fanxing.GenericExtends;

/**
 * @author hjm
 */
public class Person {
}
package com.atigo.java.fanxing.GenericExtends;

/**
 * @author hjm
 */
public class Student extends Person{
}
File类
package com.atigo.java.IOStream;
import org.junit.Test;
import java.io.File;
import java.io.IOException;
import java.util.Date;
/**
* File类的使用
* 1. File类的对象就代表一个文件或者文件目录(俗称文件夹)
* File(String filePath)
* File(String parentPath)
*
* 2. File类声明在IO包下
* 3. File类中涉及到的相关文件或者文件目录的创建,删除,重命名,修改时间,文件大小等方法,
* 并未涉及到写入或者读取文件内容的操作,如果需要读取或者写入文件内容,必须使用IO流完成
* 4. 后续File类的对象常会作为参数传递到流的构造器中,指明读取或者写入的”终点“。
*
*
* @author hjm
*/
public class FileTest {
/*
* 1.如何创建获取一个File类
* File(String filePath)
* File(String parentPath,String childPath)
* File(File parentFile,String childPath)
* 2.相对路径,绝对路径
* 3.路径分隔符
* windows:\\
* linux:/
*/
@Test
public void test1(){
//构造器一
File file = new File("helloword.txt");
System.out.println(file);
//构造器二
File file2 = new File("./dir","Java");
System.out.println(file2);
//构造器三
File file3 = new File(file2,"hi.txt");
System.out.println(file3);
}
/*
* File类的获取功能
* public String getAbsolutePath():获取绝对路径
* public String getPath() :获取路径
* public String getName() :获取名称
* public String getParent():获取上层文件目录路径。若无,返回null
* public long length() :获取文件长度(即:字节数)。不能获取目录的长度。
* public long lastModified() :获取最后一次的修改时间,毫秒值
* public String[] list() :获取指定目录下的所有文件或者文件目录的名称数组
* public File[] listFiles() :获取指定目录下的所有文件或者文件目录的File数组
* File类的重命名功能
* public boolean renameTo(File dest):把文件重命名为指定的文件路径
*/
@Test
public void test2(){
File file1 = new File("hello.txt");
File file2 = new File("d:\\123\\hi.txt");
System.out.println(file1.getAbsolutePath());
System.out.println(file1.getPath());
System.out.println(file1.getName());
System.out.println(file1.getParent());
System.out.println(file1.length());
System.out.println(file1.lastModified());
System.out.println(new Date(file1.lastModified()));
System.out.println("");
System.out.println(file2.getAbsolutePath());
System.out.println(file2.getPath());
System.out.println(file2.getName());
System.out.println(file2.getParent());
System.out.println(file2.length());
System.out.println(file2.lastModified());
}
@Test
public void test4(){
File dir = new File("D:\\123");
//获取文件目录包含的目录和文件名字
String[] list = dir.list();
for(String i : list){
System.out.println(i);
}
File[] files = dir.listFiles();
for(File f : files){
System.out.println(f);
}
}
/* File类的重命名功能
* public boolean renameTo(File dest):把文件重命名为指定的文件路径
* file1.renameTo(file2)为例
* 要想保证成功,需要保证file1存在,file2不存在
*/
@Test
public void test5(){
File file1 = new File("hello.txt");
File file2 = new File("D:\\123\\hi.txt");
boolean b = file2.renameTo(file1);
System.out.println(b);
}
/*
* File类的判断功能
* public boolean isDirectory():判断是否是文件目录
* public boolean isFile() :判断是否是文件
* public boolean exists() :判断是否存在
* public boolean canRead() :判断是否可读
* public boolean canWrite() :判断是否可写
* public boolean isHidden() :判断是否隐藏
*/
@Test
public void test6(){
File file1 = new File("hello.txt");
File file2 = new File("D:\\123\\hi.txt");
System.out.println(file1.isDirectory());
System.out.println(file1.isFile());
System.out.println(file1.exists());
System.out.println(file1.canWrite());
System.out.println(file1.canRead());
System.out.println(file1.isHidden());
}
/*
* File类的创建功能
* public boolean createNewFile() :创建文件。若文件存在,则不创建,返回false
* public boolean mkdir() :创建文件目录。如果此文件目录存在,就不创建了。如果此文件目录的上层目录不存在,也不创建。
* public boolean mkdirs() :创建文件目录。如果上层文件目录不存在,一并创建注意事项:如果你创建文件或者文件目录没有写盘符路径,那么,默认在项目路径下。
* File类的删除功能
* public boolean delete():删除文件或者文件夹,删除注意事项:Java中的删除不走回收站。
* 要删除一个文件目录,请注意该文件目录内不能包含文件或者文件目录
*/
@Test
public void test7() throws IOException {
//文件创建
File file1 = new File("hi.txt");
if(!file1.exists()){
file1.createNewFile();
System.out.println("创建成功");
}else{
file1.delete();
System.out.println("删除成功");
}
//文件目录创建
File file2 = new File("hi");
boolean mkdir = file2.mkdir();
if(mkdir){
System.out.println("创建成功");
}
File file3 = new File("op/op/li");
boolean mkdir1 = file3.mkdirs();
if(mkdir1){
System.out.println("创建成功");
}
}
}
IO流
流的分类
按操作数据单位不同分为:字节流(8 bit),字符流(16 bit)
文本一般用字符流,视频,图片等一般用字节流
按数据流的流向不同分为:输入流,输出流
按流的角色的不同分为:节点流,处理流
直接作用在文件上叫做节点流
作用在已有流的基础上叫做处理流
| (抽象基类) | 字节流 | 字符流 |
|---|---|---|
| 输入流 | InputStream | Reader |
| 输出流 | OutputStream | Writer |
IO流体系
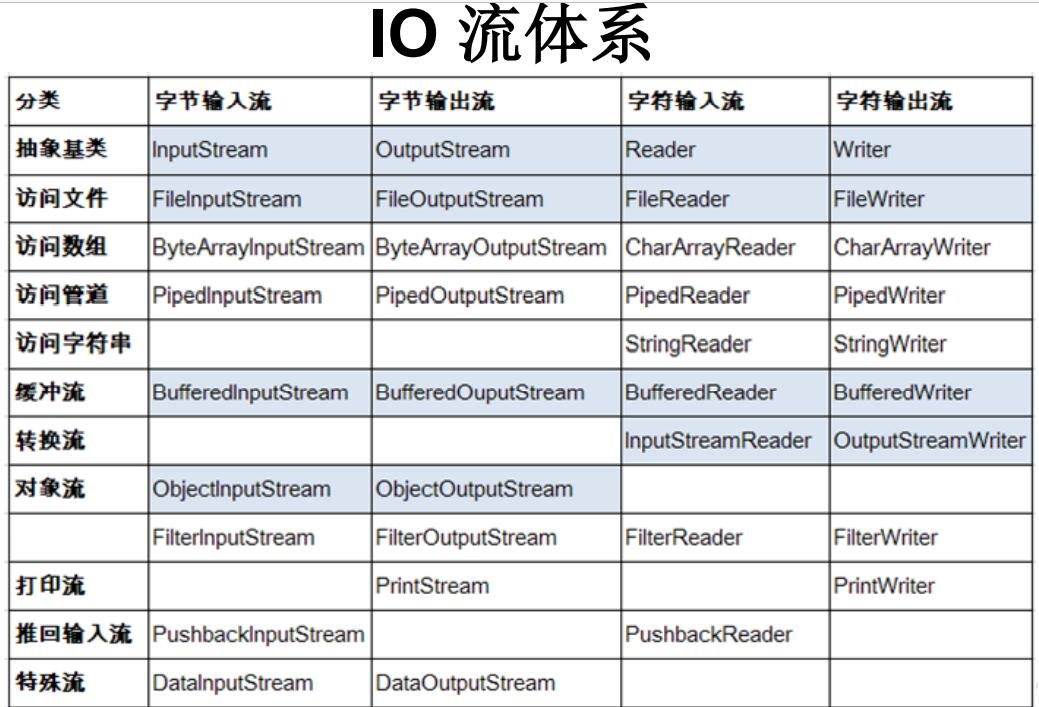
其中访问文件的流(第三行)是节点流,其他的都是处理流
package com.atigo.java.IOStream;

import org.junit.Test;

import java.io.*;

/**
 * 一、流的分类
 * 1.操作数据单位:字节流,字符流
 * 2.数据的流向:输入流,输出流
 * 3.流的角色:节点流和处理流
 *
 * 二、流的体系结构
 * 抽象基类                节点流(或文件流)                                    缓冲流(处理流的一种)
 * InputStream    字节流   FileInputStream (read(byte[] buffer)               BufferedInputStream (read(byte[] buffer)
 * OutputStream   字节流   FileOutputStream (write(byte[] buffer,0,len))      BufferedOutputStream (write(byte[] buffer,0,len)) /  flush()
 * Reader         字符流   FileReader (read(char[] buff))                     BufferedReader (read(char[] buff) /readLine())
 * Writer         字符流   FileWriter (write(char[] cbuf,0,len))              BufferedWriter (write(char[] cbuf,0,len))    /  flush()
 *
 * 使用字符流不能处理图片和视频等二进制数据
 * 结论:
 *      1.对于文本文件(.txt,.java,.c,.cpp),使用字符流处理
 *      2.对于非文本文件(.jpg,.mp3,.mp4,.avi,.doc...),使用字节流处理
 * 使用字节流处理文本文件可能出现乱码,比如一个汉字占三个字节,如果剩余字节不够,汉字被拆成两半,就会乱码
 * 如果不是在内存中进行操作,输出到控制面板,只是将其复制到另一个文件中,不会乱码
 *
 * @author hjm
 */
public class FileReaderWriterTest {

    /*
    * 注意单元测试写的相对路径是相较于当前module
    * main方法里写的相对路径,是相对于当前project
    */
    @Test
    public void test1() {
        FileReader fr = null;
        /*
        * 异常处理,为了保证资源一定可以执行关闭操作,需要使用try-catch-finally处理*/
        try {
            /*读入文件,并输出到控制台*/
            File file = new File("hi.txt");
            //提供具体流
            fr = new FileReader(file);
            //数据读入
            //read()返回读入的字符,如果结尾了,就返回-1
            int read = fr.read();
            while(read != -1){
                System.out.print((char) read);
                read = fr.read();
            }
        } catch (IOException e) {
            e.printStackTrace();
        } finally {
            //4.流的关闭操作
            try {
                if(fr != null) {
                    fr.close();
                }
            } catch (IOException e) {
                e.printStackTrace();
            }
        }

    }

    /*
    * 对read()操作升级;使用read()重载方法*/
    @Test
    public void test2() {
        FileReader fr = null;
        try {
            //1.File类的实例化
            File file = new File("hi.txt");
            //2.FilReader流的实例化
            fr = new FileReader(file);
            //3.读入操作
            //read(char[] buffer) :返回每次读入buffer数组中的字符个数,如果到文件末尾,返回-1;
            //读数据的时候将新的数据覆盖老的数据,如果新的数据覆盖不满,缓冲数组将存在老的数据
            char[] buffer = new char[2];
            int len;
            while((len = fr.read(buffer)) != -1){
                for(int i =0;i<len;i++){
                    System.out.print(buffer[i]);
                }
            }
        } catch (IOException e) {
            e.printStackTrace();
        } finally {
            //4.资源流的关闭
            if(fr != null) {
                try {
                    fr.close();
                } catch (IOException e) {
                    e.printStackTrace();
                }
            }
        }


    }

    /*
    * 从内存写出到磁盘
    * 说明:
    * 1.输出操作,对应File可以不存在的,如果不存在,在输出过程中会自动创建
    * 2.如果存在,FileWriter(file) /FileWriter(file,false)进行覆盖,FileWriter(file,true)进行追加
    */
    @Test
    public void test3() {
        FileWriter fw = null;
        try {
            //1.提供File类对象,指明写出到文件
            File file = new File("hi1.txt");
            //2.提供FileWriter的对象,用于数据写出
            fw = new FileWriter(file,true);
            //3.写出操作
            fw.write("I have a dream");
        } catch (IOException e) {
            e.printStackTrace();
        } finally {
            if(fw != null){
                //资源关闭
                try {
                    fw.close();
                } catch (IOException e) {
                    e.printStackTrace();
                }
            }
        }


    }

    @Test
    public void test4() {
        FileReader fr = null;
        FileWriter fw = null;
        try {
            //1.创建File类对象,指明读入和写出的文件
            File scrFile = new File("hello.txt");
            File destFile = new File("hello2.txt");

            //2.创建流的对象
            fr = new FileReader(scrFile);
            fw = new FileWriter(destFile);

            //3.数据读入和写出操作
            char[] cbuf = new char[2];
            int len;//记录每次读入到cbuf数组中的字符的个数
            while((len = fr.read(cbuf)) != -1){
                //每次写出len哥字符
                fw.write(cbuf,0,len);
            }
        } catch (IOException e) {
            e.printStackTrace();
        } finally {
            //4.关闭流操作
            if(fw != null){
                try {
                    fw.close();
                } catch (IOException e) {
                    e.printStackTrace();
                }
            }
            if(fr != null){
                try {
                    fr.close();
                } catch (IOException e) {
                    e.printStackTrace();
                }
            }

        }


    }

    //使用字符流不能处理图片和视频等二进制数据
    //要用字节流处理
    @Test
    public void test6() {
        FileInputStream fileInputStream = null;
        try {
            //造file类
            File file = new File("hello.txt");
            //造流
            fileInputStream = new FileInputStream(file);
            //读数据
            byte[] buf = new byte[2];
            int len;
            while((len = fileInputStream.read(buf)) != -1){
                String str = new String(buf,0,len);
                System.out.print(str);
            }
        } catch (IOException e) {
            e.printStackTrace();
        } finally {
            if(fileInputStream != null){
                //关闭流
                try {
                    fileInputStream.close();
                } catch (IOException e) {
                    e.printStackTrace();
                }
            }
        }
    }

    /*
    * 实现对图片的复制*/
    @Test
    public void test7() {
        FileInputStream fis = null;
        FileOutputStream fos = null;
        try {
            //创建File类
            File srcFile = new File("123.jpg");
            File destFile = new File("23.jpg");
            //创建文件流
            fis = new FileInputStream(srcFile);
            fos = new FileOutputStream(destFile);

            //复制过程
            byte[] buf = new byte[2];
            int len;
            while((len = fis.read(buf)) != -1){
                fos.write(buf,0,len);
            }
        } catch (IOException e) {
            e.printStackTrace();
        } finally {
            //关闭操作
            if(fis != null) {
                try {
                    fis.close();
                } catch (IOException e) {
                    e.printStackTrace();
                }
            }
            if(fos != null) {
                try {
                    fos.close();
                } catch (IOException e) {
                    e.printStackTrace();
                }
            }
        }

    }

    //文件复制方法
    public void copy(String src,String dest){
        FileInputStream fis = null;
        FileOutputStream fos = null;
        try {
            //创建File类
            File srcFile = new File(src);
            File destFile = new File(dest);
            //创建文件流
            fis = new FileInputStream(srcFile);
            fos = new FileOutputStream(destFile);

            //复制过程
            byte[] buf = new byte[2];
            int len;
            while((len = fis.read(buf)) != -1){
                fos.write(buf,0,len);
            }
        } catch (IOException e) {
            e.printStackTrace();
        } finally {
            //关闭操作
            if(fis != null) {
                try {
                    fis.close();
                } catch (IOException e) {
                    e.printStackTrace();
                }
            }
            if(fos != null) {
                try {
                    fos.close();
                } catch (IOException e) {
                    e.printStackTrace();
                }
            }
        }
    }

    @Test
    public void test8(){
        long start = System.currentTimeMillis();
        copy("123.jpg","12.jpg");
        long end = System.currentTimeMillis();
        System.out.println(end-start);
    }


    /*
    * 处理流之一:缓冲流的作用
    *
    * 1.缓冲流:
    * BufferedInputStream
    * BufferedOutputStream
    * BufferedReader
    * BufferedWriter
    *
    * 2.作用:提高流的读取,写入速度
    *        原因:内部提供了一个缓冲区,读入内存8*1024,然后一次性写入
    *
    * 处理流就是套在已有的流的基础上的流
    */
    @Test
    public void test9() {
        /*
        * 非文本文件的复制
        */
        FileInputStream fis = null;
        FileOutputStream fos = null;
        BufferedInputStream bis = null;
        BufferedOutputStream bos = null;
        try {
            //1.造文件
            File file = new File("123.jpg");
            File destFile = new File("45.jpg");
            //2.1造流
            fis = new FileInputStream(file);
            fos = new FileOutputStream(destFile);

            //2.2造缓冲流
            bis = new BufferedInputStream(fis);
            bos = new BufferedOutputStream(fos);

            //3.复制细节,读取写入过程
            byte[] buf = new byte[4];
            int len;
            while((len = bis.read(buf)) != -1){
                bos.write(buf,0,len);
                //bos.flush();//将缓冲区数据写入文件
            }
        } catch (IOException e) {
            e.printStackTrace();
        } finally {
            //4.关闭流
            //要求:先关闭外层流,再关闭内层流
            //说明:再关闭外层流的时候,内层也会自动关闭,可以省略内层流关闭不写
            if(bis != null){
                try {
                    bis.close();
                } catch (IOException e) {
                    e.printStackTrace();
                }
            }
            if(bos != null) {
                try {
                    bos.close();
                } catch (IOException e) {
                    e.printStackTrace();
                }
            }

        }

    }

    /*
    * 使用BufferedReader和BufferedWriter实现文本文件的复制
    */
    @Test
    public void test10(){
        BufferedReader br = null;
        BufferedWriter bw = null;
        try {
            //创建文件以及相应的流
            br = new BufferedReader(new FileReader(new File("hello.txt")));
            bw = new BufferedWriter(new FileWriter(new File("hello10.txt")));
            /* 方式一:使用char[]数组
            //读写操作
            char[] buf = new char[1024];
            int len;
            while((len = br.read(buf)) != -1){
                bw.write(buf,0,len);
            }*/

            //方式二:使用String,注意该方法不包含换行符
            String data;
            while ((data = br.readLine()) != null){
                //方法一
                //bw.write(data+"\n");//data中不包含换行符
                //方法二
                bw.write(data);//data中不包含换行符
                bw.newLine();//提供换行的操作
            }
        } catch (IOException e) {
            e.printStackTrace();
        } finally {
            //关闭资源
            if(bw != null){
                try {
                    bw.close();
                } catch (IOException e) {
                    e.printStackTrace();
                }
            }
            if(br != null){
                try {
                    br.close();
                } catch (IOException e) {
                    e.printStackTrace();
                }
            }

        }


    }

}
转换流的使用
package com.atigo.java.IOStream;
import org.junit.Test;
import java.io.*;
/**
* 处理流之二:转换流的使用
* 1.转换流:属于字符流
* InputStreamReader:将一个字节的输入流转换为字符的输入流
* OutputStreamWriter:将一个字符的输出流,转换为字节的输出流
*
* 2.作用:提供字节流与字符流之间的转换
*
* 3.解码:字节、字节数组 ---> 字符数组、字符串
* 编码:字符数组、字符串 ---> 字节、字节数组
*
*
* 常见的编码表
* ASCII:美国标准信息交换码。
* 用一个字节的7位可以表示。
* ISO8859-1:拉丁码表。欧洲码表
* 用一个字节的8位表示。
* GB2312:中国的中文编码表。最多两个字节编码所有字符
* GBK:中国的中文编码表升级,融合了更多的中文文字符号。最多两个字节编码
* Unicode:国际标准码,融合了目前人类使用的所有字符。为每个字符分配唯一的
* 字符码。所有的文字都用两个字节来表示。
* UTF-8:变长的编码方式,可用1-4个字节来表示一个字符。
* @author hjm
*/
public class ChangeStream {
@Test
public void test1() {
InputStreamReader isr = null;//不写字符集使用系统默认的字符集
try {
FileInputStream fis = new FileInputStream("hello.txt");
//指明字符集,字符集为文件存放时使用的字符集
isr = new InputStreamReader(fis,"UTF-8");
char[] buf = new char[2];
int len;
while((len = isr.read(buf)) != -1){
String str = new String(buf,0,len);
System.out.print(str);
}
} catch (IOException e) {
e.printStackTrace();
} finally {
if(isr != null){
try {
isr.close();
} catch (IOException e) {
e.printStackTrace();
}
}
}
}
/*
* 综合使用InputStreamReader 和 OutputStreamWriter
* 更换编码方式
*/
@Test
public void test2(){
InputStreamReader isr = null;
OutputStreamWriter osw = null;
try {
File file1 = new File("hello.txt");
File file2 = new File("dest.txt");
FileInputStream fis = new FileInputStream(file1);
FileOutputStream fos = new FileOutputStream(file2);
isr = new InputStreamReader(fis,"UTF-8");
osw = new OutputStreamWriter(fos,"gbk");
char[] buf = new char[20];
int len;
while((len = isr.read(buf)) != -1){
osw.write(buf,0,len);
}
} catch (IOException e) {
e.printStackTrace();
} finally {
if(isr != null) {
try {
isr.close();
} catch (IOException e) {
e.printStackTrace();
}
}
if(osw != null) {
try {
osw.close();
} catch (IOException e) {
e.printStackTrace();
}
}
}
}
}
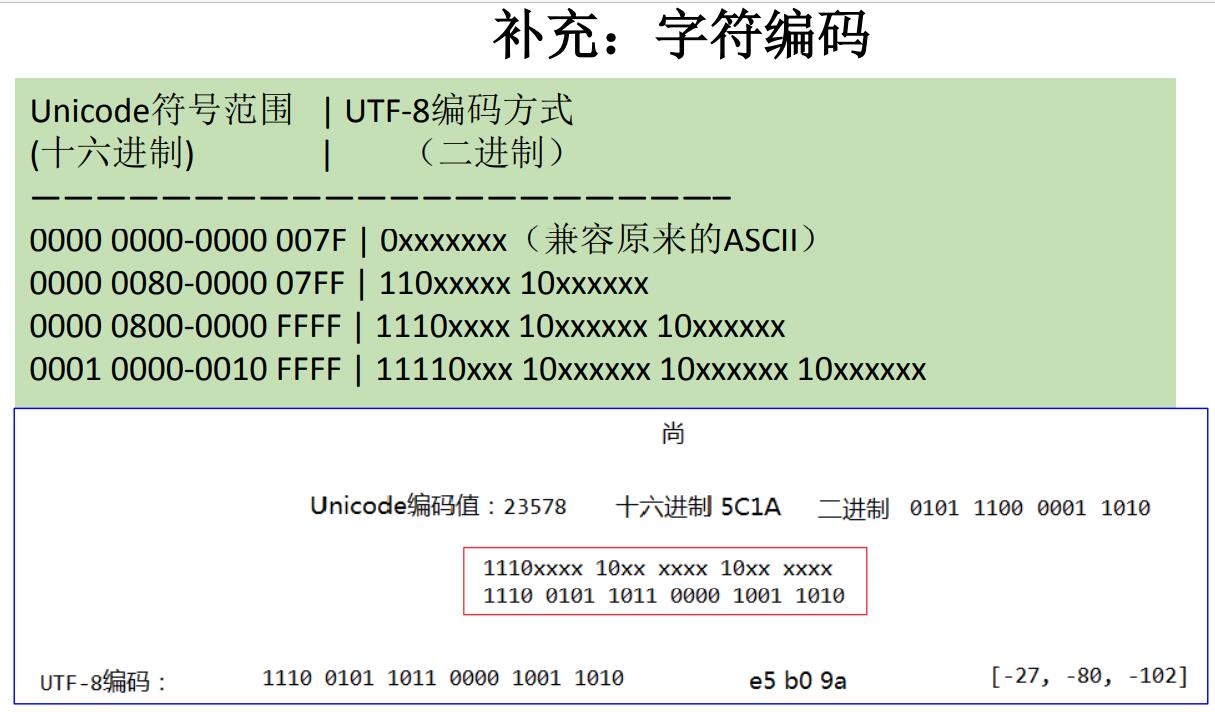
标准输入输出流
package com.atigo.java.IOStream;

import java.io.BufferedReader;
import java.io.IOException;
import java.io.InputStreamReader;

/**
 * 其他流的使用
 * 1.标准流的输入,输出流
 * 2.打印流
 * 3.数据流
 *
 * @author hjm
 */
public class OtherStream {
    /*
    * 1.标准的输入,输出流
    * 1.1
    * System.in:标准的输入流,默认从键盘输入,字节流
    * System.out:标准的输出流,默认从控制台输出
    * 1.2
    * System类的SetIn(InputStream is) / SetOut(PrintStream ps)方式重新指定输入和输出流
    * 1.3练习:从键盘输入字符串,要求将读取到的整行字符串转成大写输出。然后继续进行输入操作,直至当输入“e”或者“exit”时,退出程序。
    * 方法一:可以使用scanner实现,next返回一个字符串
    * 方法二:使用system.in实现, -> 转换流  -> BufferedReader的readline()
    * 注意:idea中单元测试不支持从键盘输入
    * */

    public static void main(String[] args) {
        BufferedReader br = null;
        try {
            InputStreamReader isr = new InputStreamReader(System.in);
            br = new BufferedReader(isr);
            String data;
            while(true){
                data= br.readLine();
                if("e".equalsIgnoreCase(data) || "exit".equalsIgnoreCase(data)){
                    break;
                }
                String uperCase = data.toUpperCase();
                System.out.println(uperCase);

            }
        } catch (IOException e) {
            e.printStackTrace();
        } finally {
            if(br != null){
                try {
                    br.close();
                } catch (IOException e) {
                    e.printStackTrace();
                }
            }
        }
    }

}
打印流
/*打印流  PrintStream 和PrintWriter
* 提供了一系列重载的print() 和 println 方法
* */
@Test
public void test2(){
    PrintStream ps = null;
    try {
        FileOutputStream fos = new FileOutputStream(new File("D:\\IO\\text.txt"));
        // 创建打印输出流,设置为自动刷新模式(写入换行符或字节 '\n' 时都会刷新输出缓冲区)
        ps = new PrintStream(fos, true);
        if (ps != null) {// 把标准输出流(控制台输出)改成文件
            System.setOut(ps);
        }
        for (int i = 0; i <= 255; i++) { // 输出ASCII字符
            System.out.print((char) i);
            if (i % 50 == 0) { // 每50个数据一行
                System.out.println(); // 换行
            }
        }
    } catch (FileNotFoundException e) {
        e.printStackTrace();
    } finally {
        if (ps != null) {
            ps.close();
        }
    }
}
数据流
/*
 * 3.数据流
 * 3.1 DataInputStream 和 DataOutputStream
 * 3.2 作用:用于读取或者写出基本数据类型的变量或者字符串
 * 练习:将内存中的字符串,基本类型数据变量写入到文件中。
 * 注意:处理异常仍然要使用try-catch-finally
 * */
@Test
public void test3(){
    DataOutputStream dos = null;
    try {
        dos = new DataOutputStream(new FileOutputStream("data.txt"));
        dos.writeUTF("lalalal");
        dos.flush();//执行刷新,就会将内存中的数据写入文件
        dos.writeInt(23);
        dos.flush();
    } catch (IOException e) {
        e.printStackTrace();
    } finally {
        if(dos != null){
            try {
                dos.close();
            } catch (IOException e) {
                e.printStackTrace();
            }
        }
    }

}

/*
 * 将文件中存储的基本数据类型变量和字符串读取到内存中,保存到变量中
 * 注意:怎么写的,怎么顺序读,也就是读取数据的顺序与当初写入文件的顺序相同
 * */
@Test
public void test4(){
    DataInputStream dis = null;
    try {
        dis = new DataInputStream(new FileInputStream("data.txt"));
        String str= dis.readUTF();
        int op = dis.readInt();
        System.out.println(str+op);
    } catch (IOException e) {
        e.printStackTrace();
    } finally {
        if(dis != null){
            try {
                dis.close();
            } catch (IOException e) {
                e.printStackTrace();
            }
        }
    }

}
对象流
package com.atigo.java.IOStream;
import org.junit.Test;
import java.io.*;
/**
* 一、对象流的使用
* 1.ObjectInputStream 和 ObjectOutputStream
* 2.作用:
* 用于存储和读取基本数据类型数据或对象的处理流。它的强大之处就是可
* 以把Java中的对象写入到数据源中,也能把对象从数据源中还原回来。
* 3.要想一个java对象是可序列化的,需要满足相应的要求。见Person类
* Person类需要满足如下需求,方位可序列化
* 1.要实现接口,Serializable
* 2.当前类提供一个全局变量:serialVersionUID
* 3.除了当前Person类需要实现Serializable接口之外,还必须保证其内部所有属性也必须是可序列化的。
* (默认情况下,基本数据类型可序列化)
* 补充:ObjectOutputStream 和 ObjectInputStream 不能序列化static和transient修饰的成员变量。
* 不会报错,但是不可序列化的成员变量无法赋值
* 因为static 修饰的变量归类所有,不归对象所有,transient修饰表示符,表示这个成员变量不可序列化。
*
* 4.序列化机制
* 对象序列化机制允许把内存中的Java对象转换成平台无关的二进制流,从
* 而允许把这种二进制流持久地保存在磁盘上,或通过网络将这种二进制流传
* 输到另一个网络节点。
* 当其它程序获取了这种二进制流,就可以恢复成原来的Java对象。
*
*
*
* @author hjm
*/
public class ObjectStream {
/*
* 序列化:用ObjectOutputStream类保存基本类型数据或对象的机制
* 允许把这种二进制流持久地保存在磁盘上,或通过网络将这种二进制流传输到另一个网络节点。
* 使用ObjectOutputStream实现
*/
@Test
public void test1(){
ObjectOutputStream oos = null;
try {
oos = new ObjectOutputStream(new FileOutputStream(new File("data.dat")));
oos.writeObject(new String("我爱中国"));
oos.flush();
oos.writeObject(new Person("Tom"));
oos.flush();
} catch (IOException e) {
e.printStackTrace();
} finally {
if(oos != null){
try {
oos.close();
} catch (IOException e) {
e.printStackTrace();
}
}
}
}
/*
* 反序列化:用ObjectInputStream类读取基本类型数据或对象的机制
* 将磁盘文件或者网络将这种二进制流还原为内存中的一个java对象
*/
@Test
public void test2(){
ObjectInputStream ois = null;
try {
ois = new ObjectInputStream(new FileInputStream(new File("data.dat")));
Object o = ois.readObject();
String str = (String) o;
Object p = ois.readObject();
Person person = (Person) p;
System.out.println(str+person.toString());
} catch (IOException e) {
e.printStackTrace();
} catch (ClassNotFoundException e) {
e.printStackTrace();
} finally {
if(ois != null){
try {
ois.close();
} catch (IOException e) {
e.printStackTrace();
}
}
}
}
}
/*
* 如果需要让某个对象支持序列化机制,则必须让对象所属的类及其属性是可序列化的,
* 为了让某个类是可序列化的,该类必须实现如下两个接口之一。
* 否则,会抛出NotSerializableException异常
* Serializable
* Externalizable
*/
/*
* Person需要满足如下的要求,方为可序列化
* 1.需要实现接口:Serializable
* 2.当前类提供一个全局常量:serialVersionUID
* serialVersionUID适用于java序列化机制。
* 简单来说,JAVA序列化的机制是通过serialVersionUID判断类的serialVersionUID来验证的版本一致的。
* 在进行反序列化时,JVM会把传来的字节流中的serialVersionUID于本地相应实体类的serialVersionUID进行比较。
* 如果相同说明是一致的,可以进行反序列化,否则会出现反序列化版本一致的异常,即是InvalidCastException
* serialVersionUID用来表明类的不同版本间的兼容性。简言之,其目的是以序列化对象进行版本控制,有关各版本反序列化时是否兼容。
* 如果类没有显示定义这个静态常量,它的值是Java运行时环境根据类的内部细节自动生成的。若类的实例变量做了修改,serialVersionUID 可能发生变化。故建议,显式声明。
*/
class Person implements Serializable{
public static final long serialVersionUID = 123131221313L;
private String name;
public Person(String name) {
this.name = name;
}
public Person(){
}
public String getName() {
return name;
}
@Override
public String toString() {
return "Person{" +
"name='" + name + '\'' +
'}';
}
public void setName(String name) {
this.name = name;
}
}RandomAccessFileTest
package com.atigo.java.IOStream;

import org.junit.Test;
import java.io.File;
import java.io.IOException;
import java.io.RandomAccessFile;

/**
 * RandomAccessFile的使用
 * 1.RandomAccessFile 直接继承于java.lang.Object类,实现了 DataInput 和 DataOutput 接口
 * 2.RandomAccessFile 既可以作为一个输入流也可以作为一个输出流
 * 3.构造器
 *   public RandomAccessFile(File file, String mode)
 *   public RandomAccessFile(String name, String mode)
 *      创建 RandomAccessFile 类实例需要指定一个 mode 参数,该参数指定 RandomAccessFile 的访问模式:
 *          r: 以只读方式打开
 *          rw:打开以便读取和写入
 *          rwd:打开以便读取和写入;同步文件内容的更新
 *          rws:打开以便读取和写入;同步文件内容和元数据的更新
 *
 * 4.如果 RandomAccessFile 作为一个输出流出现时,写出到文件如果不存在,则在执行过程中自动创建
 *   如果写出到的文件存在,则会对原有文件内容进行覆盖,从头开始覆盖,如果写入内容够多能够实现全覆盖就会全覆盖,否在会覆盖一些
 *
 * 5.可以通过 RandomAccessFile 相关操作实现”插入“数据效果
 *
 * 6.我们可以用RandomAccessFile这个类,来实现一个多线程断点下载的功能,
 *   用过下载工具的朋友们都知道,下载前都会建立两个临时文件,一个是与
 *   被下载文件大小相同的空文件,另一个是记录文件指针的位置文件,每次
 *   暂停的时候,都会保存上一次的指针,然后断点下载的时候,会继续从上
 *   一次的地方下载,从而实现断点下载或上传的功能,
 *
 *
 * @author hjm
 */
public class RandomAccessFileTest {

    @Test
    public void test1(){
        RandomAccessFile raf = null;
        RandomAccessFile raf2 = null;
        try {
            raf = new RandomAccessFile(new File("12.jpg"),"r");
            raf2 = new RandomAccessFile(new File("120.jpg"),"rw");

            byte[] buffer = new byte[1024];
            int len;
            while((len = raf.read(buffer)) != -1){
                raf2.write(buffer,0,len);
            }
        } catch (IOException e) {
            e.printStackTrace();
        } finally {
            if(raf != null){
                try {
                    raf.close();
                } catch (IOException e) {
                    e.printStackTrace();
                }
            }
            if(raf2 != null){
                try {
                    raf2.close();
                } catch (IOException e) {
                    e.printStackTrace();
                }
            }
        }
    }

    @Test
    public void test2(){
        RandomAccessFile accessFile = null;
        try {
            accessFile = new RandomAccessFile("hello.txt","rw");
            accessFile.seek(3);//将指针调到角标为3的位置
            accessFile.write("xyz".getBytes());
        } catch (IOException e) {
            e.printStackTrace();
        } finally {
            try {
                accessFile.close();
            } catch (IOException e) {
                e.printStackTrace();
            }
        }
    }

    /*
    * 使用 RandomAccessFile 实现数据的插入效果
    *
    */
    @Test
    public void test3(){
        RandomAccessFile accessFile = null;
        try {
            accessFile = new RandomAccessFile("hello.txt","rw");
            accessFile.seek(3);//将指针调到角标为3的位置
            //保存指针3后面的所有数据到 StringBuilder 中
            byte[] buff = new byte[1024];
            StringBuilder str = new StringBuilder((int) new File("hello.txt").length());
            int len;
            while((len = accessFile.read(buff)) != -1){
                str.append(new String(buff,0,len));
            }
            //调回指针写入xyz
            accessFile.seek(3);
            accessFile.write("xyz".getBytes());

            //将StringBuilder中的数据写入到文件中
            accessFile.write(str.toString().getBytes());
        } catch (IOException e) {
            e.printStackTrace();
        } finally {
            if(accessFile != null){
                try {
                    accessFile.close();
                } catch (IOException e) {
                    e.printStackTrace();
                }
            }
        }
    }

}
总结:Java NIO 概述
Java NIO (New IO,Non-Blocking IO)是从Java 1.4版本开始引入的一套新 的IO API,可以替代标准的Java IO API。NIO与原来的IO有同样的作用和目 的,但是使用的方式完全不同,NIO支持面向缓冲区的(IO是面向流的)、基于 通道的IO操作。NIO将以更加高效的方式进行文件的读写操作。
Java API中提供了两套NIO,一套是针对标准输入输出NIO,另一套就是网 络编程NIO。
|—–java.nio.channels.Channel
|—–FileChannel:处理本地文件
|—–SocketChannel:TCP网络编程的客户端的Channel
|—–ServerSocketChannel:TCP网络编程的服务器端的Channel
|—–DatagramChannel:UDP网络编程中发送端和接收端的Channel
总结:Path、Paths和Files核心API
早期的Java只提供了一个File类来访问文件系统,但File类的功能比较有限,所 提供的方法性能也不高。而且,大多数方法在出错时仅返回失败,并不会提供异 常信息。
NIO. 2为了弥补这种不足,引入了Path接口,代表一个平台无关的平台路径,描 述了目录结构中文件的位置。Path可以看成是File类的升级版本,实际引用的资 源也可以不存在。
在以前IO操作都是这样写的:
import java.io.File;
File file = new File(“index.html”);
但在Java7 中,我们可以这样写:
import java.nio.file.Path;
import java.nio.file.Paths;
Path path = Paths.get(“index.html”);
同时,NIO.2在java.nio.file包下还提供了Files、Paths工具类,Files包含 了大量静态的工具方法来操作文件;Paths则包含了两个返回Path的静态 工厂方法。
Paths 类提供的静态 get() 方法用来获取 Path 对象:
static Path get(String first, String … more) : 用于将多个字符串串连成路径
static Path get(URI uri): 返回指定uri对应的Path路径
总结:Path接口
Path 常用方法:
String toString() : 返回调用 Path 对象的字符串表示形式
boolean startsWith(String path) : 判断是否以 path 路径开始
boolean endsWith(String path) : 判断是否以 path 路径结束
boolean isAbsolute() : 判断是否是绝对路径
Path getParent() :返回Path对象包含整个路径,不包含 Path 对象指定的文件路径
Path getRoot() :返回调用 Path 对象的根路径
Path getFileName() : 返回与调用 Path 对象关联的文件名
int getNameCount() : 返回Path 根目录后面元素的数量
Path getName(int idx) : 返回指定索引位置 idx 的路径名称
Path toAbsolutePath() : 作为绝对路径返回调用 Path 对象
Path resolve(Path p) :合并两个路径,返回合并后的路径对应的Path对象
File toFile(): 将Path转化为File类的对象
java.nio.file.Files 用于操作文件或目录的工具类。
Files常用方法:
Path copy(Path src, Path dest, CopyOption … how) : 文件的复制
Path createDirectory(Path path, FileAttribute … attr) : 创建一个目录
Path createFile(Path path, FileAttribute … arr) : 创建一个文件
void delete(Path path) : 删除一个文件/目录,如果不存在,执行报错
void deleteIfExists(Path path) : Path对应的文件/目录如果存在,执行删除
Path move(Path src, Path dest, CopyOption…how) : 将 src 移动到 dest 位置
long size(Path path) : 返回 path 指定文件的大小
Files常用方法:用于判断
boolean exists(Path path, LinkOption … opts) : 判断文件是否存在
boolean isDirectory(Path path, LinkOption … opts) : 判断是否是目录
boolean isRegularFile(Path path, LinkOption … opts) : 判断是否是文件
boolean isHidden(Path path) : 判断是否是隐藏文件
boolean isReadable(Path path) : 判断文件是否可读
boolean isWritable(Path path) : 判断文件是否可写
boolean notExists(Path path, LinkOption … opts) : 判断文件是否不存在
Files常用方法:用于操作内容
SeekableByteChannel newByteChannel(Path path, OpenOption…how) : 获取与指定文件的连 接,how 指定打开方式。
DirectoryStream newDirectoryStream(Path path) : 打开 path 指定的目录
InputStream newInputStream(Path path, OpenOption…how):获取 InputStream 对象
OutputStream newOutputStream(Path path, OpenOption…how) : 获取 OutputStream 对象
附录:PathTest
package com.atguigu.java1;

import java.io.File;
import java.nio.file.Path;
import java.nio.file.Paths;

import org.junit.Test;

/**
 * 1. jdk 7.0 时,引入了 Path、Paths、Files三个类。
 * 2.此三个类声明在:java.nio.file包下。
 * 3.Path可以看做是java.io.File类的升级版本。也可以表示文件或文件目录,与平台无关
 * <p>
 * 4.如何实例化Path:使用Paths.
 * static Path get(String first, String … more) : 用于将多个字符串串连成路径
 * static Path get(URI uri): 返回指定uri对应的Path路径
 *
 * @author shkstart
 * @create 2019 下午 2:44
 */
public class PathTest {

    //如何使用Paths实例化Path
    @Test
    public void test1() {
        Path path1 = Paths.get("d:\\nio\\hello.txt");//new File(String filepath)

        Path path2 = Paths.get("d:\\", "nio\\hello.txt");//new File(String parent,String filename);

        System.out.println(path1);
        System.out.println(path2);

        Path path3 = Paths.get("d:\\", "nio");
        System.out.println(path3);
    }

    //Path中的常用方法
    @Test
    public void test2() {
        Path path1 = Paths.get("d:\\", "nio\\nio1\\nio2\\hello.txt");
        Path path2 = Paths.get("hello.txt");

//		String toString() : 返回调用 Path 对象的字符串表示形式
        System.out.println(path1);

//		boolean startsWith(String path) : 判断是否以 path 路径开始
        System.out.println(path1.startsWith("d:\\nio"));
//		boolean endsWith(String path) : 判断是否以 path 路径结束
        System.out.println(path1.endsWith("hello.txt"));
//		boolean isAbsolute() : 判断是否是绝对路径
        System.out.println(path1.isAbsolute() + "~");
        System.out.println(path2.isAbsolute() + "~");
//		Path getParent() :返回Path对象包含整个路径,不包含 Path 对象指定的文件路径
        System.out.println(path1.getParent());
        System.out.println(path2.getParent());
//		Path getRoot() :返回调用 Path 对象的根路径
        System.out.println(path1.getRoot());
        System.out.println(path2.getRoot());
//		Path getFileName() : 返回与调用 Path 对象关联的文件名
        System.out.println(path1.getFileName() + "~");
        System.out.println(path2.getFileName() + "~");
//		int getNameCount() : 返回Path 根目录后面元素的数量
//		Path getName(int idx) : 返回指定索引位置 idx 的路径名称
        for (int i = 0; i < path1.getNameCount(); i++) {
            System.out.println(path1.getName(i) + "*****");
        }

//		Path toAbsolutePath() : 作为绝对路径返回调用 Path 对象
        System.out.println(path1.toAbsolutePath());
        System.out.println(path2.toAbsolutePath());
//		Path resolve(Path p) :合并两个路径,返回合并后的路径对应的Path对象
        Path path3 = Paths.get("d:\\", "nio");
        Path path4 = Paths.get("nioo\\hi.txt");
        path3 = path3.resolve(path4);
        System.out.println(path3);

//		File toFile(): 将Path转化为File类的对象
        File file = path1.toFile();//Path--->File的转换

        Path newPath = file.toPath();//File--->Path的转换

    }
}
附录:FileTest
package com.atguigu.java1;

import java.io.IOException;
import java.io.InputStream;
import java.io.OutputStream;
import java.nio.channels.SeekableByteChannel;
import java.nio.file.DirectoryStream;
import java.nio.file.Files;
import java.nio.file.LinkOption;
import java.nio.file.Path;
import java.nio.file.Paths;
import java.nio.file.StandardCopyOption;
import java.nio.file.StandardOpenOption;
import java.util.Iterator;

import org.junit.Test;

/**
 * Files工具类的使用:操作文件或目录的工具类
 * @author shkstart
 * @create 2019 下午 2:44
 */
public class FilesTest {

	@Test
	public void test1() throws IOException{
		Path path1 = Paths.get("d:\\nio", "hello.txt");
		Path path2 = Paths.get("atguigu.txt");

//		Path copy(Path src, Path dest, CopyOption … how) : 文件的复制
		//要想复制成功,要求path1对应的物理上的文件存在。path1对应的文件没有要求。
//		Files.copy(path1, path2, StandardCopyOption.REPLACE_EXISTING);

//		Path createDirectory(Path path, FileAttribute<?> … attr) : 创建一个目录
		//要想执行成功,要求path对应的物理上的文件目录不存在。一旦存在,抛出异常。
		Path path3 = Paths.get("d:\\nio\\nio1");
//		Files.createDirectory(path3);

//		Path createFile(Path path, FileAttribute<?> … arr) : 创建一个文件
		//要想执行成功,要求path对应的物理上的文件不存在。一旦存在,抛出异常。
		Path path4 = Paths.get("d:\\nio\\hi.txt");
//		Files.createFile(path4);

//		void delete(Path path) : 删除一个文件/目录,如果不存在,执行报错
//		Files.delete(path4);

//		void deleteIfExists(Path path) : Path对应的文件/目录如果存在,执行删除.如果不存在,正常执行结束
		Files.deleteIfExists(path3);

//		Path move(Path src, Path dest, CopyOption…how) : 将 src 移动到 dest 位置
		//要想执行成功,src对应的物理上的文件需要存在,dest对应的文件没有要求。
//		Files.move(path1, path2, StandardCopyOption.ATOMIC_MOVE);

//		long size(Path path) : 返回 path 指定文件的大小
		long size = Files.size(path2);
		System.out.println(size);

	}

	@Test
	public void test2() throws IOException{
		Path path1 = Paths.get("d:\\nio", "hello.txt");
		Path path2 = Paths.get("atguigu.txt");
//		boolean exists(Path path, LinkOption … opts) : 判断文件是否存在
		System.out.println(Files.exists(path2, LinkOption.NOFOLLOW_LINKS));

//		boolean isDirectory(Path path, LinkOption … opts) : 判断是否是目录
		//不要求此path对应的物理文件存在。
		System.out.println(Files.isDirectory(path1, LinkOption.NOFOLLOW_LINKS));

//		boolean isRegularFile(Path path, LinkOption … opts) : 判断是否是文件

//		boolean isHidden(Path path) : 判断是否是隐藏文件
		//要求此path对应的物理上的文件需要存在。才可判断是否隐藏。否则,抛异常。
//		System.out.println(Files.isHidden(path1));

//		boolean isReadable(Path path) : 判断文件是否可读
		System.out.println(Files.isReadable(path1));
//		boolean isWritable(Path path) : 判断文件是否可写
		System.out.println(Files.isWritable(path1));
//		boolean notExists(Path path, LinkOption … opts) : 判断文件是否不存在
		System.out.println(Files.notExists(path1, LinkOption.NOFOLLOW_LINKS));
	}

	/**
	 * StandardOpenOption.READ:表示对应的Channel是可读的。
	 * StandardOpenOption.WRITE:表示对应的Channel是可写的。
	 * StandardOpenOption.CREATE:如果要写出的文件不存在,则创建。如果存在,忽略
	 * StandardOpenOption.CREATE_NEW:如果要写出的文件不存在,则创建。如果存在,抛异常
	 *
	 * @author shkstart 邮箱:shkstart@126.com
	 * @throws IOException
	 */
	@Test
	public void test3() throws IOException{
		Path path1 = Paths.get("d:\\nio", "hello.txt");

//		InputStream newInputStream(Path path, OpenOption…how):获取 InputStream 对象
		InputStream inputStream = Files.newInputStream(path1, StandardOpenOption.READ);

//		OutputStream newOutputStream(Path path, OpenOption…how) : 获取 OutputStream 对象
		OutputStream outputStream = Files.newOutputStream(path1, StandardOpenOption.WRITE,StandardOpenOption.CREATE);


//		SeekableByteChannel newByteChannel(Path path, OpenOption…how) : 获取与指定文件的连接,how 指定打开方式。
		SeekableByteChannel channel = Files.newByteChannel(path1, StandardOpenOption.READ,StandardOpenOption.WRITE,StandardOpenOption.CREATE);

//		DirectoryStream<Path>  newDirectoryStream(Path path) : 打开 path 指定的目录
		Path path2 = Paths.get("e:\\teach");
		DirectoryStream<Path> directoryStream = Files.newDirectoryStream(path2);
		Iterator<Path> iterator = directoryStream.iterator();
		while(iterator.hasNext()){
			System.out.println(iterator.next());
		}
	}
}
网络编程
InetAddress
package com.atigo.java.Web;
import java.net.InetAddress;
import java.net.UnknownHostException;
/**
* 一、网络编程中有两个主要的问题:
* 1.1如何准确地定位网络上一台或多台主机;定位主机上的特定的应用
* 1.2找到主机后如何可靠高效地进行数据传输
* 二、网络编程中的两个要素
* 2.1对应问题一:IP 和 端口号
* 2.2对应问题二:提供网络通信协议:TCP / IP参考模型(应用层,传输层,网络层,物理+数据链路层)
*
* 三、通信要素一:IP 和 端口号
* 1.唯一的标识 Internet 上的计算机(通信实体)
* 2.在java中使用InetAddress类来代表IP
* 3.IP分类:IPv4 IPv6;万维网和局域网的区别
* IP地址分类方式2:公网地址(万维网使用)和私有地址(局域网使用)。192.168.
* 开头的就是私有址址,范围即为192.168.0.0--192.168.255.255,专门为组织机
* 构内部使用
*
* 4.域名: www.baidu.com
* 5.本地回路地址:127.0.0.1 对应着 localhost
*
* 6.如何实例化InetAddress:两个方法:getByName(String host) 、getLocalHost
* 两个常用方法:getHostName() 获取域名 / getHostAddress() 获取IP地址
*
* 7.端口号:正在计算机上运行的进程
* 要求:不同的进程有不同的端口号
* 范围:为一个 16 位的整数 0~65535。
*
* 8.端口号与IP地址的组合得出一个网络套接字:Socket。
*
* @author hjm
*/
public class InterAdressTest {
public static void main(String[] args) {
try {
InetAddress inet1 = InetAddress.getByName("192.168.10.14");
System.out.println(inet1);
InetAddress inet2 = InetAddress.getByName("www.baidu.com");
System.out.println(inet2);
InetAddress inet3 = InetAddress.getByName("127.0.0.1");
System.out.println(inet3);
//获取本机IP,网上的IP
InetAddress inet4 = InetAddress.getLocalHost();
System.out.println(inet4);
//getHostName() 获取域名
System.out.println(inet2.getHostName());
//getHostAddress() 获取IP地址
System.out.println(inet2.getHostAddress());
} catch (UnknownHostException e) {
e.printStackTrace();
}
}
}
TCP网络编程
package com.atigo.java.Web;

import org.junit.Test;

import java.io.ByteArrayOutputStream;
import java.io.IOException;
import java.io.InputStream;
import java.io.OutputStream;
import java.net.InetAddress;
import java.net.ServerSocket;
import java.net.Socket;

/**
 * 实现TCP的网络编程
 * 例子1:
 *   客户端向服务端发送一个消息,服务端显示在控制台上
 *
 * @author hjm
 */
public class TCPTest {

    //客户端
    @Test
    public void client(){
        Socket socket = null;
        OutputStream os = null;
        try {
            //1.创建socket对象,指明服务器ip和端口号
            InetAddress inet = InetAddress.getByName("127.0.0.1");
            socket = new Socket(inet,8899);
            //2.获取一个输出流,用于输出数据
            os = socket.getOutputStream();
            //3.写出数据操作
            os.write("你好!我是客户端mm!".getBytes());
        } catch (IOException e) {
            e.printStackTrace();
        } finally {
            //4.资源关闭
            if(os != null){
                try {
                    os.close();
                } catch (IOException e) {
                    e.printStackTrace();
                }

            }
            if(socket != null){
                try {
                    socket.close();
                } catch (IOException e) {
                    e.printStackTrace();
                }
            }
        }

    }

    //服务端
    @Test
    public void Serve(){

        ServerSocket serverSocket = null;
        Socket accept = null;
        InputStream inputStream = null;
        ByteArrayOutputStream baos = null;
        try {
            //1.创建服务器端的serverSocket,指明自己的端口号
            serverSocket = new ServerSocket(8899);
            //2.调用accept(),表示接收来自客户端的socket
            accept = serverSocket.accept();
            //3.获取一个输入流
            inputStream = accept.getInputStream();
            /*不建议这样写,可能会有乱码
            byte[] buff = new byte[1024];
            int len;
            while((len = (inputStream.read())) != -1){
                String str = new String(buff,0,len);
                System.out.println(str);
            }*/
            //读取输入流当中的数据
            baos = new ByteArrayOutputStream();
            byte[] buf = new byte[5];
            int len;
            while((len = inputStream.read(buf)) != -1){
                baos.write(buf,0,len);
            }
            System.out.println(baos.toString());
            System.out.println("收到"+accept.getInetAddress().getHostAddress());
        } catch (IOException e) {
            e.printStackTrace();
        } finally {
            //进行一个资源的关闭
            if(baos != null){
                try {
                    baos.close();
                } catch (IOException e) {
                    e.printStackTrace();
                }

            }
            if(inputStream != null){
                try {
                    inputStream.close();
                } catch (IOException e) {
                    e.printStackTrace();
                }

            }
            if(accept != null){
                try {
                    accept.close();
                } catch (IOException e) {
                    e.printStackTrace();
                }

            }
            if(serverSocket != null){
                try {
                    serverSocket.close();
                } catch (IOException e) {
                    e.printStackTrace();
                }
            }
        }

    }

}
package com.atigo.java.Web;

import org.junit.Test;

import java.io.*;
import java.net.InetAddress;
import java.net.ServerSocket;
import java.net.Socket;

/**
 *
 * 例题2:客户端发送文件给服务端,服务端将文件保存在本地。
 *
 *
 * @author hjm
 */
public class TCPTest2 {

    @Test
    public void client(){
        Socket socket = null;
        OutputStream outputStream = null;
        FileInputStream fis = null;
        try {
            socket = new Socket(InetAddress.getByName("127.0.0.1"),8899);
            outputStream = socket.getOutputStream();
            fis = new FileInputStream(new File("hello.txt"));

            byte[] buffer = new byte[10];
            int len;
            while((len = fis.read(buffer)) != -1){
                outputStream.write(buffer,0,len);
            }
        } catch (IOException e) {
            e.printStackTrace();
        } finally {
            if(fis != null){
                try {
                    fis.close();
                } catch (IOException e) {
                    e.printStackTrace();
                }

            }
            if(outputStream != null){
                try {
                    outputStream.close();
                } catch (IOException e) {
                    e.printStackTrace();
                }

            }
            if(socket != null){
                try {
                    socket.close();
                } catch (IOException e) {
                    e.printStackTrace();
                }
            }
        }

    }

    /*
    * 这里涉及到的异常应该使用try-catch-finally来进行处理
    */
    @Test
    public void serve() throws IOException {
        ServerSocket serverSocket = new ServerSocket(8899);
        Socket socket = serverSocket.accept();
        InputStream inputStream = socket.getInputStream();

        System.out.println(inputStream.getClass());
        FileOutputStream fileOutputStream = new FileOutputStream("opl.txt");
        byte[] buffer = new byte[12];
        int len;
        while((len = inputStream.read(buffer)) != -1){
            fileOutputStream.write(buffer,0,len);
        }
        fileOutputStream.close();
        inputStream.close();
        socket.close();
        serverSocket.close();

    }
}
UDPTest
package com.atigo.java.Web;

import org.junit.Test;

import java.io.IOException;
import java.net.*;

/**
 * UDP协议的网络编程
 *
 * @author hjm
 */
public class UDPTest {
    @Test
    public void send() throws IOException {
        DatagramSocket socket = new DatagramSocket();
        String str = "我是UDP方式发送的导弹";
        byte[] bytes = str.getBytes();
        InetAddress inetAddress = InetAddress.getLocalHost();
        DatagramPacket datagramPacket = new DatagramPacket(bytes,0,bytes.length,inetAddress,9090);
        socket.send(datagramPacket);
        socket.close();


    }

    @Test
    public void receiver() throws IOException {
        DatagramSocket socket = new DatagramSocket(9090);
        byte[] buff = new byte[100];
        DatagramPacket datagramPacket = new DatagramPacket(buff,0,buff.length);
        socket.receive(datagramPacket);

        System.out.println(new String(datagramPacket.getData(),0,datagramPacket.getLength()));

        socket.close();
    }
}
URL测试
package com.atigo.java.Web;

import java.net.MalformedURLException;
import java.net.URL;

/**
 * URL的网络编程
 * 1.URL:统一资源定位符,对应着互联网上的莫伊资源地址
 * 2.格式:https://pic.netbian.com/uploads/allimg/211229/000134-16407072943893.jpg
 *        协议    主机名:端口号(域名)   具体资源地址                                   后边还有参数列表  ?key=value&key=value  这样
 *
 *
 * @author hjm
 */
public class URLTest {
    public static void main(String[] args) {
        try {
            URL url = new URL("https://pic.netbian.com/uploads/allimg/211229/000134-16407072943893.jpg");
            /*
            * 一个URL对象生成后,其属性是不能被改变的,但可以通过它给定的方法来获取这些属性:
            * public String getProtocol( ) 获取该URL的协议名
            * public String getHost( ) 获取该URL的主机名
            * public String getPort( ) 获取该URL的端口号
            * public String getPath( ) 获取该URL的文件路径
            * public String getFile( ) 获取该URL的文件名
            * public String getQuery( ) 获取该URL的查询名
            * */
            System.out.println(url.getProtocol());
            System.out.println(url.getHost());
            System.out.println(url.getPort());
            System.out.println(url.getPath());
            System.out.println(url.getFile());
            System.out.println(url.getQuery());


        } catch (MalformedURLException e) {
            e.printStackTrace();
        }

    }
}
package com.atigo.java.Web;

import javax.net.ssl.HttpsURLConnection;
import java.io.FileOutputStream;
import java.io.IOException;
import java.io.InputStream;
import java.net.URL;

/**
 * @author hjm
 */
public class URLtest1 {
    /*
    * 注意应该用try-catch-finally来写,throws做例子清楚
    */
    public static void main(String[] args) throws IOException {

        URL url = new URL("https://pic.netbian.com/uploads/allimg/211229/000134-16407072943893.jpg");
        HttpsURLConnection urlConnection = (HttpsURLConnection) url.openConnection();
        urlConnection.connect();

        InputStream is = urlConnection.getInputStream();
        FileOutputStream fos = new FileOutputStream("pp.jpg");
        byte[] buff = new byte[1024];
        int len;
        while((len = (is.read(buff))) != -1){
            fos.write(buff,0,len);
        }
        //关闭资源
        is.close();
        fos.close();
        urlConnection.disconnect();
    }
}
反射
Java反射机制概述
Reflection(反射)是被视为动态语言的关键,反射机制允许程序在执行期 借助于Reflection API取得任何类的内部信息,并能直接操作任意对象的内 部属性及方法。
加载完类之后,在堆内存的方法区中就产生了一个Class类型的对象(一个 类只有一个Class对象),这个对象就包含了完整的类的结构信息。我们可 以通过这个对象看到类的结构。这个对象就像一面镜子,透过这个镜子看 到类的结构,所以,我们形象的称之为:反射。
package com.atigo.java.Reflection;

import org.junit.Test;

import java.lang.annotation.ElementType;
import java.lang.reflect.Constructor;
import java.lang.reflect.Field;
import java.lang.reflect.InvocationTargetException;
import java.lang.reflect.Method;


/**
 * @author hjm
 */
public class ReflectionTest {


    //反射之前对Person类的操作
    @Test
    public void test1(){


        //1.创建person类的对象
        Person p1 = new Person("Tom",12);

        //2.通过对象,调用其内部属性、方法
        p1.age = 10;
        System.out.println(p1.toString());
        p1.show();
        //在person类的外部,不可以通过person调用其内部私有结构
        //比如:name,showNation()以及私有的构造器


    }

    @Test
    public void test2() throws NoSuchMethodException, IllegalAccessException, InvocationTargetException, InstantiationException, NoSuchFieldException {
        Class<Person> personClass = Person.class;
        //1.通过反射创建Person类的对象
        Constructor<Person> constructor = personClass.getConstructor(String.class, int.class);
        Object obj = constructor.newInstance("TOM",14);
        Person p = (Person) obj;
        System.out.println(obj.toString());
        //2.通过反射,调用对象指定的属性、方法
        Field age = personClass.getDeclaredField("age");
        age.set(p,10);
        System.out.println(p.toString());
        //3.调用方法
        Method show = personClass.getDeclaredMethod("show");
        show.invoke(p);

        //4.通过反射是可以调用person类的私有结构的,比如:私有的构造器、方法、属性
        Constructor<Person> cons1 = personClass.getDeclaredConstructor(String.class);
        cons1.setAccessible(true);
        Person jerry = cons1.newInstance("Jerry");
        System.out.println(jerry);

        //5.调用私有的属性和方法
        Field name = personClass.getDeclaredField("name");
        name.setAccessible(true);
        name.set(jerry,"hanmeimei");
        System.out.println(jerry);

        //6.调用私有方法
        Method showNation = personClass.getDeclaredMethod("showNation", String.class);
        showNation.setAccessible(true);
        showNation.invoke(jerry,"中国");//相当于String nation = jerry.showNation("中国")


    }

    //疑问:反射与前边的面向对象的封装性是不是矛盾的?如何看待两个技术
    /*
    * 不矛盾,封装建议怎么调用,反射:我都可以调用
    * */
    //疑问:通过直接new的方式或者反射的方式都可以调用公共的结构,开发中到底用哪个?
    /*
    * 直接用new的方式。反射的特性:动态性,比如:事先不知道要造什么对象,根据实时去造对象
    * */


    /*
    * 关于java.lang.Class类的理解
    * 1.类的加载过程:
    * 程序经过javac.exe以后,会生成一个或这多个字节码文件(.class结尾的),
    * 接着我们使用java.exe命令对某个字节码文件进行解释运行。
    * 相当于将某个字节码文件加载到内存中,此过程称为类的加载。
    * 加载到内存中的类我们就称为运行时类,此运行时类,就作为Class的一个实例
    * 2.换句话说,Class的实例对应着一个运行时的类
    * 3.加载到内存当中的运行时类,会缓存一定的时间,再此时间内,我们可以通过不同的方式来获得此运行时类
    * */

    /*
    * 获取Class的实例的方式(前三种方式要掌握)
    */
    @Test
    public void test3() throws ClassNotFoundException {

         //方式一:调用运行时类的属性:.class
        Class<Person> personClass = Person.class;
        System.out.println(personClass);
        //方式二:通过运行时类的对象,调用getClass()方法
        Person p1 = new Person();
        Class<? extends Person> aClass = p1.getClass();
        System.out.println(aClass);

        //方式三:调用Class的静态方法:forName(String classPath)
        Class<?> aClass1 = Class.forName("com.atigo.java.Reflection.Person");
        System.out.println(aClass1);


        System.out.println(personClass == aClass);
        System.out.println(personClass == aClass1);

        //方式四:使用类的加载器:ClassLoader(了解)
        ClassLoader classLoader = ReflectionTest.class.getClassLoader();
        Class<?> aClass2 = classLoader.loadClass("com.atigo.java.Reflection.Person");
        System.out.println(aClass2 == aClass1);


    }

    //完事万物皆对象? 对象.xxx,File,URL,反射,前端,数据库操作

    //Class可以是那些结构的说明
    @Test
    public void test5(){
        Class c1 = Object.class;
        Class c2 = Comparable.class;
        Class c3 = String[].class;
        Class c4 = int[][].class;
        Class c5 = ElementType.class;
        Class c6 = Override.class;
        Class c7 = int.class;
        Class c8 = void.class;
        Class c9 = Class.class;
        int[] a = new int[10];
        int[] b = new int[100];
        Class c10 = a.getClass();
        Class c11 = b.getClass();
        // 只要数组元素类型与维度一样,就是同一个Class,上边都是一维得int类型数组
        System.out.println(c10 == c11);
    }


}
package com.atigo.java.Reflection;

/**
 * @author hjm
 */
public class Person {
    String name;
    int age;


    public Person() {
    }

    public Person(String name, int age) {
        this.name = name;
        this.age = age;
    }

    private Person(String name) {
        this.name = name;
    }

    public String getName() {
        return name;
    }

    public void setName(String name) {
        this.name = name;
    }

    public int getAge() {
        return age;
    }

    public void setAge(int age) {
        this.age = age;
    }

    @Override
    public String toString() {
        return "Person{" +
                "name='" + name + '\'' +
                ", age=" + age +
                '}';
    }

    public void show(){
        System.out.println("你好,我一直都在");
    }

    private String showNation(String nation){
        System.out.println("我的国籍是:"+nation);
        return nation;
    }

}
package com.atigo.java.Reflection;

import org.junit.Test;

import java.io.InputStream;
import java.util.Properties;

/**
 * @author hjm
 */
public class ClassLoaderTest {

    @Test
    public void test1(){
        //对于自定义类,使用系统类加载器加载
        ClassLoader classLoader = ClassLoaderTest.class.getClassLoader();
        System.out.println(classLoader);
        //调用系统类加载器的getParent();获取扩展类加载器
        ClassLoader parent = classLoader.getParent();
        System.out.println(parent);
        //调用扩展类加载器的getParent();无法获取引导类加载器
        //引导类加载器主要是负责加载java的核心类库,无法加载自定义类的。
        ClassLoader parent1 = parent.getParent();
        System.out.println(parent1);

        ClassLoader classLoader1 = String.class.getClassLoader();
        System.out.println(classLoader1);

    }

    /*
    * Properties :用来读取配置文件
    * */
    @Test
    public void test2() throws Exception {
        Properties pros = new Properties();

        //此时文件默认在当前的model下
        //读取配置问价方式一
        /*FileInputStream fis = new FileInputStream("jdbc.properties");

        pros.load(fis);*/


        //读取配置文件的方式二:使用ClassLoader
        //配置文件,默认识别为当前model的src的具体目录下

        ClassLoader classLoader = ClassLoaderTest.class.getClassLoader();
        InputStream is = classLoader.getResourceAsStream("com/atigo/java/Reflection/jdbc1.properties");
        pros.load(is);

        String user = pros.getProperty("name");
        String pswd = pros.getProperty("password");
        System.out.println(user+pswd);

    }
}
获取当前工作目录
String current = new java.io.File( "." ).getCanonicalPath();
System.out.println("Current dir:"+current);
String currentDir = System.getProperty("user.dir");
System.out.println("Current dir using System:" +currentDir);
通过反射创建对应的运行时类的对象
package com.atigo.java.Reflection;

import org.junit.Test;

import java.util.Random;

/**
 *
 *
 * 通过反射创建对应的运行时类的对象
 * @author hjm
 */

public class NewInstanceTest {

    @Test
    public void test1() throws IllegalAccessException, InstantiationException {
        Class<Person> clazz = Person.class;
        //newInstance()  调用此方法,创建对应运行时类的对象,调用的类的空参构造器,
        //注:类必须要有空参构造器,不然会抛异常,访问权限得够,通常设置为public

        //在javabean中要求提供一个空参的public构造器。
        //原因:
        //1.便于通过反射,创建运行时类的对象
        //2.便于子类继承此运行时类时,默认调用super()时,保证父类有此构造器
        Person person = clazz.newInstance();
        System.out.println(person);


    }


    /*
    * 反射的动态性
    * */
    @Test
    public void test2() throws Exception {

        int num = new Random().nextInt(3);
        String classPath = "";
        switch (num){
            case 0:
                classPath = "java.util.Date";
                break;

            case 1:
                classPath = "java.lang.Object";
                break;
            case 2:
                classPath = "com.atigo.java.Reflection.Person";
                break;
        }

        Object obj = getInstance(classPath);
        System.out.println(obj);

    }

    /*
    * 创建一个指定类的对象
    * classPath:指定类的全类名
    * */
    public Object getInstance(String classPath) throws Exception {
        Class clazz = Class.forName(classPath);
        return clazz.newInstance();
    }

}
获取当前运行时类的属性结构
package com.atigo.java.Reflection.FieldTest;

import com.atigo.java.Reflection.dog;
import org.junit.Test;

import java.lang.reflect.Field;
import java.lang.reflect.Modifier;

/**
 *
 * 获取当前运行时类的属性结构
 * @author hjm
 */
public class FieldTest {

    @Test
    public void test1(){
        Class clazz = dog.class;

        //获取属性结构
        //getFields()  获取当前运行时类及其父类中声明为public访问权限的属性
        Field[] fields = clazz.getFields();
        for(Field field : fields){
            System.out.println(field);
        }

        System.out.println();
        //getDeclaredFields()   获取当前运行时类中声明的所有属性(不包括父类中声明的属性)
        Field[] declaredField = clazz.getDeclaredFields();
        for(Field field : declaredField){
            System.out.println(field);
        }
    }

    //权限修饰符,数据类型  变量名 = 。。
    @Test
    public void test2(){
        Class clazz = dog.class;
        Field[] declaredField = clazz.getDeclaredFields();
        for(Field field : declaredField){
            //1.权限修饰符
            int modifiers = field.getModifiers();
            System.out.print("1 "+modifiers+"\t");
            System.out.print(Modifier.toString(modifiers)+"\t");

            //2.数据类型
            Class<?> type = field.getType();
            System.out.print("2 "+type.getName()+"\t");

            //3.变量名
            String name = field.getName();
            System.out.print("3 "+name+"\t");
            System.out.println(field);
        }
    }
}
获取运行时类的完整结构
package com.atigo.java.Reflection.java2;

import com.atigo.java.Reflection.dog;
import org.junit.Test;

import java.lang.annotation.Annotation;
import java.lang.reflect.*;

/**
 * 获取运行时类的方法结构
 * @author hjm
 */
public class MethodTest {

    @Test
    public void test1(){

        Class clazz = dog.class;
        //getMethods()  获取当前时类及其所有父类中声明为public的方法
        Method[] methods = clazz.getMethods();
        for(Method method : methods){
            System.out.println(method);
        }
        System.out.println();

        //getDeclaredMethods()  获取当前运行时类中声明的所有方法(不包含父类中声明的方法)
        Method[] declaredMethods = clazz.getDeclaredMethods();

        for(Method method : declaredMethods){
            System.out.println(method);
        }


    }


    /*
    * 权限修饰符,返回值类型,方法名(参数类型1,形参名1) throws xxxException{}
    * */
    @Test
    public void test2(){

        //1.获取方法声明的注解
        Class clazz = dog.class;
        Method[] methods = clazz.getDeclaredMethods();
        for(Method method : methods){
            //1.获取注解
            Annotation[] annotations = method.getAnnotations();
            for(Annotation annotation : annotations){
                System.out.println(annotation);
            }

            //2.获取权限修饰符
            System.out.print(Modifier.toString(method.getModifiers())+"\t");

            //3.返回值类型
            System.out.print(method.getReturnType().getName()+"\t");

            //4.方法名
            System.out.print(method.getName()+"\t");

            //5.形参列表
            System.out.print("(");
            Class[] parameterTypes = method.getParameterTypes();
            if(!(parameterTypes == null && parameterTypes.length == 0)){
                for(int i =0; i<parameterTypes.length;i++){
                    if(i == parameterTypes.length - 1){
                        System.out.print(parameterTypes[i].getName()+" args_"+i);
                        break;
                    }
                    System.out.print(parameterTypes[i].getName()+"args_"+i+",");

                }
            }
            System.out.println(")");


            //6.抛出的异常
            Class[] exceptionTypes = method.getExceptionTypes();
            if(!(exceptionTypes == null && exceptionTypes.length==0)){
                System.out.print("throws: ");
                for(int i =0;i<exceptionTypes.length;i++){
                    if(i == parameterTypes.length-1){
                        System.out.print(exceptionTypes[i].getName());
                        break;
                    }
                    System.out.print(exceptionTypes[i].getName()+",");
                }
            }


        }
    }

    /*
    * 获取构造器结构
    * */
    @Test
    public void test3(){
        Class clazz = dog.class;
        //getConstructors()  当前运行时类中声明为public的构造器
        Constructor[] constructors = clazz.getConstructors();
        for(Constructor constructor : constructors){
            System.out.println(constructor);
        }

        //getDeclaredConstructors()  获取当前运行时类中生命的所有构造器
        Constructor[] declaredConstructors = clazz.getDeclaredConstructors();
        for(Constructor constructor : declaredConstructors){
            System.out.println(constructor);
        }

    }

    /*
    * 获取运行时类的父类*/
    @Test
    public void test4(){
        Class clazz = dog.class;
        Class superclass = clazz.getSuperclass();
        System.out.println(superclass);
    }

    /*
     * 获取运行时类的父类(带泛型的)*/
    @Test
    public void test5(){
        Class clazz = dog.class;
        Type genericSuperclass = clazz.getGenericSuperclass();
        System.out.println(genericSuperclass);
    }

    /*
     * 获取运行时类的带泛型的父类的泛型*/
    @Test
    public void test6(){
        Class clazz = dog.class;

        Type genericSuperclass = clazz.getGenericSuperclass();
        ParameterizedType paramType = (ParameterizedType) genericSuperclass;

        //获取泛型参数
        Type[] actualTypeArguments = paramType.getActualTypeArguments();
        System.out.println(actualTypeArguments[0].getTypeName());
        System.out.println(((Class) actualTypeArguments[0]).getName());
    }

    /*
    * 获取运行时类实现的接口
    * */
    @Test
    public void test7(){
        Class clazz = dog.class;
        Class[] interfaces = clazz.getInterfaces();
        for(Class c : interfaces){
            System.out.println(c);
        }
        System.out.println();
        //获取运行时类父类的接口
        Class[] interfaces1 = clazz.getSuperclass().getInterfaces();
        for(Class c : interfaces1){
            System.out.println(c);
        }


    }

    /*
    * 获取运行时类所在的包
    * */
    @Test
    public void test8(){
        Class clazz = dog.class;
        Package aPackage = clazz.getPackage();
        System.out.println(aPackage);

    }

    /*
     * 获取运行时类声明的注解
     * */
    @Test
    public void test9(){
        Class clazz = dog.class;
        Annotation[] annotations = clazz.getAnnotations();
        for(Annotation annotation : annotations){
            System.out.println(annotation);
        }


    }


}
调用运行时类的指定结构
package com.atigo.java.Reflection.java2;

import com.atigo.java.Reflection.dog;
import org.junit.Test;

import java.lang.reflect.Constructor;
import java.lang.reflect.Field;
import java.lang.reflect.InvocationTargetException;
import java.lang.reflect.Method;

/**
 *
 * 调用运行时类中指定的结构:属性,方法,构造器
 *
 * @author hjm
 */
public class ReflectionTest {


    /*
    * 不需要掌握,开发情况一般用下面的那种
    * */
    @Test
    public void test1() throws NoSuchFieldException, IllegalAccessException, InstantiationException {
        Class clazz = dog.class;

        //创建运行时类的对象
        dog d = (dog) clazz.newInstance();
        //获取指定属性,要求运行时类中的属性声明为public
        //通常不采用此方法
        Field id = clazz.getField("id");

        //设置当前属性的值
        //set()  参数一:指明设置那个对象的属性,参数二:将此属性设置为多少
        id.set(d,10001);

        //获取当前属性的值
        //get()   参数一:获取那个对象的当前属性的值
        int did = (int) id.get(d);
        System.out.println(did);

    }

    /*
    * 如何操作运行时类中的指定属性 -- 需要掌握
    * */
    @Test
    public void test2() throws IllegalAccessException, InstantiationException, NoSuchFieldException {
        Class clazz = dog.class;

        //创建运行时类的对象
        dog d = (dog) clazz.newInstance();

        //1.getDeclaredField(String name)  获取运行时类中指定变量名的属性
        Field name = clazz.getDeclaredField("name");

        //2.保证当前属性是可访问的
        name.setAccessible(true);
        //3.获取,设置指定对象的此属性值
        name.set(d,"May");
        System.out.println(name.get(d));
    }

    /*
    * 如何操作运行时类中的指定方法 -- 需要掌握
    * */
    @Test
    public void test3() throws IllegalAccessException, InstantiationException, NoSuchFieldException, NoSuchMethodException, InvocationTargetException {
        Class clazz = dog.class;

        //创建运行时类的对象
        dog d = (dog) clazz.newInstance();

        //1.获取指定的某个方法
        //getDeclaredMethod()  参数一:指明获取的方法的名称  参数二:指明获取方法的形参列表
        Method show = clazz.getDeclaredMethod("show", String.class);
        //2.保证当前属性是可访问的
        show.setAccessible(true);
        //3.invoke()  参数一:方法的调用者,参数二:给方法实参赋值的形参
        //invoke() 的返回值即为对应类中调用方法的返回值
        Object chn = show.invoke(d, "CHN");//String nation = d.show()
        System.out.println(chn);

        System.out.println("***************如何调用静态方法***********");

        //private static void showDesc()
        Method showDesc = clazz.getDeclaredMethod("showDesc");
        showDesc.setAccessible(true);
        //如果调用的运行时类中的方法没有返回值,则此invoke()返回null
        Object invoke = showDesc.invoke(dog.class);
        Object invoke1 = showDesc.invoke(null);//也可以,因为clazz就是当前运行时类,调用静态方法,所有类的对象都一样
        System.out.println(invoke);//null
        System.out.println(invoke1);//null


    }


    /*
     * 如何操作运行时类中的构造器,用的比较少,还是newInstance() 用的比较多,因为其调用空参构造方法,每个类都通用
     *
     * */
    @Test
    public void test4() throws IllegalAccessException, InstantiationException, NoSuchFieldException, NoSuchMethodException, InvocationTargetException {
        Class clazz = dog.class;

        //创建运行时类的对象
        dog d = (dog) clazz.newInstance();
        //public dog(String name)
        //1.获取指定构造器
        //getDeclaredConstructor()   参数:指明构造器的参数列表
        Constructor declaredConstructor = clazz.getDeclaredConstructor(String.class);

        //2.保证此构造器是可访问的
        declaredConstructor.setAccessible(true);

        //3.调用此构造器创建运行时类的对象
        dog tom = (dog) declaredConstructor.newInstance("Tom");
        System.out.println(tom);

    }

}
复习
1.获取Class实例的三种常见方法
Class clazz = Person.class//用的最少,写死,动态性不好Class clazz = person.getClass//用的比较多Clazz clazz = Class.forName(String classPath)//体现动态性,最常用2.对Class的理解
Class实例对应着加载到内存中的一个运行时类。
3.创建Class对应运行时类的对象和通用方法
Object obj = clazz。newInstance();//创建了对应的运行时类的对象1.必须要有空参构造器
2.权限修饰符要够,通常设置为public
4.调用show方法
Class User{
    public void show(){

    }
}
User user = (User)clazz.newInstance();
Method show = clazz.getDeclaredMethod("show");
show.setAccessiable(true);
show.invoke();
创建类的对象的方式
方式一:new + 构造器
方式二:要创建xxx类的对象,可以考虑:xxx,xxxs,xxxFectory,xxxBuilder类中查看是否有静态方法的存在。可以调用其静态方法,创建xxx对象
方式三:通过反射实现
代理
静态代理:
package com.atigo.java.Reflection.daili;

/**
 * 静态代理举例
 * 特点:代理类和被代理类,在编译期间就确定了
 * @author hjm
 */
interface ClothFactory{
    void produceCloth();
}

//代理类
class ProxyClothFectory implements ClothFactory{

    private ClothFactory clothFactory; //用被代理类对象进行初始化

    public ProxyClothFectory(ClothFactory clothFactory){
        this.clothFactory = clothFactory;

    }

    @Override
    public void produceCloth() {
        System.out.println("代理工程做一些准备工作");
        clothFactory.produceCloth();
        System.out.println("代理工厂做一些后续收尾工作");
    }
}

class NikeClothFactory implements ClothFactory{

    @Override
    public void produceCloth() {
        System.out.println("生产一批运动服");
    }
}

public class StaticProxyTest {
    public static void main(String[] args) {
        //创建被代理类对象
        NikeClothFactory nike = new NikeClothFactory();
        //创建代理类对象
        ProxyClothFectory proxyClothFectory = new ProxyClothFectory(nike);
        proxyClothFectory.produceCloth();

    }
}
动态代理
package com.atigo.java.Reflection.daili;

import java.lang.reflect.InvocationHandler;
import java.lang.reflect.Method;
import java.lang.reflect.Proxy;

/**
 * 动态代理
 * @author hjm
 */

interface Human{
    String getBelif();

    void eat(String food);
}

//被代理类
class SuperMan implements Human{

    @Override
    public String getBelif() {
        return "I believe I can fly!";
    }

    @Override
    public void eat(String food) {
        System.out.println("我爱吃"+food);
    }
}

/*
* 要实现动态代理,需要解决的问题
* 问题一:如何根据加载到内存中的被代理类,动态的创建一个代理类极其对象
* 问题二:当通过代理类的对象调用方法时,如何动态的去调用被代理类中的同名方法
* */
class ProxyFactory{


    //调用此方法返回一个被代理类的对象,解决问题一
    public static Object getProxyInstance(Object obj){//obj:被代理类的对象
        MyInvocationHandler handler = new MyInvocationHandler();
        handler.bind(obj);
        return Proxy.newProxyInstance(obj.getClass().getClassLoader(),obj.getClass().getInterfaces(),handler);
    }
}

class MyInvocationHandler implements InvocationHandler{

    private Object obj;//需要使用被代理类对象进行赋值

    public void bind(Object obj){
        this.obj = obj;
    }

    //当我们通过代理类的对象调用方法 a 时,就会自动的调用如下的方法:invoke()
    //将被代理类要执行的方法 a 的功能声明在invoke()中
    @Override
    public Object invoke(Object proxy, Method method, Object[] args) throws Throwable {
        //method:即为代理类对象调用的方法,此方法也就作为了被代理类要调用的方法
        //obj:被代理类的对象
        Object invoke = method.invoke(obj, args);
        //上述方法的返回值就作为当前类中的invoke()的返回值。
        return invoke;
    }
}

public class ProxyTest {
    public static void main(String[] args) {
        SuperMan superMan = new SuperMan();
        //proxyInstance  代理类的对象
        Human proxyInstance = (Human) ProxyFactory.getProxyInstance(superMan);
        //当通过代理类对象调用方法时,会自动的调用被代理类中同名的方法
        String belif = proxyInstance.getBelif();
        System.out.println(belif);
        proxyInstance.eat("四川麻辣烫");

        NikeClothFactory nikeClothFactory = new NikeClothFactory();
        ClothFactory proxyInstance1 = (ClothFactory) ProxyFactory.getProxyInstance(nikeClothFactory);
        proxyInstance1.produceCloth();


    }
}
Java8新特性
Lambda表达式
Lambda 是一个匿名函数,我们可以把 Lambda 表达式理解为是一段可以 传递的代码(将代码像数据一样进行传递)。使用它可以写出更简洁、更 灵活的代码。作为一种更紧凑的代码风格,使Java的语言表达能力得到了 提升。
Lambda表达式的使用,六种使用方法
package com.atigo.java.Java8new;

import org.junit.Test;

import java.util.Comparator;
import java.util.function.Consumer;

/**
 *
 * Lambda表达式的使用
 * 1.举例:
 * (o1,o2) -> Integer.compare(o1,o2);
 * 2.格式:
 *      -> : lambda 操作符 或 箭头操作符
 *      ->左边:lambda形参列表(其实就是接口中的抽象方法的形参列表)
 *      ->右边: lambda体(其实就是重写的抽象方法的方法体)
 *
 * 3.lambda表达式的使用(分为6种情况)
 *
 * 4.lambda表达式的本质:作为函数式接口的实例
 *
 * 总结:
 *      ->左边:lambda形参列表的参数类型可以省略(类型推断),如果lambda形参列表只有一个参数,其一对()也可以省略
 *      ->右边:lambda体应该使用一对{}包裹,如果lambda体只有一条执行语句(可能是return语句),可以省略一对{}和return关键字
 *
 * 5.如果一个接口中,只声明了一个抽象方法,则此接口就称为函数式接口,可以在一个接口上使用 @FunctionalInterface 注解,
 *   这样做可以检查它是否是一个函数式接口
 *
 * 6.以前用匿名实现类表示的现在都可以用Lambda表达式来写。
 * @author hjm
 */
public class LambdaTest1 {
    //语法格式一:无参,无返回值
    @Test
    public void test1() {
        Runnable r1 = new Runnable() {
            @Override
            public void run() {
                System.out.println("大河向东流啊");
            }
        };
        r1.run();

        System.out.println("====================");

        Runnable r2 = () -> System.out.println("大河向东流啊!!!!!!!!!!!!!");

        r2.run();
    }

    //语法格式二:Lambda 需要一个参数,但是没有返回值。
    @Test
    public void test2(){
        Consumer<String> con = new Consumer<String>() {
            @Override
            public void accept(String s) {
                System.out.println(s);
            }
        };
        con.accept("这是一段话");
        System.out.println("*******************************");
        Consumer<String> con1 = (String s) -> {
            System.out.println(s);
        };
        con1.accept("这还是一段话");


    }

    //语法格式三:数据类型可以省略,因为可由编译器推断得出,称为“类型推断”
    @Test
    public void test3(){
        Consumer<String> con1 = (String s) -> {
            System.out.println(s);
        };
        con1.accept("这还是一段话");
        System.out.println("*******************************");
        Consumer<String> con2 = (s) -> {
            System.out.println(s);
        };
        con1.accept("这还是一段话");
        int[] arr = {1,2,3,4};//也是类型推断
    }

    //语法格式四:Lambda 若只需要一个参数时,参数的小括号可以省略
    @Test
    public void test4(){

        Consumer<String> con1 = (s) -> {
            System.out.println(s);
        };
        con1.accept("这还是一段话");
        System.out.println("*******************************");
        Consumer<String> con2 =  s -> {
            System.out.println(s);
        };
        con2.accept("这还是一段话");
    }

    //语法格式五:Lambda 需要两个或以上的参数,多条执行语句,并且可以有返回值
    @Test
    public void test5(){
        Comparator<Integer> comparator = new Comparator<Integer>() {
            @Override
            public int compare(Integer o1, Integer o2) {
                return Integer.compare(o1,o2);
            }
        };
        System.out.println(comparator.compare(12,34));
        System.out.println("**************************");
        Comparator<Integer> comparator1 = ( o1,  o2) -> {
            System.out.println(o1);
            System.out.println(o2);
            return Integer.compare(o1,o2);
        };
        System.out.println(comparator1.compare(12,34));

    }

    //语法格式六:当 Lambda 体只有一条语句时,return 与大括号若有,都可以省略
    @Test
    public void test6(){

        Comparator<Integer> comparator1 = ( o1,  o2) -> {

            return Integer.compare(o1,o2);
        };
        System.out.println(comparator1.compare(12,34));
        System.out.println("**************************");
        Comparator<Integer> comparator2 = ( o1,  o2) -> Integer.compare(o1,o2);
        System.out.println(comparator2.compare(12,34));
    }
}
java内置的4大核心函数式接口
package com.atigo.java.Java8new;

import org.junit.Test;

import java.util.ArrayList;
import java.util.Arrays;
import java.util.List;
import java.util.function.Consumer;
import java.util.function.Predicate;

/**
 * java内置的4大核心函数式接口
 * 消费型接口 Consumer<T> void accept(T t)
 * 供给型接口 Supplier<T> T get()
 * 函数型接口 Function<T,R> R apply(T t)
 * 断定型接口 Predicate<T> boolean test(T t)
 * @author hjm
 */
public class LambdaTest2 {
    @Test
    public void test1(){
        happyTime(500, new Consumer<Double>() {
            @Override
            public void accept(Double aDouble) {
                System.out.println("学习太累了,去happy"+aDouble);
            }
        });
        System.out.println("************************");
        happyTime(500, money -> System.out.println("学习太累了,去happy"+money));

    }

    public void happyTime(double money, Consumer<Double> con){
        con.accept(money);
    }

    @Test
    public void test2(){
        List<String> list = Arrays.asList("北京","南京","东京","拉近","普京");
        List<String> arr = filterString(list, new Predicate<String>() {
            @Override
            public boolean test(String s) {
                return s.contains("京");
            }
        });
        System.out.println(arr);

        List<String> arr1 = filterString(list,  s -> s.contains("京"));
        System.out.println(arr1);


    }

    //根据给定的规则,过滤字符串,规则由Predicate的方法决定
    public List<String> filterString(List<String> list, Predicate<String> pre){
        ArrayList<String> filterList = new ArrayList<>();
        for(String str : list){
            if(pre.test(str)){
                filterList.add(str);
            }
        }
        return filterList;

    }
}
方法引用
当要传递给Lambda体的操作,已经有实现的方法了,可以使用方法引用!
方法引用可以看做是Lambda表达式深层次的表达。换句话说,方法引用就 是Lambda表达式,也就是函数式接口的一个实例,通过方法的名字来指向 一个方法,可以认为是Lambda表达式的一个语法糖。
要求:实现接口的抽象方法的参数列表和返回值类型,必须与方法引用的 方法的参数列表和返回值类型保持一致!
格式:使用操作符 “::” 将类(或对象) 与 方法名分隔开来。
如下三种主要使用情况:
- 对象::实例方法名
- 类::静态方法名
- 类::实例方法名
测试下面方法的工具类
package com.atigo.java.Java8new.lambda2;

/**
 * @author shkstart 邮箱:shkstart@126.com
 */
public class Employee {

	private int id;
	private String name;
	private int age;
	private double salary;

	public int getId() {
		return id;
	}

	public void setId(int id) {
		this.id = id;
	}

	public String getName() {
		return name;
	}

	public void setName(String name) {
		this.name = name;
	}

	public int getAge() {
		return age;
	}

	public void setAge(int age) {
		this.age = age;
	}

	public double getSalary() {
		return salary;
	}

	public void setSalary(double salary) {
		this.salary = salary;
	}

	public Employee() {
		System.out.println("调用空参构造器");
	}

	public Employee(int id) {

		this.id = id;
	}

	public Employee(int id, String name) {
		this.id = id;
		this.name = name;
	}

	public Employee(int id, String name, int age, double salary) {

		this.id = id;
		this.name = name;
		this.age = age;
		this.salary = salary;
	}

	@Override
	public String toString() {
		return "Employee{" + "id=" + id + ", name='" + name + '\'' + ", age=" + age + ", salary=" + salary + '}';
	}

	@Override
	public boolean equals(Object o) {
		if (this == o)
			return true;
		if (o == null || getClass() != o.getClass())
			return false;

		Employee employee = (Employee) o;

		if (id != employee.id)
			return false;
		if (age != employee.age)
			return false;
		if (Double.compare(employee.salary, salary) != 0)
			return false;
		return name != null ? name.equals(employee.name) : employee.name == null;
	}

	@Override
	public int hashCode() {
		int result;
		long temp;
		result = id;
		result = 31 * result + (name != null ? name.hashCode() : 0);
		result = 31 * result + age;
		temp = Double.doubleToLongBits(salary);
		result = 31 * result + (int) (temp ^ (temp >>> 32));
		return result;
	}
}
方法引用的使用
package com.atigo.java.Java8new.lambda2;

import org.junit.Test;

import java.io.PrintStream;
import java.util.Comparator;
import java.util.function.BiPredicate;
import java.util.function.Consumer;
import java.util.function.Function;
import java.util.function.Supplier;

/**
 * 方法引用的使用
 *
 * 1.使用的情景:当要传递给Lambda体的操作,已经有实现的方法了,可以使用方法引用!
 * 2.方法引用,本质上就是Lambda表达式,而我们的Lambda表达式作为函数式接口的实例。所以
 *           方法引用也是函数式接口的实例
 * 3.使用格式:  类(或对象) :: 方法名
 *
 * 4.具体分为如下三种情况
 * 		情况1. 对象::实例方法名
 * 		情况2. 类::静态方法名
 * 		情况3. 类::实例方法名
 *
 * 5.方法引用使用的要求:要求接口中的抽象方法的形参列表和返回值类型
 * 		与方法引用的方法的形参列表和返回值相同。(针对情况1和情况2)
 *
 * Created by shkstart.
 */
public class MethodRefTest {

	// 情况一:对象 :: 实例方法
	//Consumer中的void accept(T t)
	//PrintStream中的void println(T t)
	@Test
	public void test1() {
		Consumer<String> con1 = str -> System.out.println(str);
		con1.accept("北京");

		System.out.println("*********************************");

		PrintStream ps = System.out;
		Consumer<String> con2 = ps::println;
		con2.accept("北京");

	}

	//Supplier中的T get()
	//Employee中的String getName()
	@Test
	public void test2() {
		Employee emp = new Employee(1001,"Tom",23,5600);
		Supplier<String> sup1 = () -> emp.getName();
		System.out.println(sup1.get());
		System.out.println("*********************************");

		Supplier<String> sup2 = emp::getName;
		System.out.println(sup1.get());


	}

	// 情况二:类 :: 静态方法
	//Comparator中的int compare(T t1,T t2)
	//Integer中的int compare(T t1,T t2)
	@Test
	public void test3() {
		Comparator<Integer> com1 = (t1,t2) -> Integer.compare(t1,t2);
		System.out.println(com1.compare(12,21));

		Comparator<Integer> com2 = Integer::compare;
		System.out.println(com2.compare(12,32));
	}

	//Function中的R apply(T t)
	//Math中的Long round(Double d)
	@Test
	public void test4() {
		Function<Double,Long> func1 = d -> Math.round(d);

		Function<Double,Long> func2 = Math::round;
		System.out.println(func2.apply(1234.4));


	}

	// 情况三:类 :: 实例方法
	// Comparator中的int comapre(T t1,T t2)
	// String中的int t1.compareTo(t2)
	@Test
	public void test5() {
		Comparator<String> com1 = (s1,s2) -> s1.compareTo(s2);
		System.out.println(com1.compare("abc","dfg"));

		Comparator<String> com2 = String::compareTo;
		System.out.println(com2.compare("art","wer"));
	}

	//BiPredicate中的boolean test(T t1, T t2);
	//String中的boolean t1.equals(t2)
	@Test
	public void test6() {
		BiPredicate<String,String> pre1 = (s1,s2) -> s1.equals(s2);
		System.out.println(pre1.test("asda","asas"));

		BiPredicate<String,String> pre2 = String::equals;
		System.out.println(pre2.test("asda","asas"));

	}

	// Function中的R apply(T t)
	// Employee中的String getName();
	@Test
	public void test7() {
		Function<Employee,String> func1 = e -> e.getName();
		System.out.println(func1.apply(new Employee(123123,"tom",23,34343)));

		Function<Employee,String> func2 = Employee::getName;
		System.out.println(func2.apply(new Employee(123123,"tom",23,34343)));


	}

}
构造器引用和数组引用
package com.atigo.java.Java8new.lambda2;

import org.junit.Test;

import java.util.Arrays;
import java.util.function.BiFunction;
import java.util.function.Function;
import java.util.function.Supplier;

/**
 * 一、构造器引用
 *      和方法引用类似,函数式接口的抽象方法的形参列表和构造器的形参列表一致。
 *      抽象方法的返回值类型即为构造器所属的类的类型
 *
 * 二、数组引用
 *      可以把数组看作是一个特殊的类,则写法与构造器引用一致。
 *
 * Created by shkstart
 */
public class ConstructorRefTest {
	//构造器引用
    //Supplier中的T get()
    @Test
    public void test1(){
        Supplier<Employee> cup1 = () -> new Employee();
        cup1.get();

        Supplier<Employee> sup2 = Employee::new;//调用空参构造器
        sup2.get();
	}

	//Function中的R apply(T t)
    @Test
    public void test2(){
        Function<Integer,Employee> func1 = id -> new Employee(id);
        Employee apply = func1.apply(12221);
        System.out.println(apply);

        Function<Integer,Employee> func2 = Employee::new;
        Employee apply1 = func2.apply(10005);

        System.out.println(apply1);


    }

	//BiFunction中的R apply(T t,U u)
    @Test
    public void test3(){
        BiFunction<Integer,String,Employee> func1 = (id,name) -> new Employee(id,name);
        System.out.println(func1.apply(12222,"tom"));

        BiFunction<Integer,String,Employee> func2 = Employee::new;
        System.out.println(func2.apply(111111,"jim"));
	}

	//数组引用
    //Function中的R apply(T t)
    @Test
    public void test4(){
        Function<Integer,String[]> fun1 = (length) -> new String[length];
        String[] apply = fun1.apply(5);
        System.out.println(Arrays.toString(apply));

        Function<Integer,String[]> fun2 = String[]::new;
        String[] apply1 = fun2.apply(10);
        System.out.println(Arrays.toString(apply1));

    }
}
强大的Stream API
什么是 Stream ?
是数据渠道,用于操作数据源(集合、数组等)所生成的元素序列。
“集合讲的是数据,Stream讲的是计算!”
注意:
①Stream 自己不会存储元素。
②Stream 不会改变源对象。相反,他们会返回一个持有结果的新Stream。
③Stream 操作是延迟执行的。这意味着他们会等到需要结果的时候才执行。
Stream 的操作三个步骤
1- 创建 Stream 一个数据源(如:集合、数组),获取一个流
2- 中间操作 一个中间操作链,对数据源的数据进行处理
3- 终止操作(终端操作) 一旦执行终止操作,就执行中间操作链,并产生结果。之后,不会再被使用
Stream的创建
package com.atigo.java.Java8new.streamAPI;
import com.atigo.java.Java8new.lambda2.Employee;
import com.atigo.java.Java8new.lambda2.EmployeeData;
import org.junit.Test;
import java.util.Arrays;
import java.util.List;
import java.util.stream.IntStream;
import java.util.stream.Stream;
/**
* 1. Stream关注的是对数据的运算,与CPU打交道
* 集合关注的是数据的存储,与内存打交道
*
* 2.
* ①Stream 自己不会存储元素。
* ②Stream 不会改变源对象。相反,他们会返回一个持有结果的新Stream。
* ③Stream 操作是延迟执行的。这意味着他们会等到需要结果的时候才执行。
*
* 3.Stream的执行流程
* 1.Stream的实例化
* 2.一系列中将操作(过滤,映射,。。。)
* 3.终止操作
*
* 4.说明
* 1.一个中间操作链,对数据源的数据进行处理
* 2.一旦执行终止操作,就会执行中间操作链,并且产生结果,之后不会在被使用
*
* 测试Stream的实例化
*
* @author hjm
*/
public class StreamAPITest {
//创建Stream方式一:通过集合
@Test
public void test1(){
List<Employee> employees = EmployeeData.getEmployees();
//default Stream<E> stream() : 返回一个顺序流,按顺序取数据
Stream<Employee> stream = employees.stream();
//default Stream<E> parallelStream() : 返回一个并行流,并行的取数据
Stream<Employee> parallelStream = employees.parallelStream();
}
//创建 Stream 方式二:通过数组
@Test
public void test2(){
int[] we = {1,2,3,4,5,6,7};
//调用Arrays类的static <T> Stream<T> stream(T[] array): 返回一个流
IntStream stream1 = Arrays.stream(we);
Employee e1 = new Employee(1001,"tom");
Employee e2 = new Employee(1002,"tom1");
Employee[] arr = new Employee[]{e1,e2};
Stream<Employee> stream = Arrays.stream(arr);
}
//创建 Stream方式三:通过Stream的of()
@Test
public void test3(){
Stream<Integer> integerStream = Stream.of(1, 2, 3, 4, 5, 6);
}
//创建 Stream方式四:创建无限流
@Test
public void test4(){
// 迭代
//public static<T> Stream<T> iterate(final T seed, final UnaryOperator<T> f)
//遍历前10个偶数
Stream.iterate(0,t -> t + 2).limit(10).forEach(System.out::println);
// 生成
//public static<T> Stream<T> generate(Supplier<T> s)
Stream.generate(Math::random).limit(10).forEach(System.out::println);
}
}
测试Stream的中间操作
package com.atigo.java.Java8new.streamAPI;

import com.atigo.java.Java8new.lambda2.Employee;
import com.atigo.java.Java8new.lambda2.EmployeeData;
import org.junit.Test;

import java.util.ArrayList;
import java.util.Arrays;
import java.util.List;
import java.util.stream.Stream;

/**
 * 测试Stream的中间操作
 *
 * @author hjm
 */
public class StreamTest1 {
    //1.筛选与切片
    @Test
    public void test1(){
        List<Employee> employees = EmployeeData.getEmployees();
        //filter(Predicate p) 接收 Lambda , 从流中排除某些元素
        Stream<Employee> stream = employees.stream();
        //练习查询员工薪资表中薪资大于7K的员工信息
        stream.filter(e -> e.getSalary() > 7000).forEach(System.out::println);
        System.out.println();
        //distinct() 筛选,通过流所生成元素的 hashCode() 和 equals() 去除重复元素
        employees.add(new Employee(1010,"刘强东",40,8000));
        employees.add(new Employee(1010,"刘强东",40,8000));
        employees.add(new Employee(1010,"刘强东",40,8000));
        employees.add(new Employee(1010,"刘强东",40,8000));
        employees.stream().distinct().forEach(System.out::println);

        System.out.println();
        //limit(long maxSize) 截断流,使其元素不超过给定数量
        Stream<Employee> stream1 = employees.stream();
        stream1.limit(3).forEach(System.out::println);

        System.out.println();
        //skip(long n)跳过元素,返回一个扔掉了前 n 个元素的流。若流中元素不足 n 个,则返回一个空流。与 limit(n) 互补
        employees.stream().skip(3).forEach(System.out::println);
    }

    //2.映射
    @Test
    public void test2(){
        //map(Function f)接收一个函数作为参数,该函数会被应用到每个元素上,并将其映射成一个新的元素。
        List<String> strings = Arrays.asList("aa", "bb", "cc", "dd");

        strings.stream().map(str -> str.toUpperCase()).forEach(System.out::println);
        List<Employee> employees = EmployeeData.getEmployees();
        //练习1,获取员工名字大于3的名字
        employees.stream().map(e -> e.getName()).filter(str -> str.length() > 3).forEach(System.out::println);

        //练习2
        Stream<Stream<Character>> streamStream = strings.stream().map(this::fromStringToStream);
        streamStream.forEach(s -> s.forEach(System.out::println));


        //flatMap(Function f)接收一个函数作为参数,将流中的每个值都换成另一个流,然后把所有流连接成一个流
        strings.stream().flatMap(this::fromStringToStream).forEach(System.out::print);


    }

    //将字符串中的多个字符构成的集合转换为对应的 Stream 实例
    public Stream<Character> fromStringToStream(String str){
        ArrayList<Character> list = new ArrayList<>();
        for(Character c : str.toCharArray()){
            list.add(c);
        }
        return list.stream();
    }

    @Test
    public void test3(){
        ArrayList list = new ArrayList();

        list.add(1);
        list.add(2);
        list.add(3);

        ArrayList list2 = new ArrayList();

        list2.add(4);
        list2.add(5);
        list2.add(6);

        //list.add(list2);   map相当于add,流作为一个元素
        //list.addAll(list2);  flatMap相当于addAll  ,将流打乱,重新组合一个流

    }

    //3-排序
    @Test
    public void test4(){
        //sorted() 产生一个新流,其中按自然顺序排序
        List<Integer> list = Arrays.asList(12, 34, 56, 78, 98, 34);
        list.stream().sorted().forEach(System.out::println);
        /*Employee没有实现Comparable接口,会抛异常
        List<Employee> employees = EmployeeData.getEmployees();
        employees.stream().sorted().forEach(System.out::println);
        */


        //sorted(Comparator com) 产生一个新流,其中按比较器顺序排序
        List<Employee> employees = EmployeeData.getEmployees();
        employees.stream().sorted((e1,e2) -> {
            return Integer.compare(e1.getAge(), e2.getAge()) != 0 ?
                    Integer.compare(e1.getAge(), e2.getAge()) :
                    Double.compare(e1.getSalary(),e2.getSalary());
        }).forEach(System.out::println);

    }

}
测试Stream的终止操作
package com.atigo.java.Java8new.streamAPI;
import com.atigo.java.Java8new.lambda2.Employee;
import com.atigo.java.Java8new.lambda2.EmployeeData;
import org.junit.Test;
import java.util.Arrays;
import java.util.List;
import java.util.Optional;
import java.util.Set;
import java.util.function.BinaryOperator;
import java.util.stream.Collectors;
import java.util.stream.Stream;
/**
* 测试Stream的终止操作
* @author hjm
*/
public class StreamTest2 {
//1-匹配与查找
@Test
public void test1() {
// 终端操作会从流的流水线生成结果。其结果可以是任何不是流的值,例
//如:List、Integer,甚至是 void 。
// 流进行了终止操作后,不能再次使用。
List<Employee> list = EmployeeData.getEmployees();
//方法 描述
//allMatch(Predicate p) 检查是否匹配所有元素
//练习,是否所有的员工年龄都大于18岁
boolean b = list.stream().allMatch(e -> e.getAge() > 18);
System.out.println(b);
//anyMatch(Predicate p) 检查是否至少匹配一个元素
boolean b1 = list.stream().anyMatch(e -> e.getSalary() > 10000);
System.out.println(b1);
//noneMatch(Predicate p) 检查是否没有匹配所有元素
boolean b2 = list.stream().noneMatch(e -> e.getName().contains("雷"));
System.out.println(b2);
//findFirst() 返回第一个元素
Optional<Employee> first = list.stream().findFirst();
System.out.println(first);
//findAny() 返回当前流中的任意元素
Optional<Employee> any = list.stream().findAny();
System.out.println(any);
//count() 返回流中元素总数
long count = list.stream().filter(e -> e.getSalary() > 5000).count();
System.out.println(count);
//max(Comparator c) 返回流中最大值
Stream<Double> doubleStream = list.stream().map(e -> e.getSalary());
//Optional<Double> max = doubleStream.max((d1,d2) -> d1 > d2 ? 1 : -1);
Optional<Double> max = doubleStream.max(Double::compare);
System.out.println(max);
//min(Comparator c) 返回流中最小值
Optional<Employee> min = list.stream().min((e1, e2) -> Double.compare(e1.getSalary(), e2.getSalary()));
System.out.println(min);
//forEach(Consumer c)内部迭代(使用 Collection 接口需要用户去做迭代,称为外部迭代。相反,Stream API 使用内部迭代——它帮你把迭代做了)
list.stream().forEach(System.out::println);
//使用集合的遍历操作
list.forEach(System.out::println);
}
@Test
public void test2(){
//2-归约
//备注:map 和 reduce 的连接通常称为 map-reduce 模式,因 Google用它来进行网络搜索而出名。
//方法 描述
//reduce(T iden, BinaryOperator b) 可以将流中元素反复结合起来,得到一个值。返回 T
List<Integer> list = Arrays.asList(1,2,3,4,5,6,7,8,9,0);
Integer reduce = list.stream().reduce(0, new BinaryOperator<Integer>() {
@Override
public Integer apply(Integer integer, Integer integer2) {
return integer+integer2;
}
});
System.out.println(reduce);
list.stream().reduce(0,Integer::sum);
list.stream().reduce(0,(i1,i2) -> i1+i2);
//reduce(BinaryOperator b) 可以将流中元素反复结合起来,得到一个值。返回 Optional<T>
List<Employee> employees = EmployeeData.getEmployees();
Optional<Double> reduce1 = employees.stream().map(Employee::getSalary).reduce(new BinaryOperator<Double>() {
@Override
public Double apply(Double aDouble, Double aDouble2) {
return aDouble + aDouble2;
}
});
Optional<Double> reduce2 = employees.stream().map(Employee::getSalary).reduce(Double::sum);
Optional<Double> reduce3 = employees.stream().map(Employee::getSalary).reduce((d1,d2) -> d1+d2);
System.out.println(""+reduce1+" "+reduce2);
}
@Test
public void test3(){
//collect(Collector c)将流转换为其他形式。接收一个 Collector接口的实现,用于给Stream中元素做汇总的方法
List<Employee> employees = EmployeeData.getEmployees();
List<Employee> collect = employees.stream().filter(e -> e.getSalary() > 6000).collect(Collectors.toList());
collect.forEach(System.out::println);
System.out.println();
Set<Employee> collect1 = employees.stream().filter(e -> e.getSalary() > 6000).collect(Collectors.toSet());
collect1.forEach(System.out::println);
}
}
Optional类
Optional类:为了在程序中避免出现空指针异常而创建
package com.atigo.java.Java8new.streamAPI;
import org.junit.Test;
import java.util.Optional;
/**
*
* Optional类:为了在程序中避免出现空指针异常而创建
* 常用方法: Optional.ofNullable(T t):
* T orElse(T other)
* T get(): 如果调用对象包含值,返回该值,否则抛异常
*
* 创建Optional类对象的方法:
* Optional.of(T t) : 创建一个 Optional 实例,t必须非空;
* Optional.empty() : 创建一个空的 Optional 实例
* Optional.ofNullable(T t):t可以为null
* 判断Optional容器中是否包含对象:
* boolean isPresent() : 判断是否包含对象
* void ifPresent(Consumer<? super T> consumer) :如果有值,就执行Consumer
* 接口的实现代码,并且该值会作为参数传给它。
* 获取Optional容器的对象:
* T get(): 如果调用对象包含值,返回该值,否则抛异常
* T orElse(T other) :如果有值则将其返回,否则返回指定的other对象。
* T orElseGet(Supplier<? extends T> other) :如果有值则将其返回,否则返回由
* Supplier接口实现提供的对象。
* T orElseThrow(Supplier<? extends X> exceptionSupplier) :如果有值则将其返
* 回,否则抛出由Supplier接口实现提供的异常。
*
* @author hjm
*/
public class OptionTest {
//创建Optional类对象的方法:
// Optional.of(T t) : 创建一个 Optional 实例,t必须非空;
// Optional.empty() : 创建一个空的 Optional 实例
// Optional.ofNullable(T t):t可以为null
@Test
public void test1(){
Girl girl = new Girl();
//of(T t) 必须要保证 t 非空的
Optional<Girl> girl1 = Optional.of(girl);
System.out.println(girl1);
}
@Test
public void test2(){
Girl girl = new Girl();
girl = null;
Optional<Girl> girl1 = Optional.ofNullable(girl);
System.out.println(girl1);
//orElse(T t) 如果当前的 Optional 内部封装的t是非空的,则返回内部的t。
//如果内部的t是非空的,则返回orElse()方法中的参数t1
Girl girl2 = girl1.orElse(new Girl("lalal"));
System.out.println(girl2);
}
public String getGirlName(Boy boy){
return boy.getGirl().getName();
}
@Test
public void test3(){
Boy boy = new Boy();
String girlName = getGirlName1(boy);
System.out.println(girlName);
}
//优化以后的 getGirlName()
public String getGirlName1(Boy boy){
if(boy != null){
Girl girl = boy.getGirl();
if(girl != null){
return girl.getName();
}
}
return null;
}
//使用Optional优化以后的 getGirlName()
public String getGirlName2(Boy boy){
Optional<Boy> boyOptional = Optional.ofNullable(boy);
Boy boy1 = boyOptional.orElse(new Boy(new Girl("opopop")));
Girl girl = boy1.getGirl();
Optional<Girl> girlOptional = Optional.ofNullable(girl);
Girl girl1 = girlOptional.orElse(new Girl("super"));
//boy1
return girl1.getName();
}
@Test
public void test4(){
Boy boy = null;
String girlName2 = getGirlName2(boy);
System.out.println(girlName2);
boy = new Boy();
girlName2 = getGirlName2(boy);
System.out.println(girlName2);
boy = new Boy(new Girl("一个女孩"));
girlName2 = getGirlName2(boy);
System.out.println(girlName2);
}
}
jdk9模块化特点
暴露类
/**
 * @author hjm
 */
module jdk9test {
    exports com.at.bean;
}
引入类
/**
 * @author hjm
 */
module java9test {
    requires jdk9test;
}
测试
package jdk.java9.test;

import com.at.bean.Person;

/**
 * @author hjm
 */
public class ModelTest {
    public static void main(String[] args) {
        Person p = new Person("tom",19);
        System.out.println(p);
    }
}
接口私有方法
package jdk.java9.test;

/**
 * @author hjm
 */
public interface MyInterface {
    //下面三个方法都为public权限,default在这里是关键字,不是权限
    void methodAbstract();
    static void methodStatic(){
        System.out.println("握手接口中的静态方法");
    }
    default void methodDefault(){
        System.out.println("我是接口中的默认方法");
    }

    //java jdk9中允许定义私有的方法
    private void methodPrivate(){
        System.out.println("我是接口中的私有方法");
    }
}
package jdk.java9.test;

/**
 * @author hjm
 */
public class MyInterfacempl implements MyInterface{

    @Override
    public void methodAbstract() {

    }

    @Override
    public void methodDefault() {
        System.out.println("实现了重写了方法");
    }

    public static void main(String[] args) {
        //接口中的静态方法只能由接口自己调用
        MyInterface.methodStatic();
        //接口的实现类 MyInterfacempl 不能调用接口的静态方法
        //接口对象可以调用接口的方法
        MyInterface mpl = new MyInterfacempl();
        mpl.methodDefault();
        //接口私有方法只能自己的方法去调用
    }
}
钻石操作符
public class java9testcaozuofu {
    @Test
    public void test1(){
        //钻石操作符和匿名内部类在jdk8中不能共存,在java9中可以
        Comparator<Object> com = new Comparator<>() {
            @Override
            public int compare(Object o1, Object o2) {
                return 0;
            }
        };
    }
}
try结构的优化
@Test
public static void main(String[] args) {

    //java9 特性6:try操作符的优化
    //java8 之前的资源关闭操作
    /*InputStreamReader inputStreamReader = null;
        try {
            inputStreamReader = new
            InputStreamReader(System.in);
            char[] cbuf = new char[20];
            int len;
            if((len = inputStreamReader.read(cbuf))!=-1){
                String str = new String(cbuf,0,len);

            }
        } catch (IOException e) {
            e.printStackTrace();
        } finally {
            if(inputStreamReader!=null){
                try {
                    inputStreamReader.close();
                } catch (IOException e) {
                    e.printStackTrace();
                }
            }
        }
*/
    /*//java8 中资源关闭的操作:实现资源自动关闭
        //要求需要自动关闭的资源申请在try的一对小括号里
        try(InputStreamReader reader = new
            InputStreamReader(System.in)){
            char[] cbuf = new char[20];
            int len;
            if((len = reader.read(cbuf))!=-1){
                String str = new String(cbuf,0,len);
                System.out.println(str);
            }
        } catch (IOException e) {
            e.printStackTrace();
        }*/

    //java9 中的资源关闭操作
    //需要自动关闭的资源的实例化可以放在try一对小括号外边。
    //此时的资源属性是一个常量,不可再try里修改
    InputStreamReader reader = new           				       InputStreamReader(System.in);
    try(reader){
        char[] cbuf = new char[20];
        int len;
        if((len = reader.read(cbuf))!=-1){
            String str = new String(cbuf,0,len);
            System.out.println(str);
        }
    } catch (IOException e) {
        e.printStackTrace();
    }

}
String底层储存结构变更
String 类的当前实现将字符存储在 char 数组中,每个字符使用两个字节(16 位)。 从许多不同应用程序收集的数据表明,字符串是堆使用的主要组成部分,此外,大多数 String 对象仅包含 Latin-1 字符。 此类字符仅需要一个字节的存储空间,因此此类 String 对象的内部 char 数组中的一半空间未使用。
将 String 类的内部表示从 UTF-16 字符数组更改为字节数组加上编码标志字段。 新的 String 类将根据字符串的内容存储编码为 ISO-8859-1/Latin-1(每个字符一个字节)或 UTF-16(每个字符两个字节)的字符。 编码标志将指示使用哪种编码。是一个动态调整
当然StringBuilder和StringBuffer也变了,在其父类里。
剩余新特性
package jdk.java9.test;

import org.junit.Test;

import java.io.FileOutputStream;
import java.io.IOException;
import java.io.InputStream;
import java.io.OutputStream;
import java.util.*;
import java.util.stream.Stream;

/**
 * @author hjm
 */
public class java9test {

    //java8的一种写法
    @Test
    public void test1(){
        List<String> namesList = new ArrayList<>();
        namesList.add("Joe");
        namesList.add("Bob");
        namesList.add("Bill");
        //反回的 namesList 是一个只读的集合
        namesList = Collections.unmodifiableList(namesList);
        System.out.println(namesList);
    }

    @Test
    public void test2(){
        List<String> list = Collections.unmodifiableList(Arrays.asList("a", "b", "c"));
        Set<String> set = Collections.unmodifiableSet(new HashSet<>(Arrays.asList("a", "b", "c")));
        // 如下操作不适用于jdk 8 及之前版本,适用于jdk 9,因为有钻石操作符
        Map<String, Integer> map = Collections.unmodifiableMap(new HashMap<>() {
            {
                put("a", 1);
                put("b", 2);
                put("c", 3);
            }
        });
        map.forEach((k, v) -> System.out.println(k + ":" + v));
    }

    @Test
    public void test3(){
        List<Integer> list = Arrays.asList(1,2,3,4,56,7);
        //不可添加数据,因为返回的也是一个只可读的集合列表,添加会报 UnsupportedOperationException 异常
        list.add(78);
        System.out.println(list);
    }

    //java9新特性八:集合工厂方法:创建只读集合
    @Test
    public void test4(){
        List<Integer> list = List.of(1,2,3,4,5,6);
        System.out.println(list);

        Map<Integer,Integer> map = Map.of(12,34,11,34,13,4446);
        System.out.println(map);

        Map<Integer, Integer> integerIntegerMap = Map.ofEntries(Map.entry(1, 2), Map.entry(2, 3));
        System.out.println(integerIntegerMap);

    }

    //java9新特性9 InputStream 加强transferTo方法
    @Test
    public void test5(){
        ClassLoader cl = this.getClass().getClassLoader();
        try (InputStream is = cl.getResourceAsStream("hello.txt");
             OutputStream os = new FileOutputStream("src\\hello1.txt")) {
             is.transferTo(os); // 把输入流中的所有数据直接自动地复制到输出流中
        } catch (IOException e) {
            e.printStackTrace();
        }

    }

    //java9新特性十:stream API的加强
    //在 Java 9 中,Stream API 变得更好,Stream 接口中添加了 4 个新的方法:
    //takeWhile, dropWhile, ofNullable,还有个 iterate 方法的新重载方法,
    // 可以让你提供一个 Predicate (判断条件)来指定什么时候结束迭代。
    @Test
    public void test6(){
        List<Integer> integers = Arrays.asList(1, 2, 3, 4, 5, 6, 7, 8, 9, 0);
        //takeWhile 返回从开头开始的尽量多的元素。
        integers.stream().takeWhile(x -> x < 6).forEach(System.out::println);
        //dropWhile 的行为与 takeWhile 相反,返回剩余的元素。
        integers.stream().dropWhile(x -> x < 6).forEach(System.out::println);


    }

    //Java 8 中 Stream 不能完全为null,否则会报空指针异常。而 Java 9 中的 ofNullable 方
    //法允许我们创建一个单元素 Stream,可以包含一个非空元素,也可以创建一个空Stream。
    @Test
    public void test7(){
        Stream<Integer> stream = Stream.of(1,2,3,4,5,6,7,8,9,null);
        stream.forEach(System.out::println);

        Stream<Object> objectStream = Stream.of(null,null);
        System.out.println(objectStream);


        //下面方式不被允许,不可存储单个null
        //Stream<Object> objectStream1 = Stream.of(null);
        //System.out.println(objectStream1);

        //ofNullable() : 形参变量是可以为null值的单个元素
        Integer i = 10;
        i = null;
        Stream<Integer> i1 = Stream.ofNullable(i);
        System.out.println(i1.count());


    }

    @Test
    public void test8(){
        Stream.iterate(0,x -> x+1).limit(10).forEach(System.out::println);

        //java9 中重载的方法
        Stream.iterate(0,x -> x < 200,x -> x+2).forEach(System.out::println);
    }

    //Optional也是一个容器,应该也有获取流的方法,所以Java9,补充了其获取流的方法
    //java9 新特性 为 Optional 提供新的方法 stream()
    @Test
    public void test9(){
        List<String> list = new ArrayList<>();
        list.add("Tom");
        list.add("Jerry");
        list.add("Tim");
        Optional<List<String>> optional = Optional.ofNullable(list);
        Stream<List<String>> stream = optional.stream();
        stream.flatMap(x -> x.stream()).forEach(System.out::println);

    }


}
java10新特性
类型推断
package com.atigo.java.java10test;
import org.junit.Test;
import java.util.ArrayList;
/**
* @author hjm
*/
public class java10test {
/*
* 局部变量的类型推断
* */
@Test
public void test1(){
//声明变量时,根据所附的值,推断变量的类型
var num = 10;
//<> 里边不写默认 object
var list = new ArrayList<Integer>();
//遍历操作
for(var i : list){
System.out.println(i);
}
for(var i = 0;i<100;i++){
System.out.println(i);
}
//注意:
//1.不赋值,不能实现类型推断
//2.lambda表达式中,左边的函数式接口不能声明为var
//3.方法引用中,左边函数式接口不能声明为var
//4.数组静态初始化中,注意如下情况不可以
//var arr = {1,2,3,4,5};
//还有以下情况不可以
// 情况1:没有初始化的局部变量声明
// 情况2:方法的返回类型
// 情况3:方法的参数类型
// 情况4:构造器的参数类型
// 情况5:属性
// 情况6:catch块
}
}
java10新特性二,集合中新增的 copyOf()
//java10新特性二;集合中新增的 copyOf() ,用于创建一个只读的集合
@Test
public void test2(){
    //示例1:
    var list1 = List.of("Java", "Python", "C");
    var copy1 = List.copyOf(list1);
    System.out.println(list1 == copy1); // true
    //示例2:
    var list2 = new ArrayList<String>();
    var copy2 = List.copyOf(list2);
    System.out.println(list2 == copy2); // false
    //示例1和2代码基本一致,为什么一个为true,一个为false?
    //结论:copyOf(xxx),如果xxx本身就是一个只读集合,则copyOf方法返回值即为xxx
    //      如果xxx不是一个只读集合,则copyOf()返回一个新的集合,这个集合只读

}
java11新特性
package com.atigo.java.java11test;

import org.junit.Test;

import java.io.IOException;
import java.net.URI;
import java.net.http.HttpClient;
import java.net.http.HttpRequest;
import java.net.http.HttpResponse;
import java.util.Optional;
import java.util.function.Consumer;

/**
 * @author hjm
 */
public class java11test {
    @Test
    public void test1() {
        //java11新特性一,String中新增的方法
        //判断字符串是否为空白 " ".isBlank();
        System.out.println("   \t \t \n    ".isBlank());

        //去除首尾空白 " Javastack ".strip();
        System.out.println("-------------"+"   \t \t \n ada   \n".strip()+"-----------");
        System.out.println("-------------"+"   \t \t \n ada   \n".trim()+"-----------");

        //去除尾部空格 " Javastack ".stripTrailing();
        System.out.println("-------------"+"   \t \t \n ada   \n".stripTrailing()+"-----------");

        //去除首部空格 " Javastack ".stripLeading();
        System.out.println("-------------"+"   \t \t \n ada   \n".stripLeading()+"-----------");

        //复制字符串 "Java".repeat(3);
        System.out.println("5".repeat(3));
        //行数统计 "A\nB\nC".lines().count();
        System.out.println("A\nB\nC".lines().count());

    }

    //java11新特性二
    @Test
    public void test2(){
        //boolean isEmpty() 判断value是否为空 JDK 11
        //ifPresentOrElse(Consumer<? super T> action, Runnable emptyAction)
        //      value非空,执行参数1功能;如果value为空,执行参数2功能 JDK 9
        //Optional<T> or(Supplier<? extends Optional<? extends T>> supplier)
        //      value非空,返回对应的Optional;
        //      value为空,返回形参封装的Optional
        //Stream<T> stream()
        //      value非空,返回仅包含此value的
        //      Stream;否则,返回一个空的Stream JDK 9
        //T orElseThrow() value非空,返回value;否则抛异常NoSuchElementException JDK 10
        Optional<Object> empty = Optional.empty();
        System.out.println(empty.isPresent());//判断内部的value是否存在
        System.out.println(empty.isEmpty());//判断内部的value是否为空
        empty = Optional.of("abc");
        var obj = empty.orElseThrow();
        System.out.println(obj);

        //or
        //Optional<T> or(Supplier<? extends Optional<? extends T>> supplier)
        //      value非空,返回对应的Optional;
        //      value为空,返回形参封装的Optional
        Optional<String> hello = Optional.of("hello");
        Optional<Object> empty2 = empty.or(() -> hello);

    }

    //java11新特性三:局部变量类型推断升级
    @Test
    public void test3(){
        //错误的形式: 必须要有类型, 可以加上var
        //Consumer<String> con1 = (@Deprecated t) -> System.out.println(t.toUpperCase());
        //正确的形式:
        //使用var的好处是在使用lambda表达式时给参数加上注解。
        Consumer<String> con2 = (@Deprecated var t) -> System.out.println(t.toUpperCase());

    }

    //java11特性四:HttpClient替换原有的HttpUrlConnection。
    @Test
    public void test4(){
        HttpClient client = HttpClient.newHttpClient();
        HttpRequest request = HttpRequest.newBuilder(URI.create("http://127.0.0.1:8080/test/")).build();
        HttpResponse.BodyHandler<String> responseBodyHandler = HttpResponse.BodyHandlers.ofString();
        HttpResponse<String> response = null;
        try {
            response = client.send(request, responseBodyHandler);
        } catch (IOException e) {
            e.printStackTrace();
        } catch (InterruptedException e) {
            e.printStackTrace();
        }
        String body = response.body();
        System.out.println(body);

    }
}
// 编译 javac Javastack.java
// 运行 java Javastack 在我们的认知里面,要运行一个 Java 源代码必须先编译,再运行,两步执行动作。
而在未来的 Java 11 版本中,通过一个 java 命令就直接搞定了,如以下所示: java Javastack.java 一个命令编译运行源代码的注意点:
执行源文件中的第一个类, 第一个类必须包含主方法。
并且不可以使用其它源文件中的自定义类, 本文件中的自定义类是可以使用的。
ZGC
GC是java主要优势之一。 然而, 当GC停顿太长, 就会开始影响应用的响应时 间。消除或者减少GC停顿时长, java将对更广泛的应用场景是一个更有吸引力 的平台。此外, 现代系统中可用内存不断增长,用户和程序员希望JVM能够以高 效的方式充分利用这些内存, 并且无需长时间的GC暂停时间。
ZGC, A Scalable Low-Latency Garbage Collector(Experimental) ZGC, 这应该是JDK11最为瞩目的特性, 没有之一。 但是后面带了Experimental, 说明这还不建议用到生产环境。
ZGC是一个并发, 基于region, 压缩型的垃圾收集器, 只有root扫描阶段会 STW(stop the world), 因此GC停顿时间不会随着堆的增长和存活对象的增长 而变长
优势:
GC暂停时间不会超过10ms
既能处理几百兆的小堆, 也能处理几个T的大堆(OMG)
和G1相比, 应用吞吐能力不会下降超过15%
为未来的GC功能和利用colord指针以及Load barriers优化奠定基础
初始只支持64位系统
ZGC的设计目标是:支持TB级内存容量,暂停时间低(<10ms),对整个 程序吞吐量的影响小于15%。 将来还可以扩展实现机制,以支持不少令人 兴奋的功能,例如多层堆(即热对象置于DRAM和冷对象置于NVMe闪存), 或压缩堆。
完结撒花!!!